Bring on the Clouds!
by Mark Schacter

“Great day for taking pictures!” is what people who know I’m a photographer will often say to me on a cloudless day. On the other hand, someone who sees me heading out with my gear on an overcast or even a rainy day may offer good wishes along the lines of “Hope the weather clears up for you!”.
In fact, I’m likely to be thinking just the opposite, because as far as I’m concerned there’s nothing like a clear blue sky to ruin what might otherwise be an interesting photograph.
I do a lot of landscape photography, often with an ultra-wide lens (my favorite is the Sigma 12-24mm EX DG zoom) on a full-frame digital camera (a Canon 1Ds Mark III). Under those circumstances, the sky ends up being a major compositional element in the images I produce. And so I want to make the most of out of the pixels that will occupy the upper portion of the final image. A blank strip of blue (or gray/black in a black-and-white photograph) is usually (though of course not always) the last thing that I want.
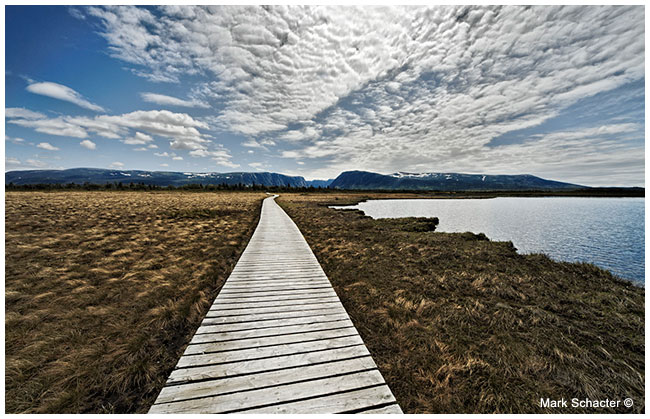
Clouds can make or break a photograph – the difference between an ordinary and an extraordinary image. And I’m talking about the full range of cloud possibilities: everything from a few friendly cumulus clouds in otherwise clear blue heavens to a completely overcast sky in all its shades-of-gray and delicately textured glory.
The key to unlocking the full visual value of clouds lies in post-production: the adjustments you make, using software, to the original image captured on your digital camera. The need for adjustment arises because the sensor in your camera isn’t nearly as good as your eye at capturing a wide range of tonal variation: the detail in the relatively dark foreground as opposed to the equally important detail in the brighter portion of the image occupied by the sky.

We’re all familiar with the problem. If you open up your exposure to capture shadow detail, the highlight detail gets washed out. The sky becomes an overexposed blob. Similarly, if you stop down to optimize exposure for highlight detail, the foreground ends up as an undifferentiated mass of blackness.
One way to cope is to use a split neutral density filter, which reduces the amount of light hitting the top portion – but not the bottom part – of a camera’s sensor. But I take a different approach, relying entirely on image editing software (I use DxO Optics Pro for RAW conversion and Photoshop CS3). bottom part – of a camera’s sensor. But I take a different approach, relying entirely on image editing software (I use DxO Optics Pro for RAW conversion and Photoshop CS3).
I opt for one of two techniques, depending on how large the gap is in tonal range between sky and foreground. When the gap is extremely large, it’s virtually impossible to extract both shadow and highlight detail from the same image. So – and this is an advantage of capturing images in RAW as opposed to jpeg format – I effectively create a second “original” image by processing the same RAW image twice, each time using different exposure settings in the RAW converter. I also make some other lighting adjustments in the RAW converter.
At the end of this stage of processing I have two exposures, one with the sky (more or less) properly exposed and one with the foreground (more or less) properly exposed. I combine the two images in Photoshop, and then make further adjustments.
In some images there may be three distinct tonal regions: foreground, mid-ground and sky. In such cases I may have to produce three “original” images that I ultimately combine in Photoshop.
In cases where the gap in tonal range between sky and foreground is less pronounced, I skip the step of processing the image twice (or more) with the RAW converter. In Photoshop, through the use of layer masks, I make separate adjustments to the foreground and the sky to maximize the tonal definition in each part of the image.

Some readers will observe that what I am describing mimics the automated “Merge to HDR” command in Photoshop. The fact is that I simply prefer the more “hands-on” (if that term makes sense in the context of digital photography) approach to producing high dynamic range images.
|