
Tips for Buying a Light Microscope
Compound, Inverted and Stereoscope and Why you might want to buy a Microscope
by Dr. Robert Berdan
April 13, 2019
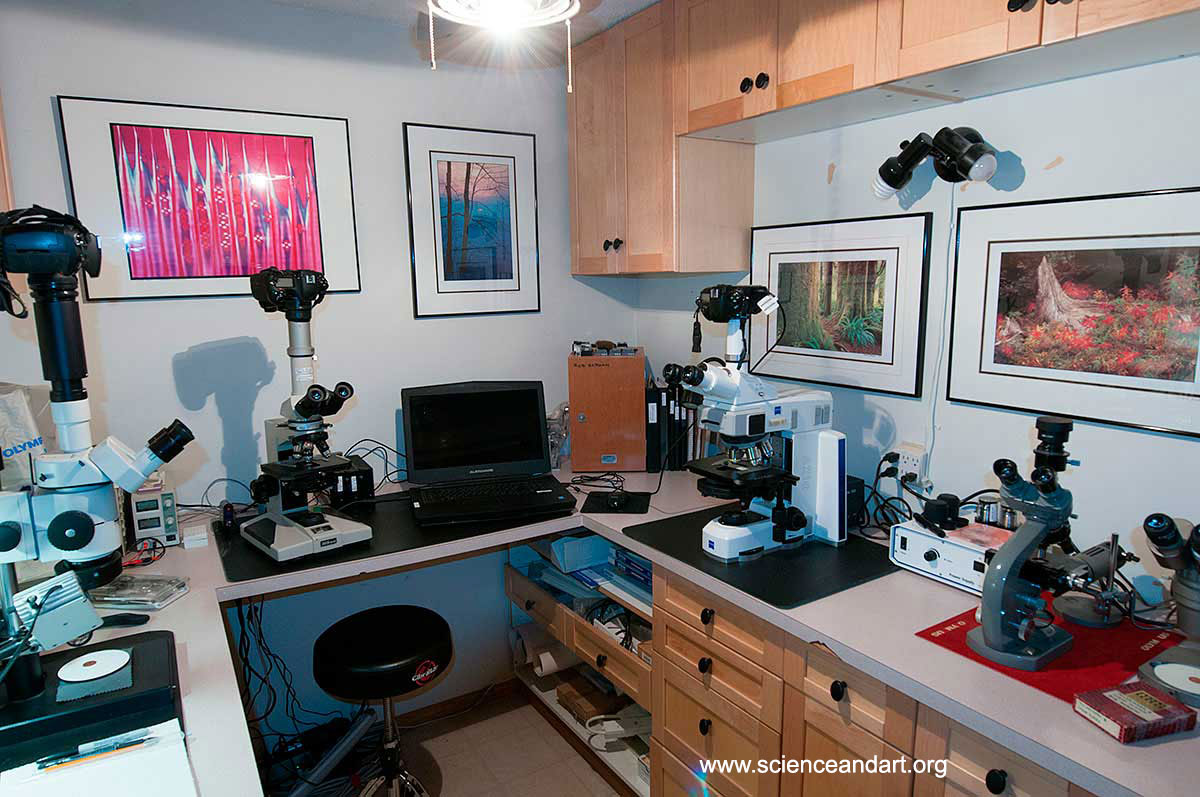
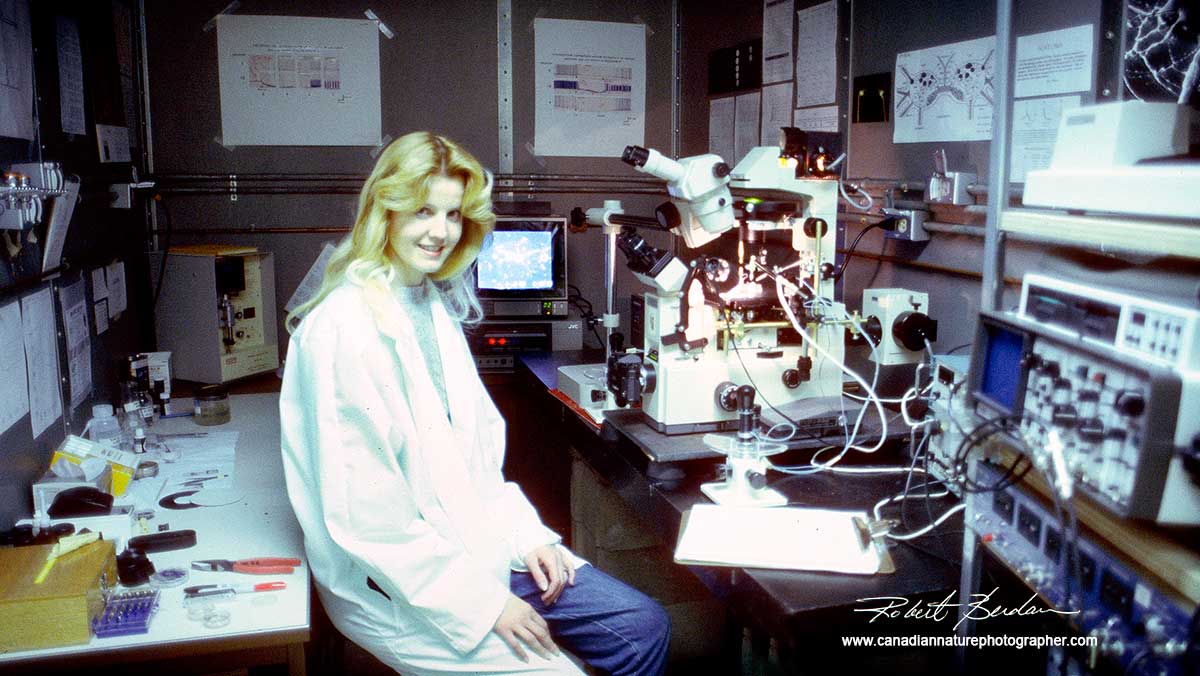
Home Microscopy Lab I built in my old darkroom including a variety of stereo and compound microscopes I used to take the pictures for this article.
Introduction
There is a microscopic universe all around us filled with alien creatures and crystals with colours like no where else on the planet. Many microscopic sized items even include the food we eat like potatoes - when a piece of fresh potato is squashed onto a microscope slide the starch grains look like jewels with a polarizing microscope. There are many things around us that when magnified are beautiful, some of them are incredibly strange and others will expand your imagination. To see the micro-world all you need is a microscope, time and curiosity. In this article I provide some tips on what to look for if you are considering buying a microscope and some things you might want to examine with a microscope. I hope this article will be useful to new microscopists, intermediate and even perhaps to some more experienced users.

Potato starch grains photographed with a polarizing microscope 200X

Citric Acid crystals photographed with a polarizing microscope 50X
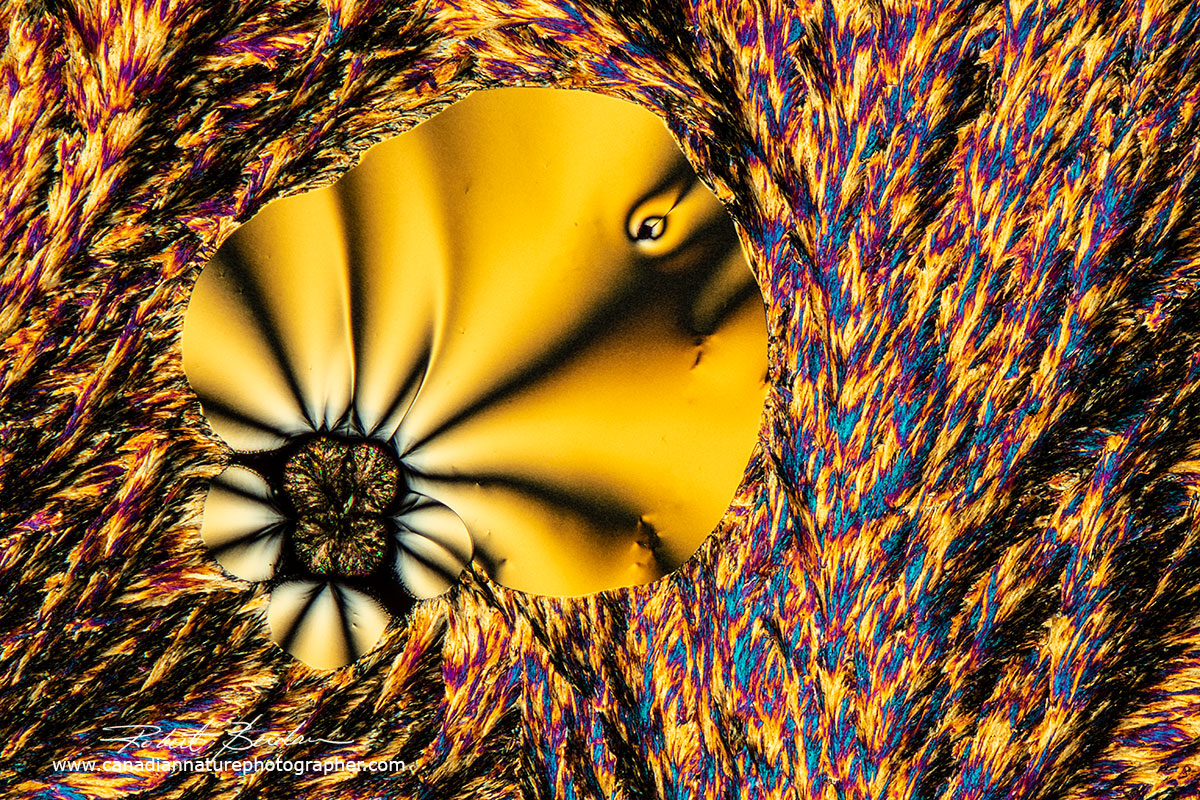
Ascorbic acid (Vitamin C) crystals by polarized light microscopy 100X
My microscopy background
I received my first microscope in Grade 6 for Christmas which is when my addiction started. Upon graduating from Grade 8, with the financial help of my parents, I purchased a research quality microscope - an Olympus E trinocular scope for $300. The microscope led me to a career in research in the fields of Cell Biology and Neurobiology where I used a wide range of microscopes. I also used both the Transmission and Scanning electron microscopes extensively in my research. In short I love working with microscopes and cameras.

Above is a picture of my first microscope. It cost $29 from Sears. A microscope like this is suitable for children under the age of 11. I could see microscopic pond organisms with it and it was good enough to get me excited about the micro-world, but for anyone older I would recommend a microscope like the one shown below. Alternatively, I think a stereoscope might be better option for young folks. One could add a light microscope later on, and the two types of microscopes complement each other.
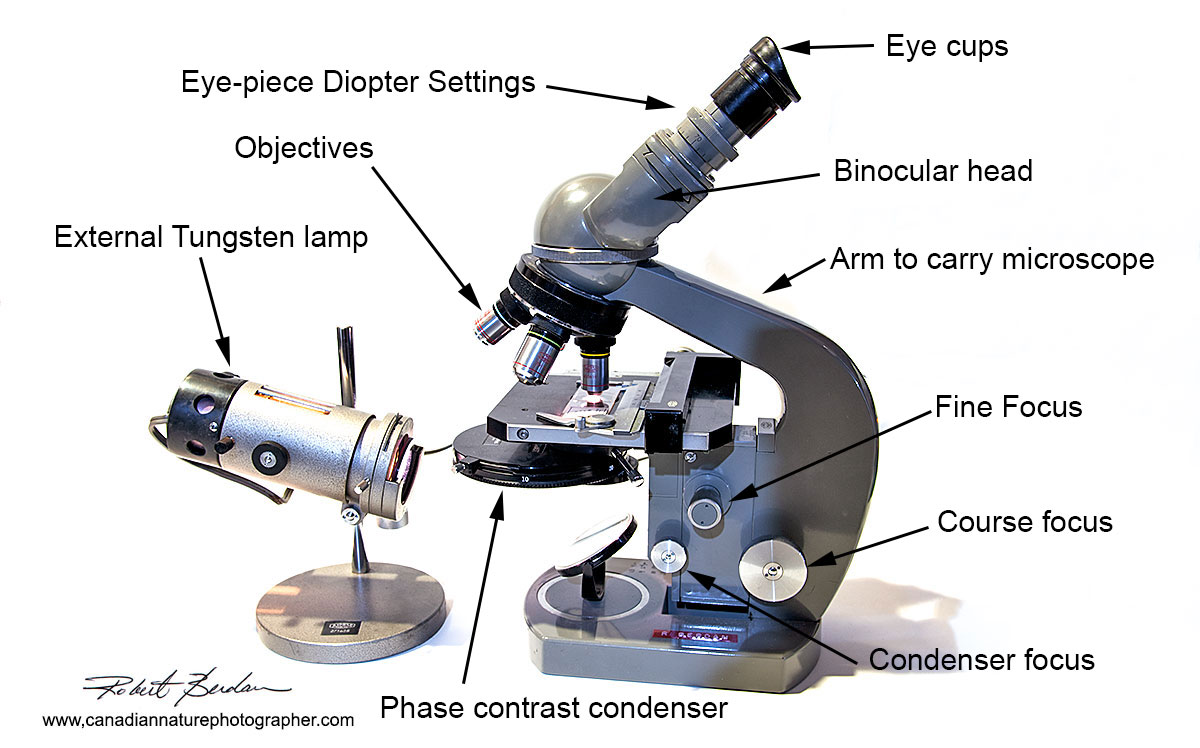
Above is a Chinese made microscope. I purchased this microscope for $100 used on Kijjii, it cost $300 new. This would be an ideal microscope for anyone starting out. It has binocular viewing, 4, 10, 40 and 100X objectives, condenser and both fine and course focus knobs. I added a mechanical stage - see this article and pictures on mechanical stages on the Olympus web site. I also added polarizing and dark-field filters to the scope. The light source is sufficient for viewing specimens, but a brighter light source would be better for photomicrography. This scope has the minimum features I would look for in a compound light microscope. Microscopes with stages that remain horizontal are better for viewing wet specimens like pond water than those shown below with a stage that tilts back.

Above shows two older microscopes from the 1950's and 1960's I purchased used. On the left is Russian made microscope - WM-1 Vintage microscope from Lytkarino Optical Glass Factory. It doesn't have a fine focus knob or glass condenser but it would be OK as beginner scope or for taking into the field. You can only attach one objective at a time, whereas microscopes with objective turrets that rotate and can hold 3-6 objectives make it quicker and easier to change magnification and are preferable over microscopes that only allow one objective at a time. The Russians also made some good quality microscopes under the brand name LOMO for more information see - Why are Russian optics so good? On the right is an American made Unitron polarizing microscope, it has fine focus, condenser, rotating stage, Bertrand lens, a 1/4 and full wave plates, a polarizer and analyzer. It is designed to study mineral sections in polarized light. New it cost about $600. This microscope is excellent for looking at mineral specimens and crystals with polarized light.

My first laboratory was in my garage. My Olympus E microscope is behind me and there are photographs of mosquito larvae, rotifers and copepods hanging on the wall behind me that I photographed with this microscope and an Olympus OM-1 35 mm film camera years ago. My room in the garage also served as a dark room for printing pictures.
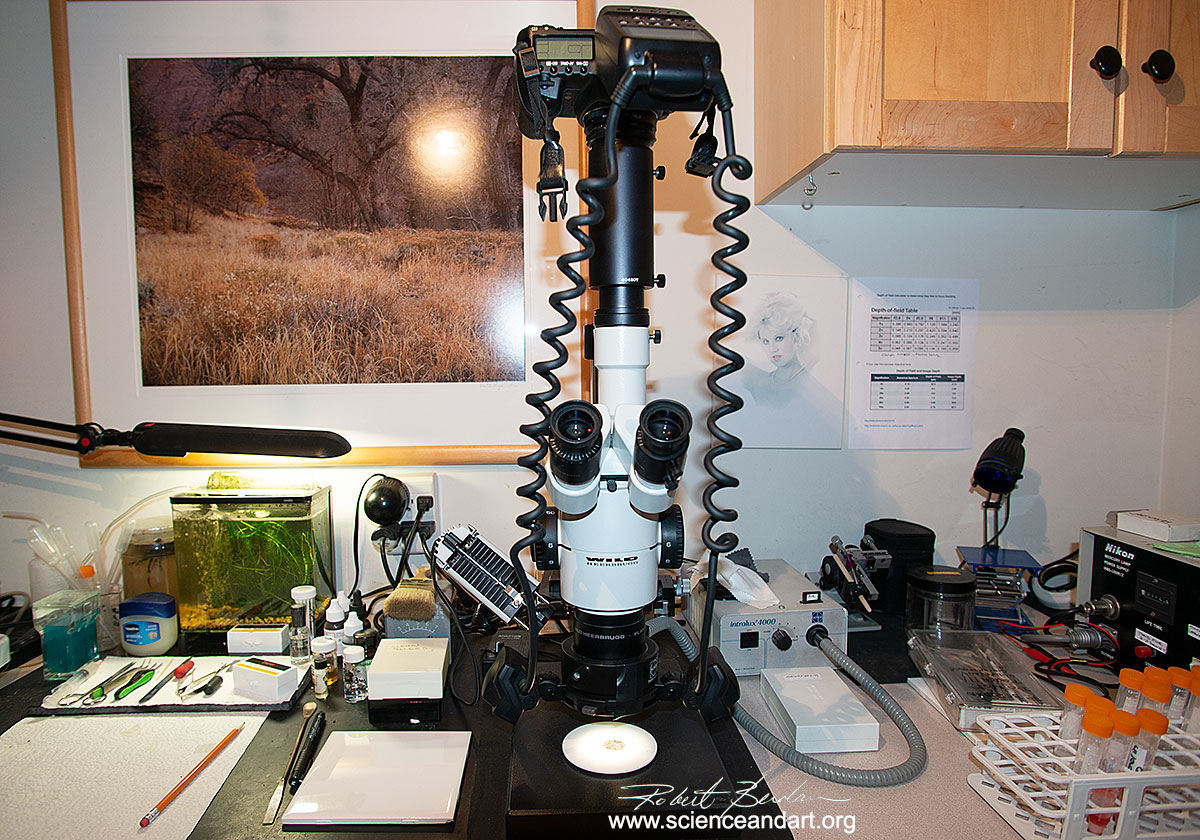
Years later, after spending 15 years in research and 7 days a week in the lab, in 1993 I left the University of Alberta and started a career in nature photography, multimedia and teaching. Two decades later my passion for microscopy and photomicrography returned. I set up a home microscopy lab so I could pursue specific interests and take pictures.

On the right is my Zeiss Axioscope microscope with a Nikon D500 camera attached on top.
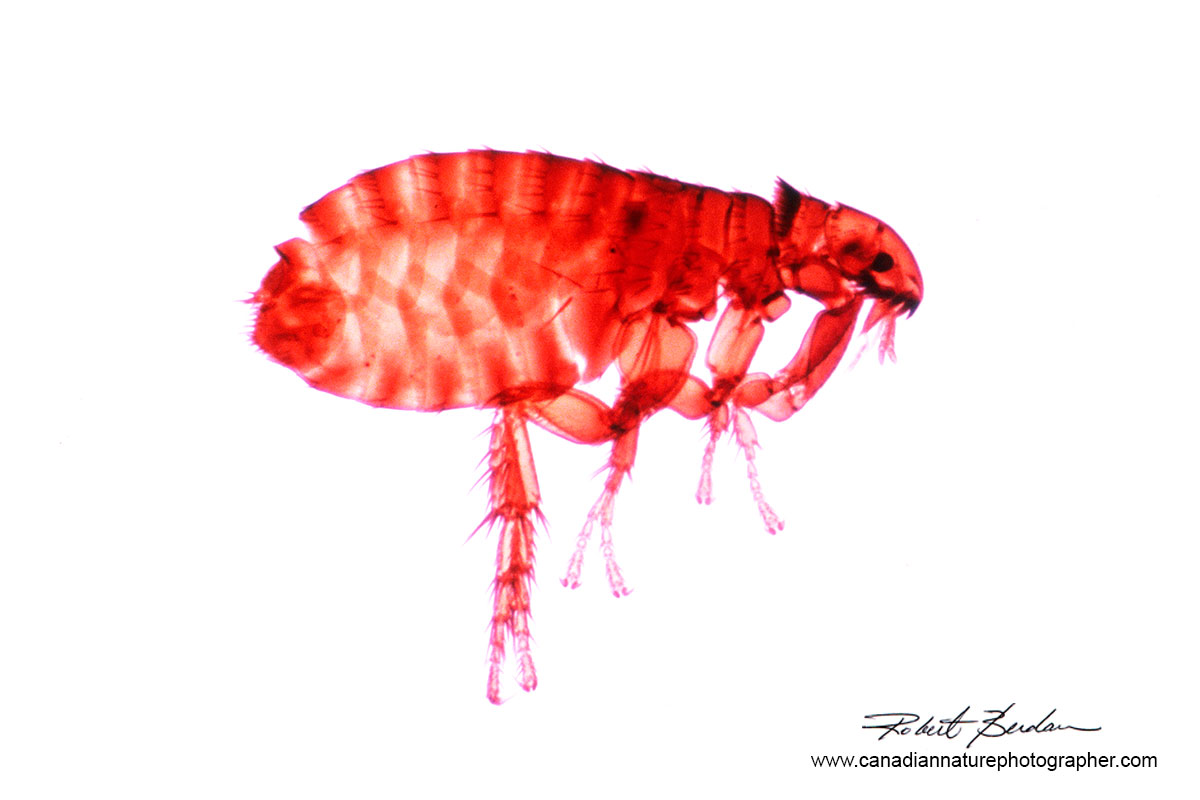
Dog flea photographed with bright field microscope Olympus E - taken over 40 years ago. 40X
Used Microscopes
Buying a used microscope is a good option for experienced microscopy users, but most of the used scopes I purchased needed repair. My secret ingredient to fix gears is WD-40. I also clean the scope with alcohol and soft scrub brush and when necessary I purchase and replace parts from E-bay. I clean the lenses with optical cleaning fluid, lens cloth, cotton swabs and compressed air but be careful not get the freon (propellant) on the lenses. A few tools and a bit of knowledge and one can fix some microscopes.
Buying a microscope online where you cannot examine it first is a risk and you need to beware. Sometimes sellers won't answer your questions - I then make a low offer and hope I can repair the item if they accept. If you can purchase a used microscope locally (e.g. through Kijjii or dealer) that would be my first recommendation, but you also need to beware that many folks selling the microscopes may not know much about the scope or what their real value might be which can be both an advantage and a disadvantage. A microscope if cared for can last a lifetime and still be a good tool.
Things to look for if you can examine a used microscope are 1) are the optics clear and sharp? - you will need a test slide - I use one with diatoms 2) Do the coarse and fine focus knobs turn smoothly? 3) If it has a mechanical stage does it operate smoothly? 4) If it has a built in light is it working and does it offer variable power output? 5) what is the overall condition of the microscope - is it covered in dirt, scratches, and rust? 6) Unscrew the objectives and look through them and examine the surface of the lens for marks, scratches and delamination - do the same with the eyepieces. 7) If it has phase contrast make a cheek-cell preparation (read below) and look if the cells have good contrast - you may need to align the phase rings first. If you are not sure how to do these things then a used microscope might not be the right choice for you. Of course if the price is fantastic, you can always purchase it and have a dealer or someone knowledgeable repair it, but you might want to get an estimate to repair the microscope first.
Microscopes used for teaching in schools get a lot of wear and are usually not in great condition when they are sold. Even so I have purchased some used microscopes from government surplus that were good value. I am not a fan of public auctions because folks can get excited and will pay more for a used scope then what the same scope costs new.
Above my wife is sitting in front of my customized inverted Olympus IMT microscope in my lab at the University of Alberta, she is not a scientist - she was just visiting me. I added a Nikon stereo microscope above the Olympus inverted scope. The microscope was equipped with Fluorescence, Differential interference contrast, Phase contrast and was attached to a 35 mm Olympus OM-4 film camera and had video port used for time-lapse photography. I also used micro-manipulators to impale isolated brain cells grown in culture. Total cost of this research microscope was $65,000. What I liked about doing research was that I had access to cutting edge and expensive equipment.

Amoeba viewed with Differential interference microscopy (DIC) with a diatoms inside and the amoeba is about to engulf two more diatoms 400X.
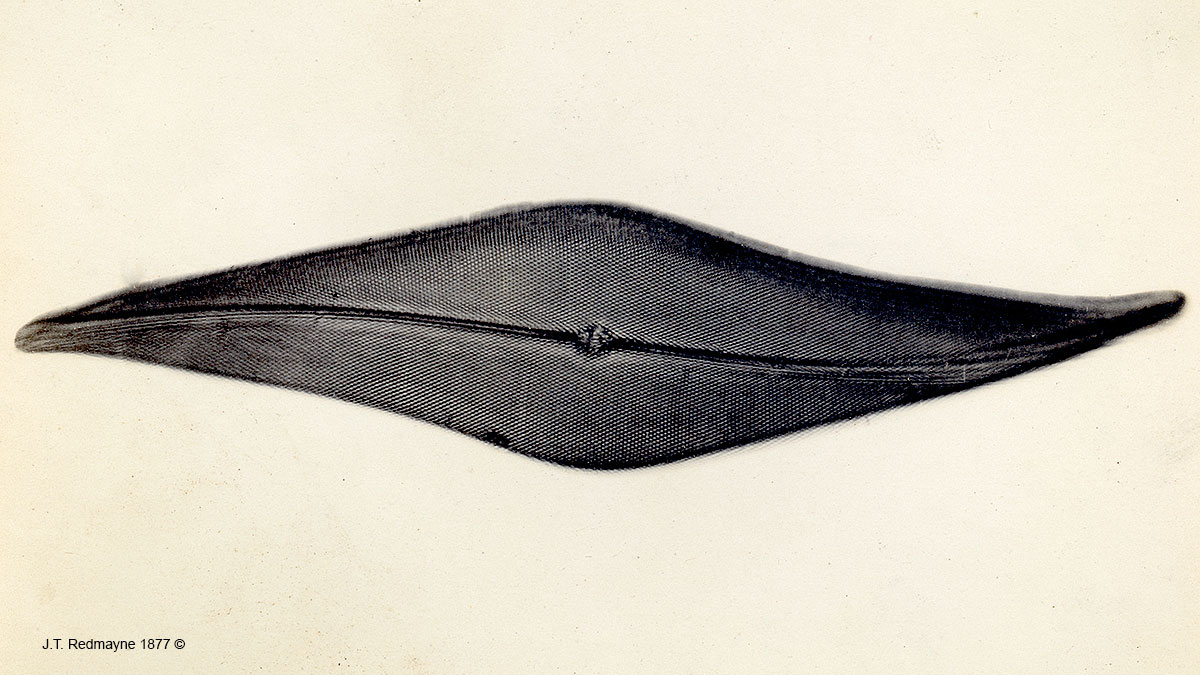
Diatom Pleurosigma angulatum Plate 50 Magnification 750X. This photograph was taken in 1877 and rivals what can be resolved with modern light microscopes today. Some older microscopes have optics that are comparable to new scopes e.g. see article showing Diatoms photographed in 1877 by J. T. Redmayne. This demonstrates why some used microscopes can be a good option for experienced microscopy users.

Closterium a single celled Desmid photographed with Differential Interference Microscopy (DIC) 400X
A new microscope with the basics can be purchased for few hundred dollars and really good one for about $1000-$2000 - about the same price as a good digital camera. A decent used microscope will start at about $100 and that might be all you need to kick-start your microscope addiction. One of the benefits of the Internet is that there is a lot of microscope information available. You can often download old microscope manuals, free books on microscopy, and get ideas about experiments or view videos that show you how to use a microscope (see end of this article). Also most laboratory glassware, test tubes, dissection instruments, chemicals etc. are available online from Amazon, E-Bay, online science stores (e.g. Boreal) and the cost of these items is affordable. You can even order live microorganisms like water fleas, rotifers, paramecium, and amoeba from Boreal and other companies and have them mailed to your home during the winter. These live micro-organism are ideal for home schoolers and anyone interested in viewing these animals during the off-season. The rest of the year you can visit a local pond and collect your own specimens in a jar for free.
Why take up Microscopy?
I show some of the beauty of the micro-world including crystals, animals and plants that live in a pond, soil, lichen, moss, and rainwater. I have also invited some of the world's best photomicrographers to share some of their photography on this web site. In short, a microscope is like a magnifying lens for the mind. It will let you see things that most folks never see and these organism are all around us, in our homes, in and on our bodies. Unlike astronomy, which I explored for a few years, you can touch and interact with microorganisms and view them from the comfort of your home during all seasons independent of the weather. Living creatures and plants are the most interesting things to view in my opinion whereas crystals in polarized light are the most colourful subjects I have ever seen. A microscope doesn't take up much room and you can keep it out on a table (with a dust cover) for when ever you get the urge to look at something.
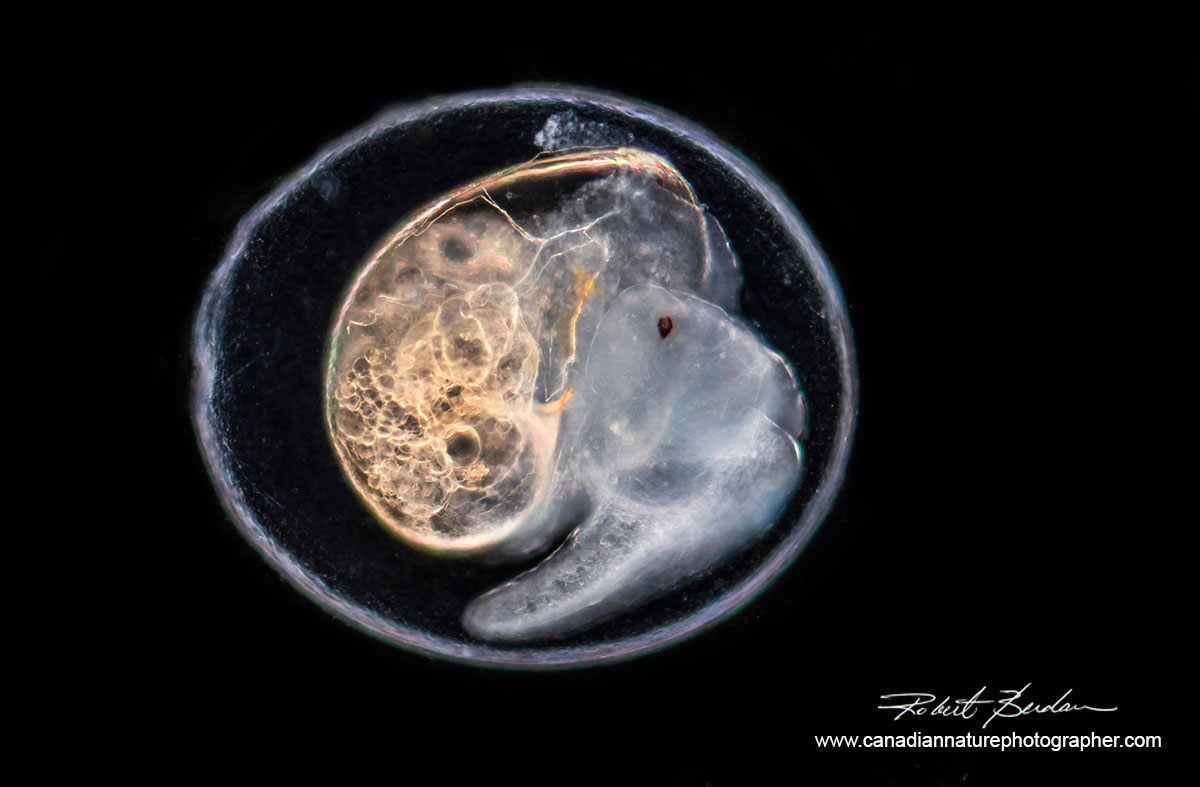
Fresh water snail in egg Dark field microscopy 40X. You can watch a freshwater snail develop from a single cell into a young snail over a period of about a week - watch Time Lapse Video.

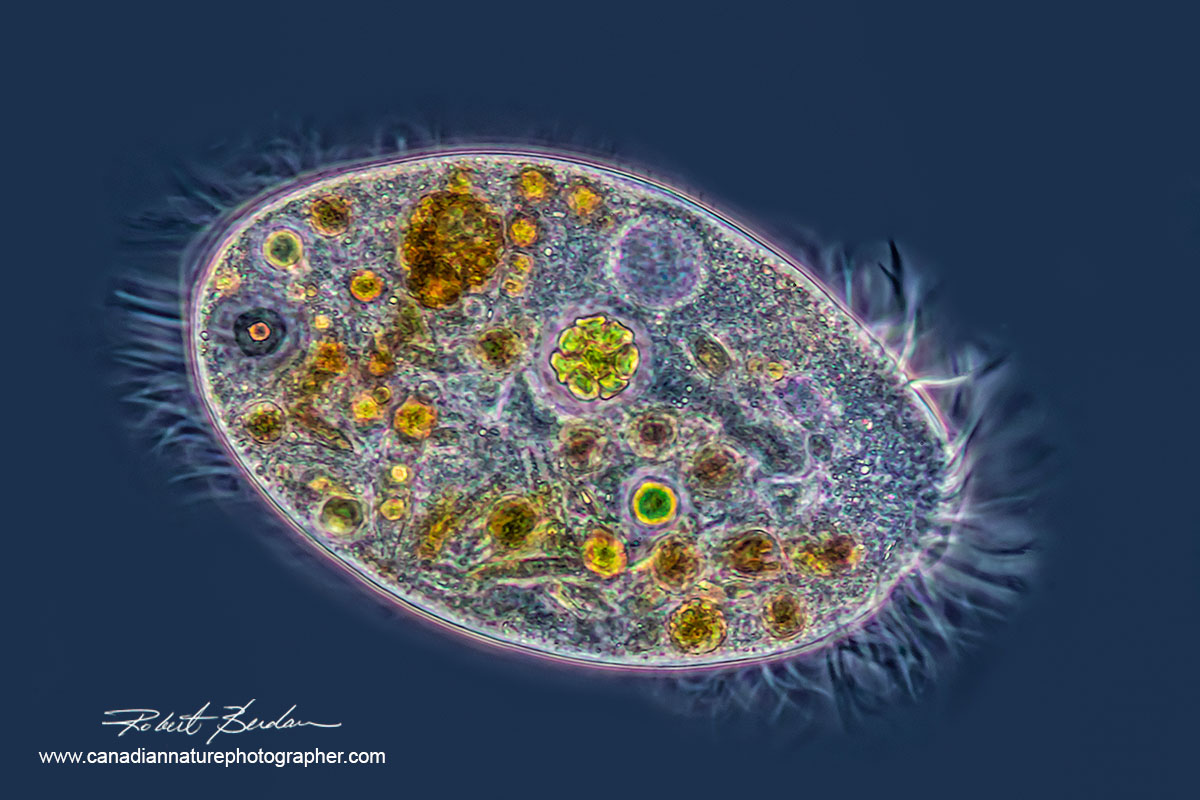
Two ciliates from pond water shown in the process of cell division. 400X DIC microscopy.
Living organisms are amazing and watching single celled ciliates and other microorganisms divide, feed, and prey is mesmerizing. We can learn a lot from microorganisms as scientists today are studying Hydra to understand why it does not age and Tardigrades (Water bears) which can survive dessication, extreme temperatures and even the vacuum of outer-space. There is always the possibility that you could discover some new organism that has never been seen or described before, and it might even live in your backyard.
Hydra found in pond water viewed with bright field microscopy. 50X For more about Hydra see my article.
Microscopes are an important tool in many industries and knowing how to use one can be beneficial for those considering a career in a field that uses microscopes. Microscopes are routinely used in: medicine, research, pharmaceutical industries, health laboratories, forensic science labs, manufacturing, electronics inspection, engineering, metallurgy, microbiology, geology, surgery, chemistry, physics, botany, zoology, agriculture research, veterinary science, museums, art restoration, aquariums, fisheries, jewellers, gemologists, environmental science, wildlife, health laboratories, beer brewery and winery and many other fields (see article Careers that use microscopes).
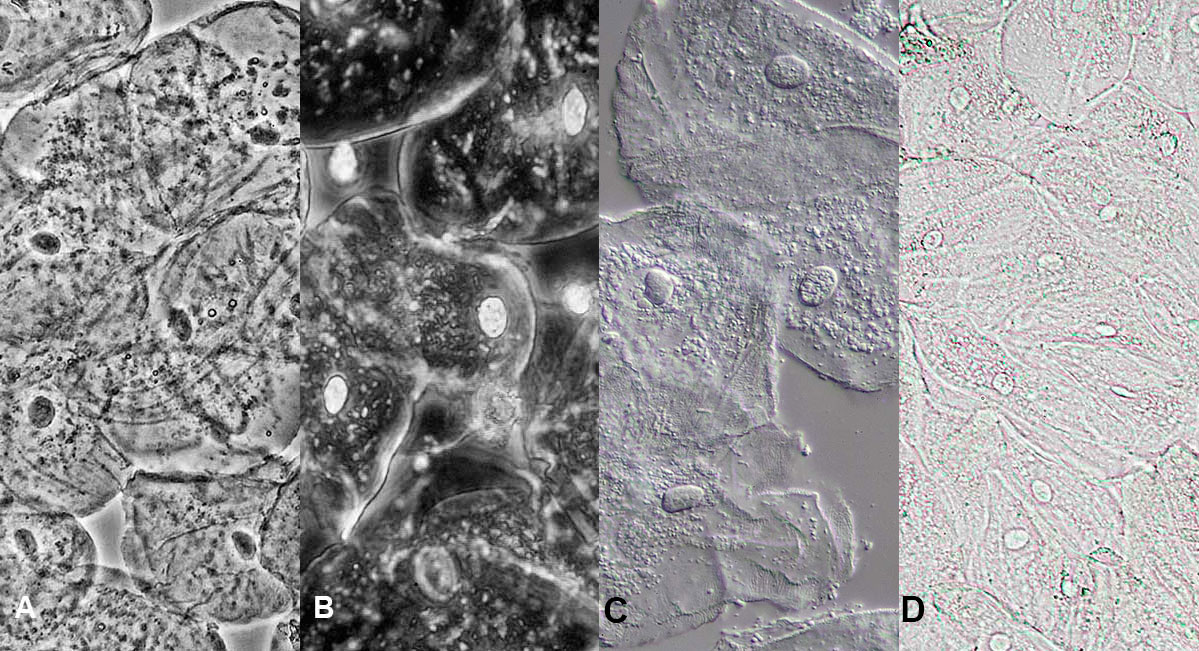
Above - human cheek cells. The photomicrographs were taken with 4 different microscopy techniques A) Positive Phase contrast - note the cells nuclei are dark B) Negative Phase contrast - nuclei are bright C) Differential Interference Contrast has a 3D relief and D) Bright field microscopy where cells are translucent and barely visible - all at 200X.
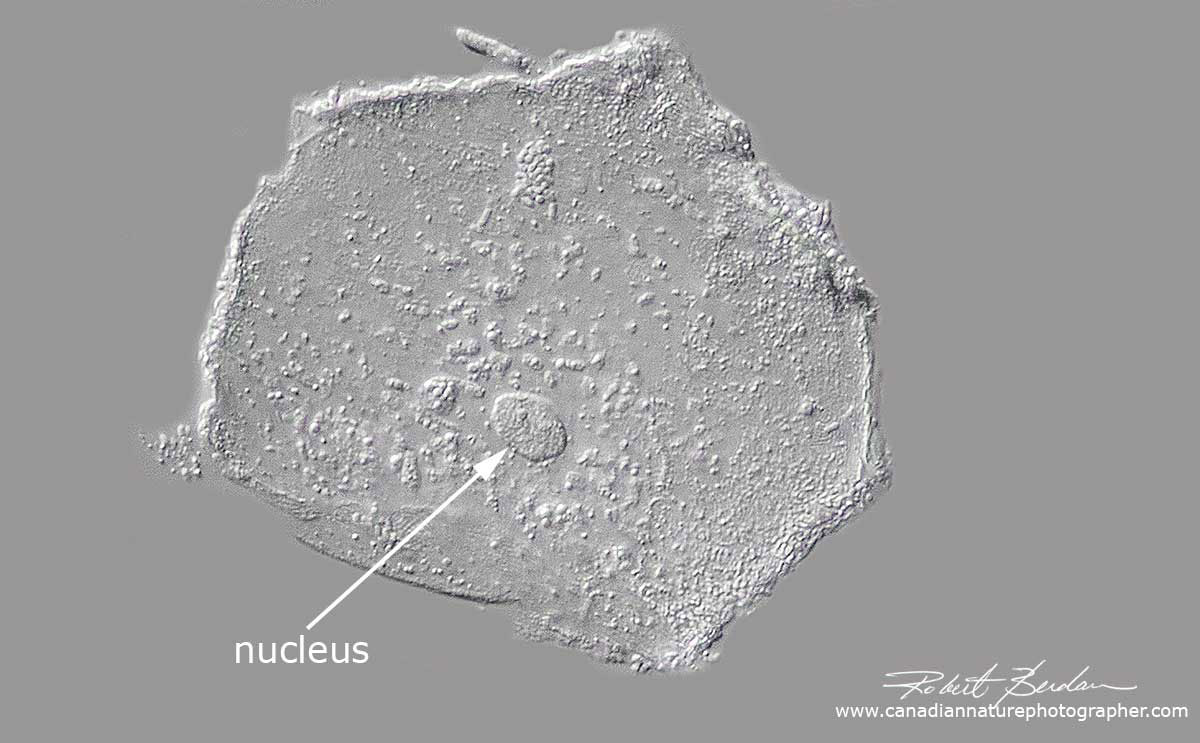
Single human cheek cell viewed by Differential Interference microscopy showing the nucleus. 400X.
Making a preparation of human cheek cells is easy, you take a clean microscope slide and carefully scrape the narrow edge of the glass slide on the inside of your mouth against your cheek, then take that slide with associated cells and smear it on another microscope slide, cover the cell scraping with a cover-slip (also called cover-glass) and view. With a bright-field microscope the cells will be hard to see, but using contrast enhancing techniques you can see the nucleus near the center of the cells and mitochondria inside. If you have a bright field microscope try staining the cells with methylene blue or other colourful dye. A Vital stain kit for Living cells is available from AMscope. You can also use oblique illumination with a bright field microscope by putting the filter tray under the condenser part way in or using home made filters.

Human cheek cells from a female stained with Methylene blue using bright field microscopy. Note bacteria appear as small dark staining spheres or short rods, 400X.
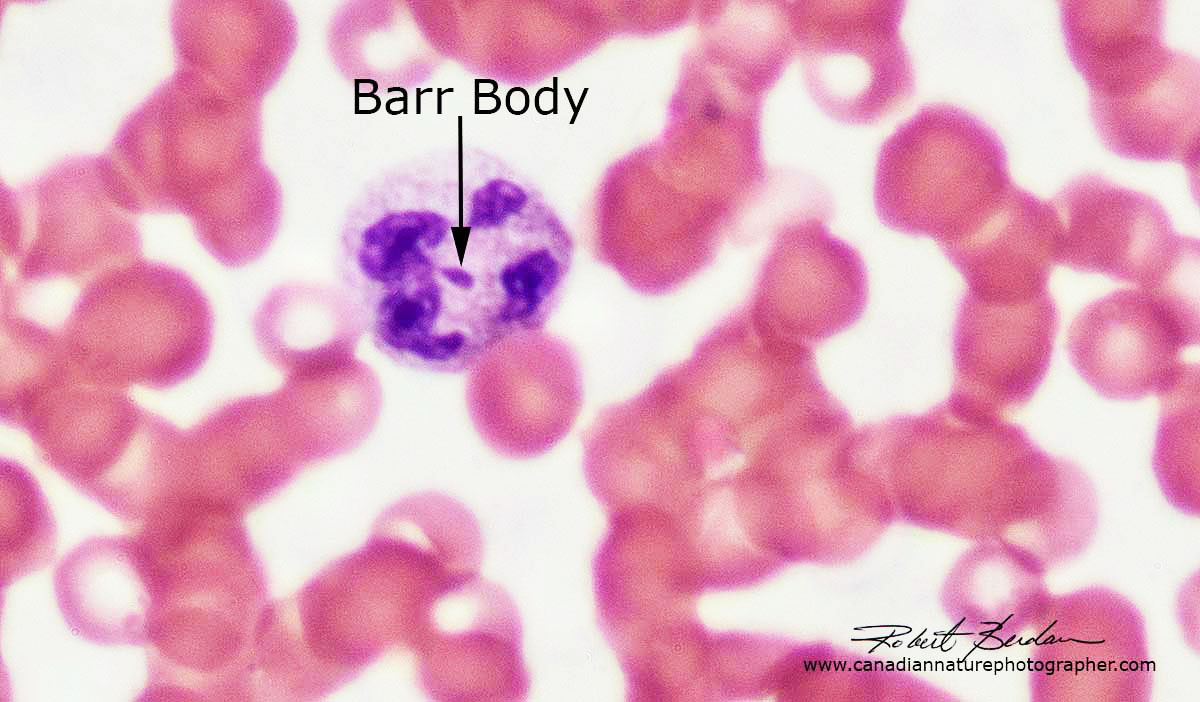
Stained blood smear showing a white blood cell (Neutrophil) with a Barr Body which is an inactivated X chromosome - females have 2 "X" chromosomes but only one is active in each cell. The white blood cell is surrounded by more numerous red blood cells. 600X Bright-field microscopy from a prepared slide.
An interesting fact is that we can detect whether human cheek cells are from a male or female using the microscope. The nucleus from a female cheek cell has what is called a Barr body visible in a percentage of the cells. The Barr body is named after Dr. Murray Barr from the University of Western Ontario who discovered this first in cat neurons along with his student E. Bertram in 1949. The Barr body is an inactive X Chromosome - females have two X chromosomes but only one is active and the inactive chromosome can be stained and is usually attached to the nuclear membrane. Barr bodies can also be seen in female white blood cells (Neutrophils) and hair follicles (note the photomicrographs are not clear in the publications I have linked to). Barr bodies are not easy to spot; they may also appear in a small percentage of males (e.g. those with Klinefelter syndrome).

Polarized light microscopy showing Vitamin C crystals 100X - to see more crystal photomicrographs.
To make Vitamin crystals you can buy some powdered Vitamin C at a medicine shop or health food store, add some of the powder to water and isopropyl alcohol (1:1) mix, then apply the solution to a microscope slide and let it dry. Crystals will begin to form in minutes - Watch this Video by Oliver Kim to see how to do it. This video also shows you how to convert any light microscope into a polarizing microscope using a cheap pair of card board polarized glasses.
Types of Microscopes
There are three common types of optical microscope: stereomicroscope, compound microscopes and inverted microscopes. There are also digital microscopes which I won't discuss as any light microscope can be converted to a digital microscope by attaching a digital camera with a USB cord. I connect my Nikon and Canon digital cameras and view the images on my computer using free software called Digicam control for Windows. This software supports many of the more popular digital cameras and it is free. For those interested in photomicrography - see my article Tips on How to take better pictures with a microscope. Microscopes have been around for about 400 years, and even an elementary microscope today is better then most of the early microscopes used by scientists like Robert Hooke who in 1665 discovered cells. If you would like to take photos good equipment is helpful but there are also a wide variety of adaptors for cell phones available on Amazon for about $23.
Three common types of light microscope
1) Stereo microscope
Stereo microscopes allow you to see specimens magnified with stereo vision hence their name. They are also called dissection microscopes and are widely used to study arthropods, molluscs, small organisms, rocks and minerals, jewelry, and they are also used by doctors during surgery to repair the human eye, brain or suture small blood vessels.
In general a stereoscope provides about 2X to 50X magnification. Some have fixed magnifications (4, 10, 20X) and others have built in zoom. I prefer those with zoom capability. Stereoscope are easy to use, some are portable and can be taken into the field. They can be used with a variety light sources from above or below for transparent specimens even with polarized light. Their main advantages are that they can be used to view opaque specimens, and the specimens require little or no preparation. Stereomicroscopes also offer plenty of working space above the specimen unlike compound microscopes. They can also be fitted with a UV light to study fluorescence of rocks and lichen. In the electronics industry they are used to solder small parts and to inspect items - watch video.
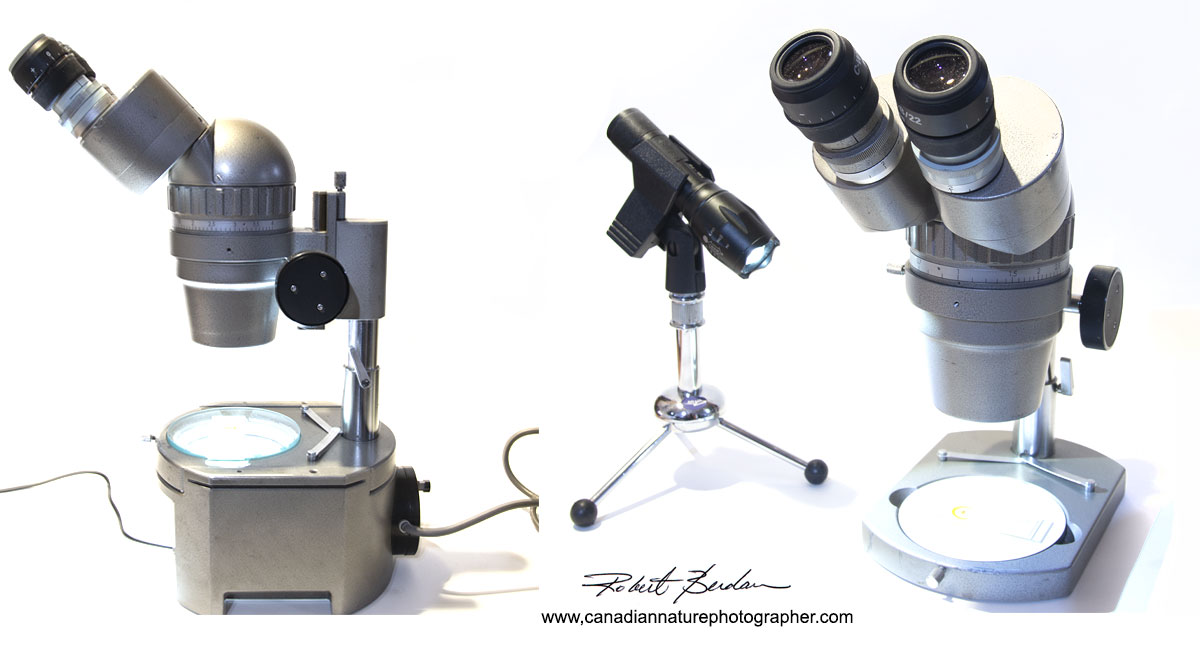
Above is an Olympus SMZIII zoom stereo microscope with 7-40X magnification. On the left the stereoscope is shown with a removable base that allows a light source below the stage for translucent subjects and on the right the scope is shown without the base light. This particular stereoscope model was first offered in 1968 and I purchased it refurbished from Quality Microscopes in Calgary. I also purchased some better quality Nikon eyepieces for the scope.
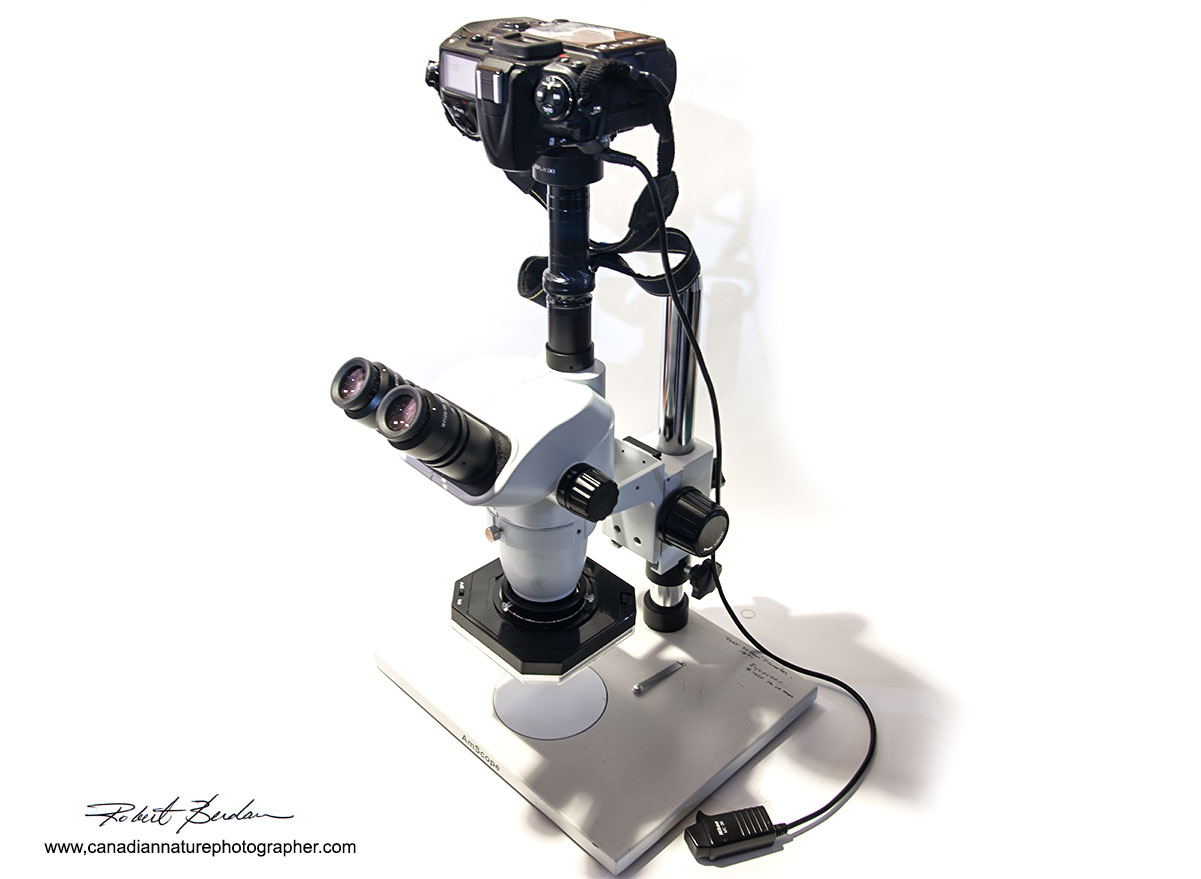
Above is stereo microscope with a trinocular head for photomicrography by AM Scope. The eyepieces are wide field and bright and the scope provides a zoom from 2-45X magnification and cost about $1000 US new. I made a battery operated ring light fit it, but I also use a standard fibre optic light, a UV lamp and an LED flashlight. I purchased an eyepiece micrometre which I use to measure the size of objects. My only criticism is that the stand that holds the microscope is not rock solid for taking pictures. You can test a stereo microscope for vibration by lightly tapping on the back support that holds the scope while looking through the scope to see how much movement their is. Note you don't need a rock-solid support for viewing specimens, but you do for taking sharp pictures. This AM stereoscope above makes for a good intermediate level steremicroscope. AMscope also offers cheaper models (e.g. 3.5X to 90X zoom trinocular).
Another tip is that you can put any microscope on an anti-vibration table (expensive option) or on some support to absorb the vibration. I tried heavy metal plates with tennis balls, partly inflated tire tubes and also looked at using audio feet for turn tables - none of them worked very well for me. However, I found that using rubber exercise and gym floor mats does work well. I can purchase the rubber mats at a local hardware store (about $20 for 18 x 18 inch square) and cut them to size with an X-acto knife.

Above is a picture of Zeiss Stemi 305 CAM stereo microscope with built in light and wifi camera. A basic Zeiss Stemi 305 binocular scope is about $1600. In Calgary and area you can contact Quality Microscopes to view or purchase one of these Zeiss stereomicroscopes, if you live else where you can visit the Zeiss web site and order online.
When evaluating and buying a stereomicroscope important things to consider are:
1) Prisms are aligned properly (no double or overlapping images)
2) Eyepieces are not de-laminated (see article describing de-laminated objective lenses)
3) Focus and zoom mechanisms move smoothly and freely
4) Microscope has not been exposed to high heat and humidity (tropical environment promotes fungal growth)
5) Ideally scopes are from a clean room rather than used in the field in dirty or harsh environments
6) Previous user used proper lubricants (petroleum-based greases have a solvent component that can affect optics)
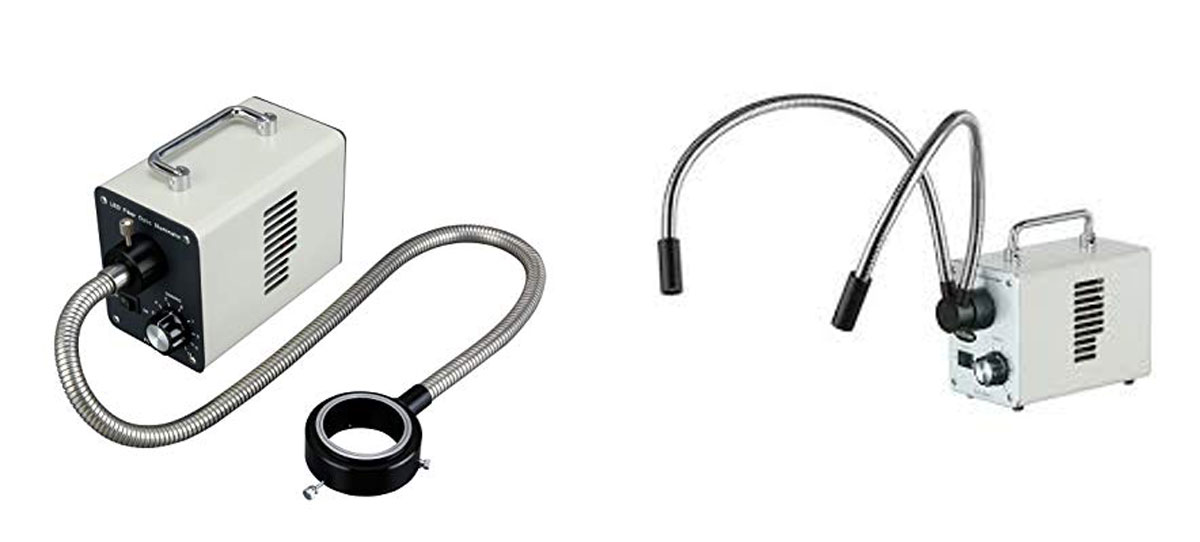
Above are fibre optic lights: on the left a ring light and the right a goose neck light. Both units are from AM systems but similar lights are made by many different manufacturers. The goose neck lamp is more versatile in that you can light specimens from two sides and it creates more of a 3D appearance. The ring light allows lots of working room and provides a flat light from above. I own both types so I can use which ever light source is better for a particular situation. Some power sources accept both types which is what I have. Fibre optic lights range in cost from about $250 to $1500 new.
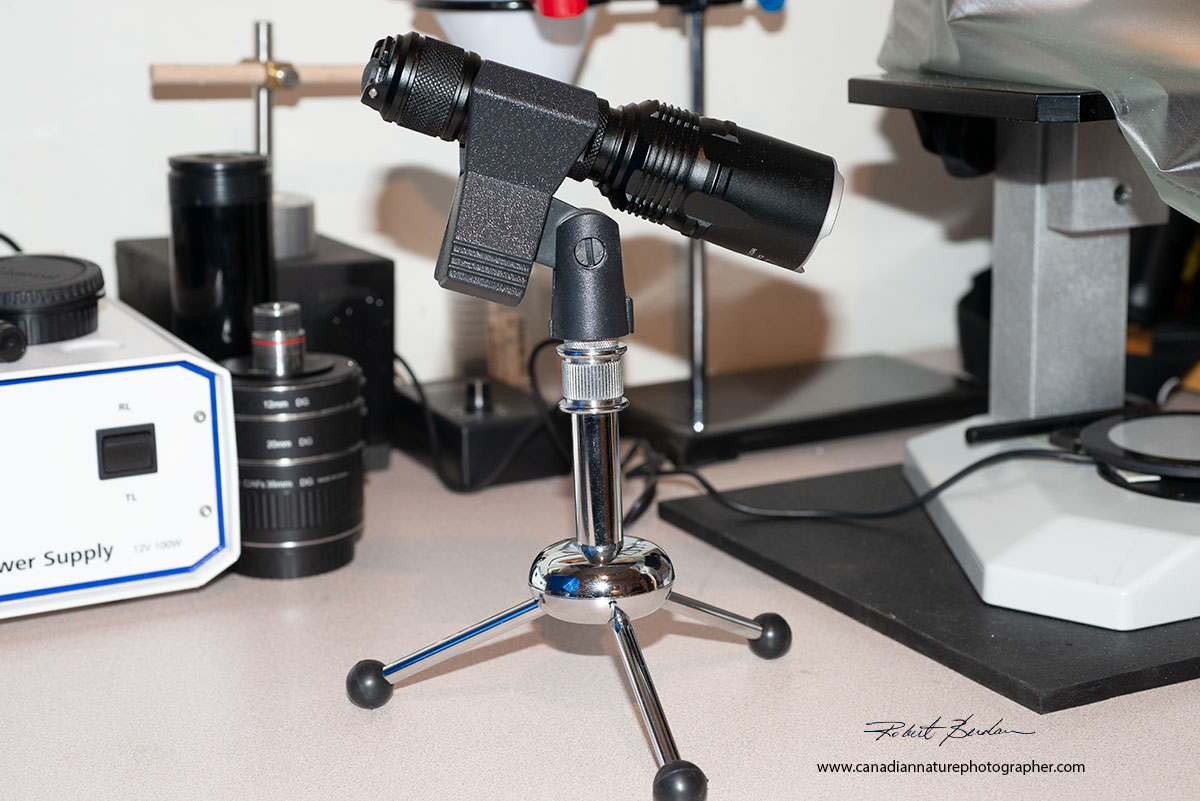
Nitecore Flashlight which provides up to 2800 lumen and the intensity can be varied. This flashlight is one of the brightest light sources I have been able to find. The light is held by a table top microphone stand and microphone clip costing a total of $22 from a local music store.

Trout Alevin photographed using dark-field illumination with a stereomicroscope. 10X
A stereomicroscope makes a useful companion for those that already own a compound microscope or might be buying one in the future. The cost of a stereoscope varies from $100 up to over $10,000 for the very best. There are other ways to photograph subjects like insects using macro lenses, bellows, extension tubes and microscope objectives - see Closeupphotograpy.com for examples. I also use these techniques with focus stacking and the Canon MP65-E macro lens for macrophotography, but a stereoscope is the most practical tool for comfortable viewing of small specimens. A stereomicroscope is often used during the preparation of specimens for the compound light microscope - I use it for instance to find water bears.
Above I customized and modified this M8 Wild Stereo microscope which has a zoom range of 1-50X, trinocular head for photography, ring light, and 2 flash units which in turn are attached to a Canon 5D Mark II camera on top. This is a research/surgery quality stereoscope. Due to the heavy weight of the base this stereomicroscope is very stable but it is not portable.

Photograph of a Canadian Penny taken with the Wild Stereomicroscope 4X
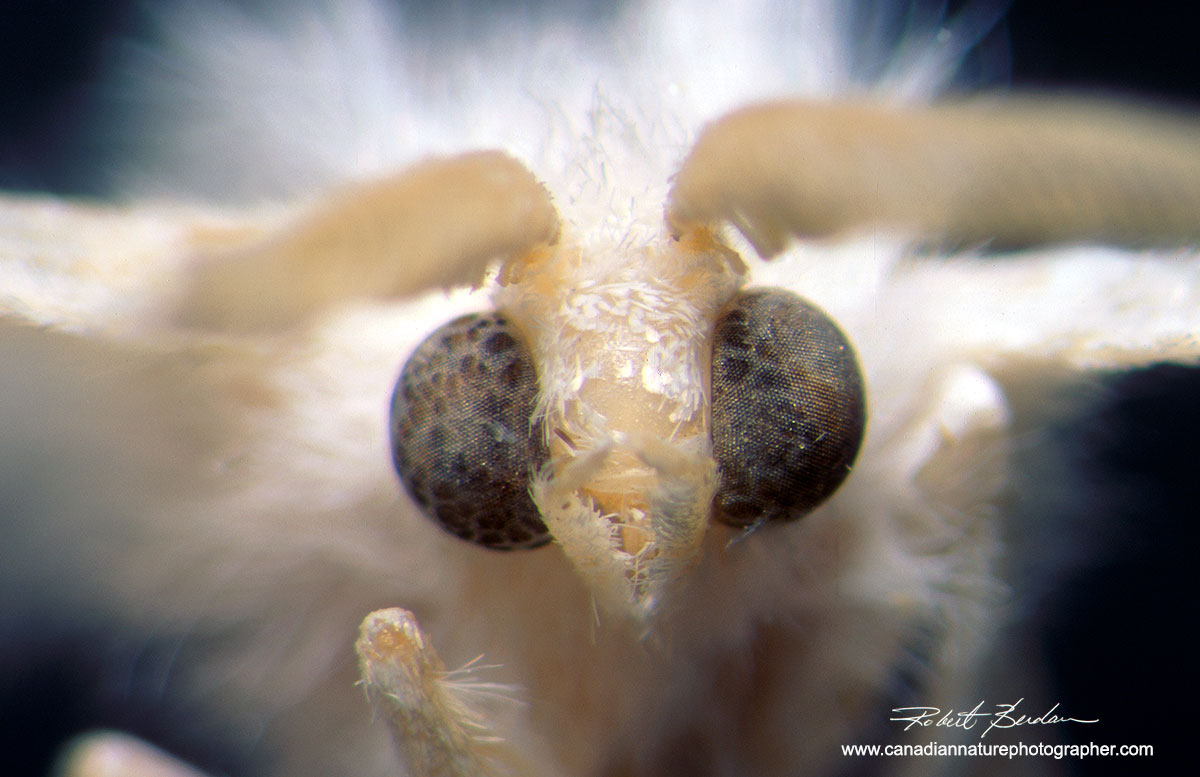
Moth photographed with the M8 Stereoscope - no focus stacking, recorded on film (Velvia). 50X Note the shallow depth of field. The higher the magnification with any microscope the smaller the depth of field.
Tip - If you buy a stereoscope you will want to acquire some dissection tools like needles, pipettes, tweezers etc. to manipulate specimens. You can make many of these tools yourself. I also find drink coasters made of cork from the Dollar Store and a few fine needles (insect pins) are useful for mounting and positioning arthropods under the stereoscope (see photo below).

One problem I have encountered with some stereoscopes is that their optics can go out of alignment if they are knocked and they may require an expert repair person. If you buy a used stereoscope look at something through the scope (e.g. coin, stamp or feather) to see how clear the image is and also view the image at different magnifications. Also look down the scope with both the left and right eye piece separately to see if the images are clear and crisp. If you can't examine the stereoscope before purchase make sure you can return the scope if it is not satisfactory. Used stereoscopes will vary in price depending on their age, condition and brand name and can cost from a few hundred to several thousand dollars.
Tip - better microscopes allow you to vary the diopter setting on each of the eyepieces so that if your vision is different in each eye you can correct for this. When first looking through the scope make sure the diopter setting is at the zero setting and then adjust according to your eyes. If you wear glasses you can adjust the diopter so an image appears clear without wearing your glasses. If you have astigmatism however, look for high eye point eyepieces so that you can leave your glasses on while viewing through the scope.
2) Compound Light Microscope
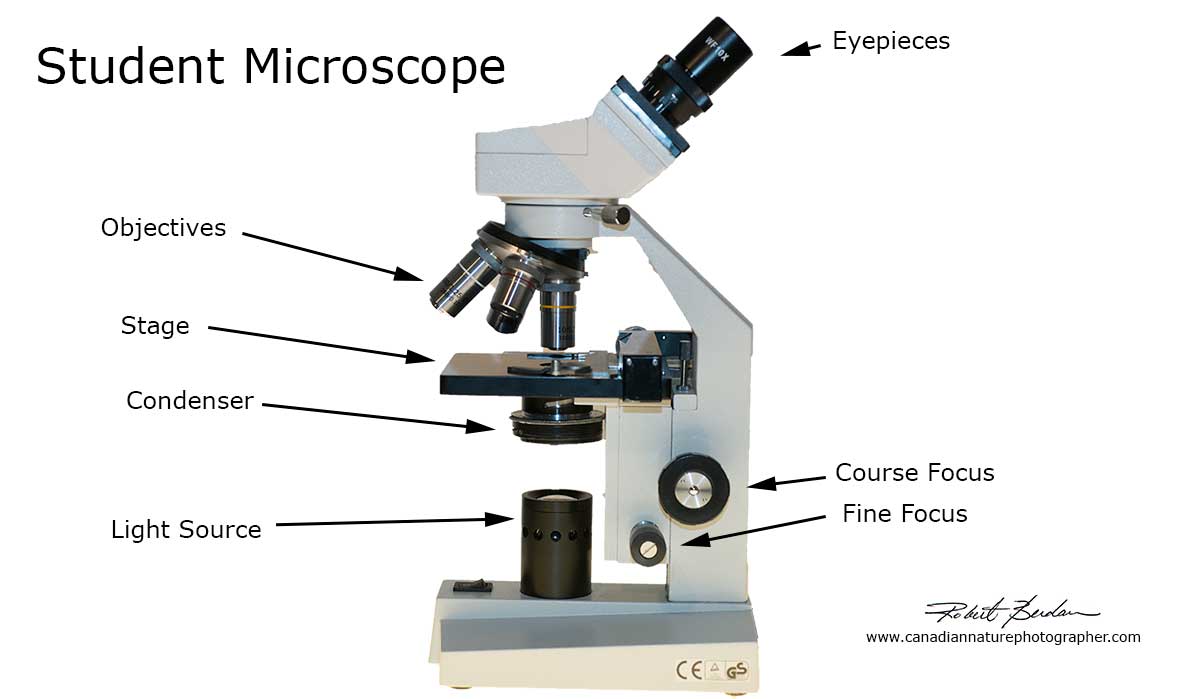
Compound microscopes have been around since the 1600's. They permit magnifications from 2 to 1000X and can be used to view bacteria (not viruses), cells and other small microorganisms. They are available with monocular, binocular and trinocular heads. The monocular head is OK to get started and for young children, but frankly it is a lot more comfortable to view specimens with a binocular head even though they cost more. A trinocular head makes photography more convenient. It is possible to attach a camera to both the monocular and binocular heads though this is unstable and blocks your view.
Above is binocular light microscope an Olympus E with a phase contrast condenser and mirror to reflect light from the tungsten light source. Most compound microscopes with mirrors have both a flat and concave surface on the mirror. According to my Olympus manual - the flat mirror surface is for use with objectives of high magnification while the concave surface is employed when using objectives of low magnification. I verified this is true - the flat surface of the mirror was best for 10, 20, 40, 100X objectives. The curved mirror surface was better for the 4X objective using the light source shown above. A microscope mirror is compact and can be used with a wide variety of external light sources. This microscope also came with a tungsten light source which is fine for viewing but a brighter light source is better for photomicrography or making movies. For years I used a Kodak slide projector as a bright light source, if I need a really bright light I use the Nitecore flashlight. Adding polarizing filters will significantly reduce the brightness of the light (by about 4 F-stops). So microscopes with mirrors are good and allow you to use a variety of light sources.
Ciliate found in pond water photographed using positive phase contrast (Zeiss Axioscope) showing intracellular components and external cilia (hairs) that it uses for propulsion. 400X .
The basic compound microscope provides bright field illumination so the background is white and you view transparent or translucent specimens on a microscope slide. Some specimens must be stained in order to see them clearly. Compound microscopes are useful for viewing prepared slides of tissue, insects, worms and other small organisms. Cells (e.g. cheek cells) and many aquatic organisms are transparent and require staining in order to see detail or they must be viewed by some contrast enhancing technique like phase contrast. It is possible to view pond organisms with bright-field though the organisms transparency makes viewing their inner details challenging.
To view specimens with a compound microscope we put them on glass slides which are usually covered with a thin rectangular cover-glass to hold the specimens flat. A cover-glass isn't always necessary, but is often essential when using 20X or higher magnification objectives. Most objectives are designed for use with No. 1.5 coverglass (0.17mm) thick. I buy high performance coverglass from Zeiss as they are 0.170 mm ± 0.005mm thick for photomicrography, but you don't need this quality to get started. Methods used to stain and prepare some samples for a compound microscope can be involved. For thicker specimens I sometimes add small drops of Vaseline or vacuum grease on the corner of the cover-glass so the cover glass does not squash and kill small soft bodied organisms like water bears.

Tissue stained with Hematoxylin and Eosin from a prepared slide of large intestine showing cells and nuclei by bright field microscopy. Nuclei are dark purple whereas cytoplasm is lighter and pink in colour. 400X.
There are additions you can make to a bright field microscopes to make specimens more visible e.g. 1) Darkfield 2) Phase contrast 3) Rheinberg lighting and 4) Polarizing filters.

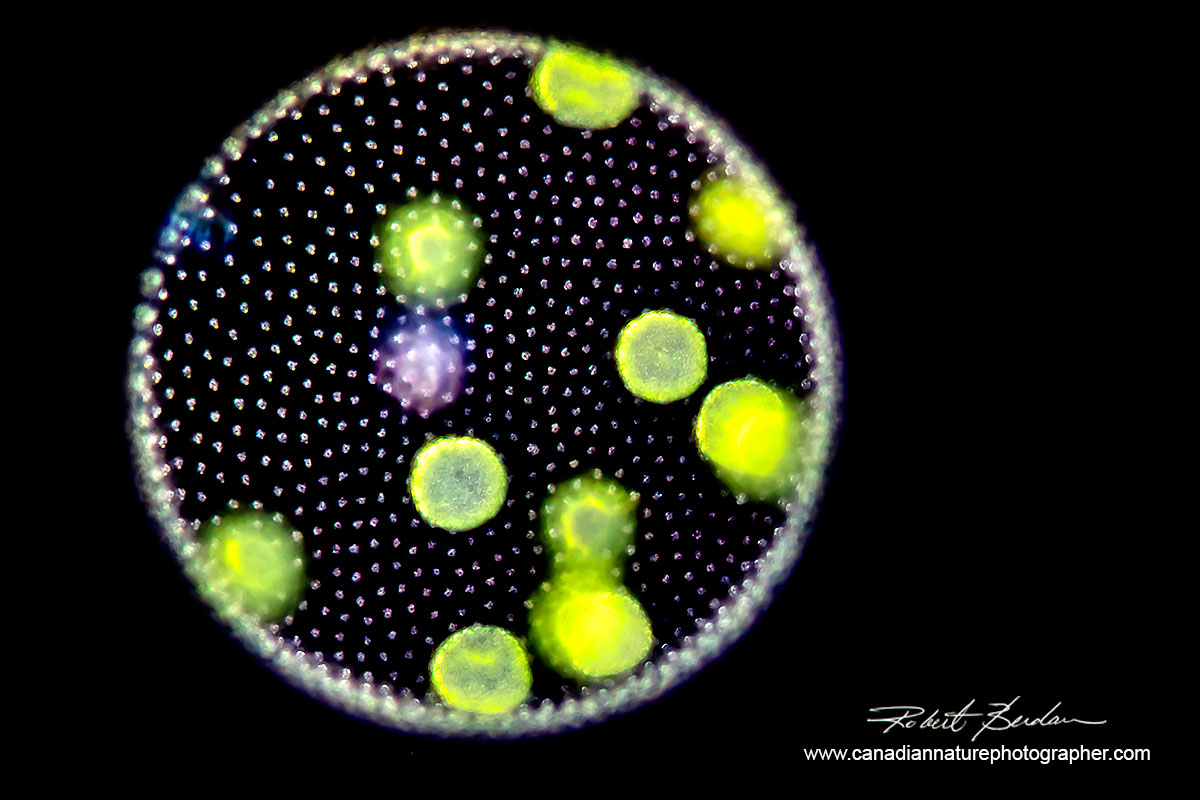
Volvox a colonial microorganism found in pond water viewed by Bright field microscope 100X
Volvox viewed by Dark field microscopy 100X

Volvox viewed by Phase contrast 100X

Above an aquatic ribbon worm photographed using Rheinberg lighting which uses coloured filters - you can buy a whole set of filters on E-bay for about $30 and they can be used with any compound light microscope - check out my article about Rheinberg lighting for more information and pictures.
All microscopes should have a dust cover - a clear plastic bag works but a proper cover is not costly. You will also need some lens paper or cloth to clean the optics from time to time. If you have a 100X objective oil immersion type you will need oil immersion fluid and you need to clean off the objective after use. To learn how to use oil immersion watch this video by Oliver Kim - generally oil immersion makes the specimen appear clearer, brighter and sharper. For viewing specimens with 4, 10, 20, 40X objectives you don't use oil immersion. Some 60X objectives are used dry others use oil - if it is an oil immersion objective it will say so on the objective.

Above is a Nikon Optiphot microscope which offers phase contrast, fluorescence and polarizing ability - it is a research quality scope. I purchased it from Kijjii and I was able to inspect the scope first. This microscope required quite a bit of work to refurbish it. I added a new LED lamp, several objectives and polarizing accessories and a used microscope like this would not be suitable for a new person to microscopy.

Autofluorescence of wood showing individual cells, photo taken with the used Nikon Optiphot microscope shown above. Robert Hooke first discovered cells in cork with his simple compound microscope in 1665. 400X.
Objectives (for geeks that want to know more)
The most important components of a light microscope are the lenses - specifically the objectives which are usually 4, 10, 20, 40 and 100X but there are also 1.3, 2.5, 60X objectives which are available for some microscopes. There are 4 main types of objectives and it is the quality of the objectives that are most important and they are in turn are usually the most expensive components of a light microscope. The cheapest objectives are Achromat objectives, the main issue with them is that only the center of the specimen viewed is sharp and the outer edges tend to blur and go out of focus (see below). They are usually corrected for one wavelength of light (green 550 nm) and so some folks use a green filter to achieve the sharpest photographs - but in practice they can be used for colour photomicrography.
The main problem with the Achromat objectives is that they do not offer a flat field and the edges of the field are blurred (see below). You can crop the images so they don't include the edge of the field or use Plan Achromats which are corrected and offer a flat viewing field which is important for good photography. There is some chromatic aberration (colour fringing) in these objectives, but one can correct this using image editors like Photoshop and unless you are perfectionist you probably won't even see this (you can also convert the image to black and white if colour is not important e.g. onion cell chromosomes shown below).
The next best objectives are called Plan Fluorite (Semi-apochromats) which are flat field corrected and more highly corrected for colour and photomicrography - they are also more expensive. The third type of objectives are Apochromats which are flat field, highly corrected for colour photography and are very expensive. The cost of a Plan Achromat is about 2X that of Achromat, a fluorite objective is about 5X the cost of an Achromat and an Apochromat can be 10X or more the cost of an equivalent Achromat objective. Achromats are fine to get started with, but if you can afford Plan Achromats they might be all you will ever need for photography. To learn more about objectives start with this article and if you want to know more about color rings on the objectives, working distance, and other features see Davidson and Abramowitz - free PDF on Zeiss Web site.
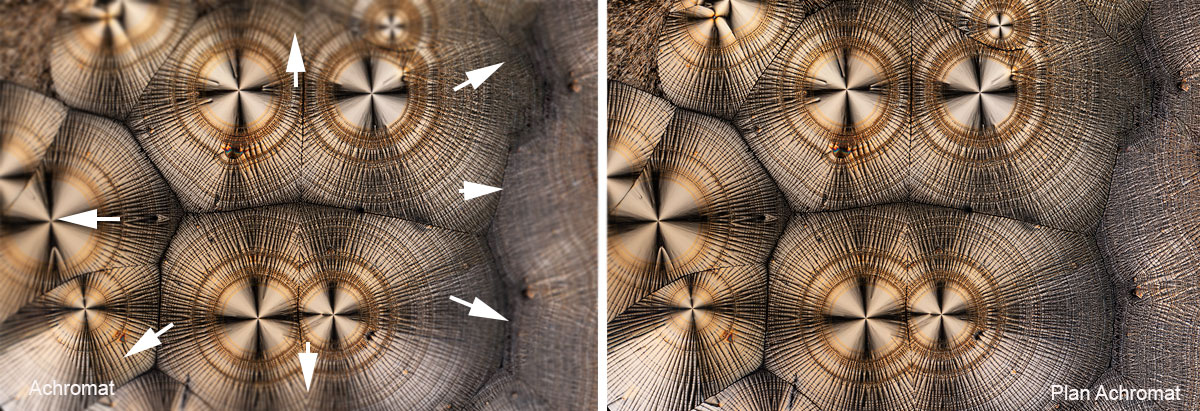
Left: picture of Vitamin C crystals photographed with an Achromat objective - note the edges where the arrows are pointing are out of focus - the center is sharp. Right: Photo of Vitamin C photographed with a Plan Achromat objective that is flat field corrected.
Most objectives being sold belong to one of two major groups - fixed focal length and infinity focal length. The most common types of objectives are those with a fixed focal length. Infinity corrected objectives started to become popular in the 1980s and permit the ability to place other components in the light path that modify the mechanical focal length of the microscope without affecting the optical quality. In the past most manufacturers of light microscopes used 160 mm as the focal length of their objectives (some companies provide the focal length in inches - convert inches to mm and divide 160\objective focal length in mm e.g. 2\3 inches = 16.74 mm 160\16.7 = 9.58X or 10X). A few microscope companies used 170, 180 or 210 mm mechanical tube focal length - read more. The important thing is if you are buying more objectives for your microscope whether it is used or new - make sure the objectives you are purchasing have the same mechanical tube length as your current microscope for the best image quality.

Above are three compound microscope objectives all 10X. Left is a 10X Olympus Phase contrast objective Positive Low (PL) pointing to the 0.25 Numerical aperture which is the same on the other 2 objectives. In the middle is a 10X Plan Achromat objective from AM systems costing about $20 and on right is an infinity objective from Zeiss costing hundreds of dollars. Note the Zeiss objective has a much wider thread diameter. Standard objective thread size (RMS - Royal Microscopical Society) is 20.32 mm but some microscopes use different thread sizes - read this article that describes objective features in more detail. Even if the objective thread size fits (and there are also adaptors which can be purchased to make them fit) unless the mechanical tube length is correct the image quality will suffer.
When purchasing new or used objectives check the mechanical focal length in order to get the best image quality with your microscope. AMscope.com offers microscopes with both infinity and 160 mm objectives for sale. Generally they are not interchangeable. Is one better then the other? From the point of what you see through the microscope not really. The advantage of the 160 mm objectives is that there are lots of used ones available, they will be cheaper and they are of excellent quality. It is only if you plan to add other features to your microscope that alter the mechanical focal length that the infinity objectives are better. Most if not all brand name microscopes sold today use infinity objectives and some of them can not be used with other brand name infinity microscopes.

Radiolarian skeletons - radiolarians live in the ocean and form intricate "glass" shells. 400X Dark field microscopy. Focus stack of images.
Fluorite and Apochromat objectives are costly and for most amateurs they are not worth the extra money. Objectives with higher Numerical apertures are brighter and useful for fluorescence microscopy and polarizing microscopy or any kind of microscopy where subject brightness is low. Plan Achromat objectives compared to Achromat objectives are definitely worth the extra cost if you plan to take photographs with your microscope. You can still use Achromat objectives for photography if you restrict the image to the center of the field and\or you crop the outer edge of the images. For example in the specimen below the outer areas of the photograph are black and an Achromat objective would be fine for this subject where edge sharpness is not important.

Above water mite with dark-field microscopy 40X
Objectives usually have the magnification inscribed along with the Numerical aperture (NA) which is a a dimensionless number that characterizes the range of angles over which the system can accept light. Higher NA objectives are more costly and offer brighter images. The purpose of adding immersion oil to a 100X objective is to increase the NA of the objective, making the image brighter and clearer.

Above plant cells from Bladderwort common in ponds. DIC microscopy 200X.
Above I describe that you can add polarizers, dark-field and, Rheinberg lighting to almost any bright field microscope. I recommend adding Phase contrast objectives and a phase contrast condenser if you can afford it. This will cost you between $600 and $1500 for a new no-name brand equipment. Phase contrast includes both phase objectives and a phase condenser with phase rings. Without going into detail about how phase works, the basics are that it creates contrast out of differences in refractive index of the intracellular organelles like mitochondria and the nucleus to make them darker (positive phase contrast) or lighter (negative phase contrast).

Above is a Desmid (Staurastrum) a single celled plant-like organism that lives in acidic pond water and I photographed it using Dark field microscopy 400X using the Nikon Optiphot.
Software to Simulate Phase Contrast and DIC microscopy
I have been searching for software that might simulate Phase contrast and DIC and although I found some science papers on the web none of these techniques have become a reality yet and the authors have not replied to my emails- but I think this type of software will become available in the future. However, adding Dark field, Rheinberg and polarizing filters to a compound microscope is easy, and affordable.

Pediculus capitis or Head louse bright field microscopy 40x
Magnification versus resolution (for geeks that want to know more)
Most light microscopes provide a maximum of 1000X magnification, some can provide higher magnification using 15X or 20X eyepieces, but you won't be able to see more detail or resolve things better. Resolution refers to the ability of the microscope to separate two objects that are close together. The resolution of light microscopes is about 0.2 microns (0.002 mm) which in turn is limited by the wavelength of light. There are special light microscopes that can detect objects closer together than this - usually fluorescent labelled substances and through image processing they can even detect single large molecules. This form of microscopy is called Super resolution microscopy, it's super expensive and used by research scientists.

Montage of freshwater Diatoms that form silica shells and live in freshwater lakes, ponds and rivers. 200X. Diatoms were used in the past to test the resolving power of the best objectives.
 Diatom (Pinularia) 400X DIC microscopy - Focus Stack. Depth of field is very limited at high magnification so to increase the depth of field many photomicrographers take several images at different depths and then stack them - I posted an article on focus stacking if you are interested. Of course when viewing the specimen you can simply focus up and down with the fine focus knob to see different levels - this is called optical sectioning.
Magnification in a light microscope is a combination of the objective magnification times the eyepiece magnification (e.g. 40X objective with 10X eyepiece gives 400X). I recommend 10X wide field high eye-point eye pieces and objectives 4, 10, 20 and 40X for viewing most subjects including bacteria. Most companies also provide 60X and a 100X oil immersion objectives (there are other types of objectives e.g. water immersion used for special purposes). These 60X and 100X objectives offer ability to magnify more than 400X but you are likely to use the the lower power objectives more often. If you would like an in depth discussion of resolution see microscope resolution at Microscopy U.
Resolution (r) = λ/(2NA)
or
Resolution (r) = 1.22λ/(NA(objective) + NA(condenser))
NA = Numerical aperture is a measure of the angle of the cone of light entering the objective.
λ or lambda is the symbol for the wavelength (colour) of light
(Download pictures showing optical magnification vs resolution provided by Doug Hayden - PDF)
If we use green light (λ = 550 nm) or 0.550 microns and divide this by the combined Numerical aperture of the objective and condenser it comes out to about 0.2 microns which is small enough to resolve bacteria (bacteria are usually between 0.5 and 10 microns). In optics, the numerical aperture (NA) of an optical system is a dimensionless number that characterizes the range of angles over which the system can accept or emit light. Higher NA allows more light to enter into the objective and objectives with higher NA cost more.
With oil immersion objectives the oil allows the objective to use the maximum NA and oil immersion is usually only available with some 60X and most 100X objectives. In my experience you will be using 4, 10, 20, and 40X objectives most of the time. The 4X helps you find subjects, and the 100X objective is used once in a while to resolve intracellular organelles like mitochondria, nuclei or small bacteria. I also use a 1.3 and 2.5X objectives for crystals and when I need really low magnification but these objectives require special condensers that provide a wider light cone. If you have a choice between a 20X or 100X objective - get the 20X you will use it more often. Also note that with 100X oil immersion objectives to get the maximum resolution you need to put oil on the slide between the objective and with some condensers with NA up to 1.25 also put oil between the glass slide and the condenser to create an "oil-sandwhich".

Above is a Stentor - single celled ciliate that lives in pond water. They grow up to 0.5 mm long. Magnification 100X DIC microscopy.

Above is a closeup of the cytoplasm of the Stentor - a ciliate that lives in pond water, showing the beaded macro-nucleus, cilia and symbiotic algae Chlorella living inside. 600X DIC microscopy.
3) Inverted or tissue culture microscope
An inverted microscope is usually used in hospitals and research labs for viewing live cells in culture. They can also be used to view aquatic microorganisms as most of these microscopes feature phase contrast optics. I buy special plastic dishes which use a coverglass on the bottom so they can be used for photomicrography. Before you buy a used inverted microscope, check out the cost of a new one, then consider what you are willing to pay. Some of the inverted microscopes I have seen online are over priced. I purchased an inverted Olympus Microscope shown below for $400, the buyer was asking for $2,000 - don't be afraid to bid low all they can say is no. When I received the microscope I needed to put in quite a bit of work to make it functional which is probably why they let it go for the low price. Back in the 1970s it cost about $10,000. I think an inverted microscope is good choice for someone that has had previous experience with microscopes. I don't recommend them as first microscope I think you would be better off searching for a stereoscope and\or a compound microscope first.

Olympus IMT inverted microscope about 40 years old that I purchased on E-bay and refurbished. The advantage of this particular scope is that it provides phase contrast even with objectives that don't have internal phase rings which is rare.
Eyepieces - for viewing and for photography.
After the quality of the objectives, the eyepieces are very important. Some eyepieces are specifically corrected for certain objectives. Also the design of the eyepiece influences how comfortable it is to look through the microscope. I prefer eyepieces with a high eye-point so even eyeglass wearers can use them and I also prefer super wide field of view as opposed to those with tiny key-holes for viewing (see picture below). Some eyepieces have rubber eye-cups which block out extraneous light. Good eyepiece can be expensive, but when you buy a microscope make sure you look at the eyepieces to see if they have a wide field of view or have tiny holes. The eyepieces with tiny holes maybe good quality, but they are not comfortable for viewing specimens for several hours.

Above are three eyepiece, those with small ocular view ports are less comfortable to look through than those with wider openings. The eyepiece on the right is the most comfortable to look through but also the most expensive. Good eyepieces are worth paying extra for if you plan to spend a few hours viewing specimens. Also note that in most instances eyepieces for a stereoscope will not fit a compound microscope because their diameters are different. Bottom line is pay attention to the eyepieces included with the microscope you are considering and get the widest openings you can afford. Usually a good set of eyepieces can be purchased for a few hundred dollars and it's one way you can upgrade your microscope - most companies use the same tube diameters, but check the diameter before you buy.

Rotifer viewed by Dark field microscopy 400X
Eyepieces for Photomicrography
For taking pictures with your microscope (photomicrography not microphotography) it is best to use eyepieces that are designed with flat-field projection. Olympus made NFK eyepieces with magnifications 1.6, 2.5, 3.3, and 5X that are common on E-bay and can be used with most other microscopes. The lower magnifications account for the longer tubes used to attach a digital camera. I usually use a 2.5X eyepiece for photography, the 1.6X is rare and sells for over $500 on Ebay so I have not acquired one yet. Some microscope companies will offer their own photo-eyepiece and tube, my Zeiss eyepiece and tube alone cost me about $1000 - it works great and for this price it should.
You can buy a camera adaptor where no eyepiece is required and it joins to a digital single lens reflex camera for $20, but the image has vignetting around the edge. AM systems sells an adaptor for Nikon and Canon Cameras for about $100 with an eyepiece and it works well (see pictures of these adaptors in my article - Tips on How to Take Better Pictures with a Microscope).

Water fleas (there are many species) Simocephalus sp. with eggs and Vorticella living on the outer carapace. Water fleas provide food for other invertebrates and small fish, they are common in lakes and ponds. Dark field microscopy 100X. 1 micron = 0.001 mm. To see more pictures of Water fleas see my article (identification courtesy Josh Grosse).
Microscope Lighting
In the early days microscopists used a candle light and\or a mirror with window light. Many of the older microscopes come with a mirror and they offer the ability to use many kinds of light sources. Many of the built in microscope light sources are not that bright. One fellow on E-bay (web site Retrodiode) has built 2 - 20 Watt LED (light-emitting diodes) lights for my older microscopes for a few hundred dollars each and they work great. I recommend the brighter 20W version for photomicrography. LED's should last thousands of hours whereas the normal 12 V bulbs last only a few hundred hours and are getting harder to find. Also the LED lamps are close to daylight in colour temperature and need less colour correction. For my Zeiss Axioscope I purchased a 100W Tungsten lamp, the brightest they offered, in order to be able to use high shutter speeds during photomicrography. Some microscopists have adopted an electronic flash to their microscope light source (e.g. Ron Neumeyer, Flash Photomicrography, David Walker, Charles Krebs).

Above is a longitudinal section through an onion root at low magnification. This is from a prepared slide where the cells have been stained. This type of slide is used to study mitosis (cell division) and a higher magnification it is possible to see chromosomes in the dividing cells. 50X.
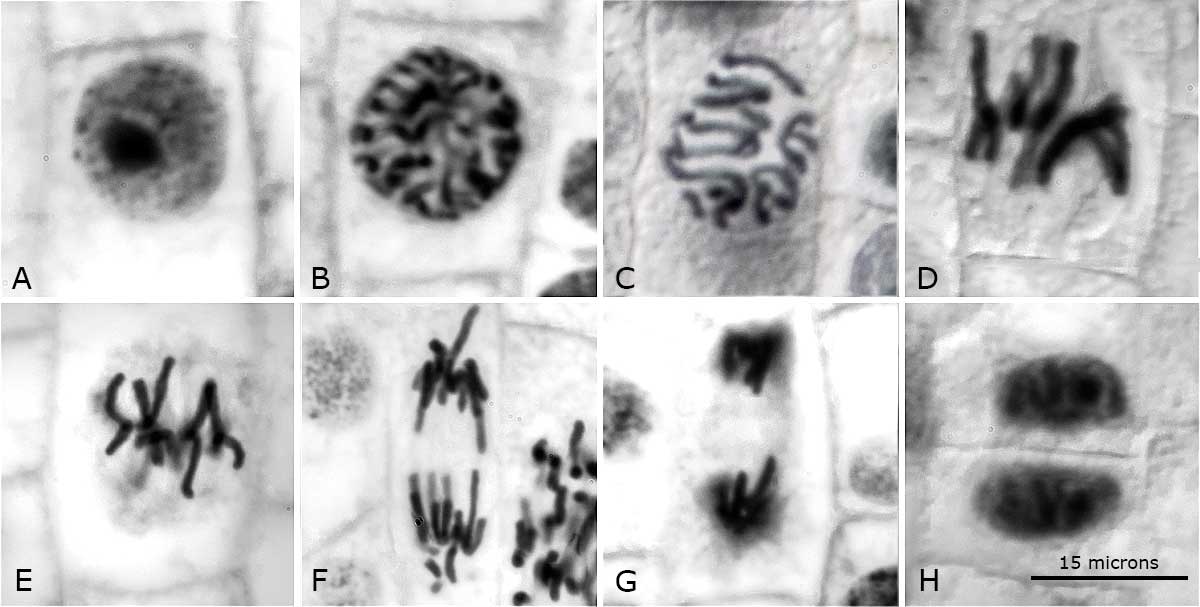
Higher magnification pictures of onion cells viewed with bright field microscopy showing cells in different phases of the cell cycle. A) Interphase B) Early Prophase C) Late Prophase D-E) Metaphase F-G) Anaphase and H) Telophase - see Wikipedia for more information on the Cell Cycle. There are 16 chromosomes in a normal onion cell. About 600X.
Some photomicrographs I see on the web and in books are not colour corrected and the backgrounds are yellow with uneven illumination. This is simple to fix by centring the lamp, using an LED light source, a frosted blue filter or correcting the white balance of the image in Photoshop and using Köhler illumination. Zeiss describes the steps for Köhler lighting that can be applied to almost any compound microscope and it's worth learning.

Above cross section through a plant leaf showing the individual cells from a prepared slide using bright field illumination. This is a panorama stitch of several images. 40X
The Condenser
The microscope condenser fits under the microscope stage and has three functions: 1) is to concentrate and focus light onto the specimen 2) is to control the diameter of the cone of light with an iris diaphragm and 3) it can hold filters e.g. blue, green, dark-field or of the Rheinberg variety and can be used to create oblique illumination. Their are different types of condensers - a basic condenser is usually provided with most microscopes, cheap microscopes simply have a disc with different sized holes in it (e.g. the Russian made microscope shown at the top of the page).
Some condensers are specialized for Phase contrast, Differential Interference microscopy, Dark field or for use with very low magnification objectives e.g. 1.3X Plan Achromats. A phase condenser is nice because it also has a bright field mode that can be used with any of the objectives. For beginning users it is usually sufficient if the microscope simply has a condenser. To learn more about substage condensers see this article on the Olympus web site.

Above onion skin cells that were stained and viewed by polarized light microscopy 200X
Metallurgical Microscope
Finally, there is a 4th type of light microscope that is used in metallurgy both upright and inverted versions and they are not as common as the other microscopes. These microscopes uses epi-illumination, that is light that comes from above and sends light down through the objectives to provide reflected light. With this microscope you can view opaque subjects like metal surfaces up to 400X. I purchased and refurbished one recently. It is a specialized microscope that I don't recommend for newcomers, but I am hoping to use it to photograph butterfly scales and other biological specimens. Some metallurgical microscopes offer reflected DIC used for examining metal surfaces or microchips - I don't have any experience with them, but they would not suitable for viewing cells or pond microorganisms.

Metallurgical Microscope for viewing opaque specimens
Buying a Brand Name Microscope
Zeiss, Leica, Nikon and Olympus have built a reputation over decades and their used microscopes if in good condition are excellent. If you have the money these companies also offer high quality new microscopes but you will pay accordingly for them - all of their new scopes use infinity optics and objectives.
Because of the past popularity of brand name microscopes there are also lots of accessories available on E-bay that you can purchase for their older microscopes. When buying if you are new - don't over purchase as you might not find microscopy that engaging - it's hard for me to imagine this - but just in case. You can always resell your microscope, usually with some depreciation on the microscopes original value.

Radiolarians are singled cell oceanic plankton photographed with an Olympus E microscope on Kodak Technical pan film over 40 years ago. Darkfield microscopy 400X
If you are a biologist or love to study wildlife and nature a microscope will likely provide years of satisfaction. It's like a good pair of binoculars, if you like to watch birds and other animals you will get a life time of enjoyment from them. Getting good pictures with your equipment is as much about the skill of the photographer as the quality of the equipment. I do acknowledge that equipment can sometimes be a limiting factor but most of the time it is the operator's skill and knowledge that is more important.
Beware of companies that sell a microscope with a computer and some software for several thousand dollars and claim you will be able to analyze blood and diagnose illnesses with their limited training - they are a scam - stay away. To analyze blood you need to be properly trained and the equipment they provide is often cheap and the training of little value.

Above single celled Paramecium caudatum - single celled ciliate common in pond water. 400X DIC microscopy.
Tip - before you buy a used microscope, search Google and see if you can find and download the manual as a PDF for the specific microscope you are considering and research the cost of similar used and new microscopes.
Tip - there are microscopy forums where you can ask questions and advice about microscopes and I highly recommend that you spend some time in them before or after you buy a microscope. You may get different opinions, but most of the opinions are helpful and the individuals genuinely want to help you. See links to the forums below.

Chironomid Rheinberg lighting 50X

Plant cells and stomata (oval objects) through which plants can exchange gas. 400X DIC microscopy.
Foldscope Paper Microscopes (Low cost paper microscopes)
 Foldscope is an affordable paper microscope. Designed to be portable, durable, and to give optical quality similar to conventional research microscopes (magnification of 140X and 2 micron resolution). Their cost varies from $1 to $40 and they were developed to allow a microscope to be used by those that could not afford a conventional microscope such as in underdeveloped countries or for children - watch Youtube video. I have not used one of these microscopes so I can't comment on their quality, but they are worth looking into for those with limited funds - www.foldscope.com. I will get a hold of one, test it and write an article in the future. You can download the original paper that describes these paper microscopes - download PDF.
In Summary
If you don't want to do a lot of reading or research before you buy and you are not experienced with a microscope I think that you will find that a new Chinese brand microscope for under $500 will satisfy you. If you have extra money add Phase contrast. If you don't plan to take photographs try to get a binocular head for comfortable viewing, otherwise a trinocular head is essential for good photomicrography. If you find your interest increases you can always sell what ever microscope you purchased and buy a better one. I suggest that the amount of research you do should be proportionate to the amount of money you plan to spend. If you are interested in microscopes for young children see some of the links I provide below.
A stereomicroscope makes a nice first scope for any age and is easy to use and makes a great companion to a compound microscope. Used brand name microscopes if in good working condition are excellent investments but I recommend them for experienced microscope users or try to purchase one from a reputable seller. The Chinese made microscopes I have tried were excellent value and they are good way to get started. I can't comment on how long lasting they might be, but if your interest in microscopy increases you can always upgrade later to a better quality scope.

Blue-green algae (Oscillatoria) DIC microscopy. 800X
If you live in the Calgary area and you are interested in learning about microscopes I offer training, personal instruction and if you are under 18 interested in microscopy I would be happy to provide a free introduction to microscopy in my home lab accompanied by an adult or parent, just email or call me (403 247-2457) to set up a date and time. I would also like to start an amateur microscopy group in Calgary in the future if there is enough interest - if you are interested contact me. RB
Acknowledgements: I would like to thank Dr. Richard Howey, Dr. Sharif Galal and Doug Hayden for suggestions, documents and comments on a draft of this article. Note all photos in this article were taken with Nikon and Canon cameras. I photograph using RAW files and process the images in Photoshop. I am not affiliated with any microscope company and I receive no compensation for recommending or linking to their website, my recommendations are based solely on my experience.
References and Links
Videos
Top reasons why amateur microscopy is a great hobby by Oliver Kim - Youtube
Buying Advice for Microscopes by Oliver Kim the Microbe hunter - Youtube
Brand vs No name microscopes by Oliver Kim the Microbe hunter - Youtube
Stereo vs compound microscopes for beginners by Oliver Kim the Microbe Hunter - Youtube
Adding Phase contrast microscopy by Olver Kim the Microbe Hunter - Youtube
Microscope eyepieces by Oliver Kim the Microbe Hunter - Youtube
Different microscope cameras and adaptors by Oliver Kim the Microbe Hunter - Youtube
Microscope tutorial Youtube video
Using the microscope by Oliver Kim the Microbe Hunter - Youtube
How to see bacteria with a microscope by Oliver Kim the Microbe Hunter - Youtube
Basic Microscope Use and Setup
How to use a microscope
Using a microscope - The parts and how to focus - very basic
Measuring with a Microscope using Eyepiece Graticule & Stage Micrometer
Foldscope: Origami Based Paper Microscopes - Youtube
Microscopy Articles and Web sites
Optical Microscopy by MW Davidson and M. Abramowitz - Detailed review - free PDF
Microscopy from the beginning - an overview of microscopy by Zeiss - free PDF
Introduction to Microscopy
Reviving and Old microscope
Zeiss - instructions for setting up Köhler illumination.
Three best microscopes for Kids
10 Things to know before buying a microscope
The $1 Pocket Microscope
Using a Flatbed and Slide Scanner as a Low Power Microscope
Advice on Microscopes for children - The Quekett Microscopical Club
Buying a cheap microscope for home use - PDF
Live Cell Imaging Resource Laboratory at University of Calgary
The McCrone group - microscopy school
How to use a microscope for schools
4 Worlds to Explore through a Stereo microscope includes some videos.
N. Kaur et. al. (2017) Buccal Barr Bodies: Accuracy and Reliability in Sex Determination - PDF
Microscopy Today Online - Free online magazine about Microscopy
Microscopy UK online magazine and web site
J.S. Cybulski et al. (2014) Foldscope: Origami-Based Paper Microscope - PDF
Cleaning a Microscope and Care
Zeiss - The Clean Microscope - instructions for cleaning a microscope - PDF
Zeiss - Quality microscope instructions to care for a new stereoscope from Doug Hayen - PDF
Microscope and Accessory Sellers
Quality Microscopes - Zeiss Dealer in Calgary NW specializing in stereoscopes
Zeiss Microscopy
Leica Microscopes
Nikon Microscopy
Olympus Microscopes
Unitron Microscopes
AMScope - Chinese made
OMax
Microscope - Chinese made
Motic Microscopes - Chinese made
Valley Microscope - slides, accessories etc
Brunel Microscopes Ltd in UK has a wide range of scopes and accessories
Vermont Optechs - many used microscopes
Olympus Microscope and Photographic equipment by Alan Wood - details older equipment.
Retro Diode - makes custom LED lights for older microscopes - I purchased 2 20W LEDs
MicroscopeNet.com
Microscope Central
Microscope.com
AZ Microscope located in London, Ontario - light bulbs, used microscopes and repair services
Home Science Tools - Microscope Gift Guide for Kids
Foldscope - is an ultra-affordable, paper microscope magnifies 140X - approx $40 US
Microscopy Web sites and Forums where you can share information and ask questions
Oliver Kim's Web site and online microscopy forum for amateur microscopists
Photomacrography.net - international forum on macrophotography and photomicrography
Yahoo Amateur Microscope Club
Mikro-Forum - in German - use Google to translate if you can't read German
The Quekett Microscopical Club
The Micro-Naturalist - located in British Columbia
Micscape - online microscopy magazine with thousands of great articles for amateurs
Microscopy Society of Canada
Related Microscopy Articles by Robert Berdan on this web site
1. Crystals Photographed with Polarization Microscopy
2. Photomicrography of Hydra - a model for studying regeneration and aging
3. Photographing Daphnia
4. Photographing Gastrotrichs
5. Photographing Rotifers
6. Photographing Ciliates
7. Photographing Stentors - A Large Unicellular Protozoan (ciliate) living in Freshwater
8. How to Collect and Photograph Water Bears (Tardigrades).
9. Tips on How to take Better pictures with a Microscope
10. Microscopic Pond Organisms from Silver Springs Calgary
11. Microscopic Life in Ponds and Rainwater - Pond Scum I
12. Photographing Microscopic Plant and Animal Life - Pond Scum II
13. Photomicrography and Video of Protozoa, Volvox and Rotifers
14. Home Microscopy Laboratory for Photomicrography
15. The Art & Science of Photomicrography with Polarized Light
16. Photographing Through a Microscope Photomicrography - Inner Space
17. Focus Stacking comparing Photoshop, Helicon Focus and Zerene
18. Rheinberg Filters for Photomicrography
19. Scanning Electron Microscopy - Photography
20. Photomicrographs of Diatoms from 1877 by John T. Redmayne
Authors Biography & Contact Information
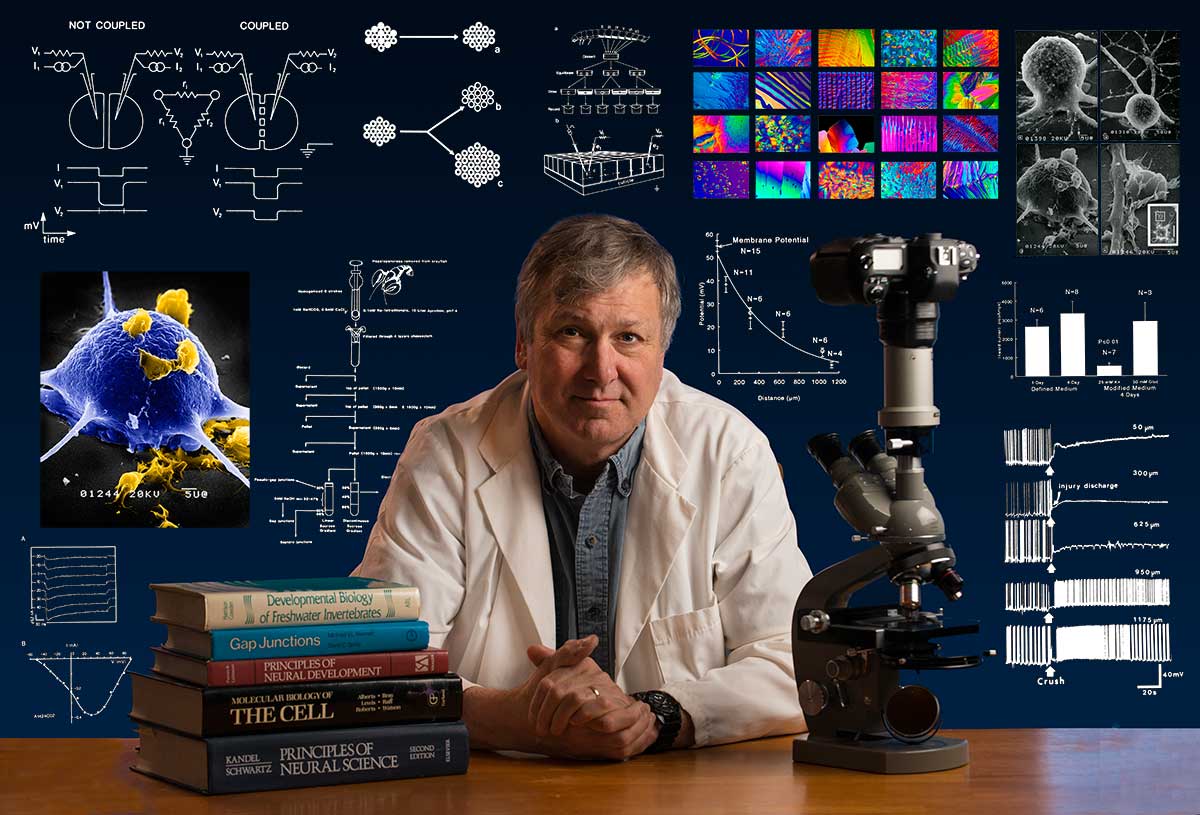
Bio: Robert Berdan is a professional nature photographer living in Calgary, AB specializing in nature, wildlife and science photography. Robert retired from Cell\Neurobiology research to take up photography full time years ago. Robert offers photo guiding and private instruction in all aspects of nature photography and Adobe Photoshop training - including photomicrography and macrophotography. Portrait of Robert Berdan with pictures from some of his science publications taken by Dr. Sharif Galal. His first research microscope is shown on the right.
Email at: rberdan@scienceandart.org
Web sites:
www.canadiannaturephotographer.com
www.scienceandart.org
Phone: 9 am -7 pm MST (403) 247-2457.