
Polarization Microscopy
The Motic BA310 Polarizing Microscope a Review
by Dr. Robert Berdan
Revised Feb 3, 2021

Potato starch grains by polarizing microscopy - Motic BA310 Polarizing microscope and Moticam ProS5 lite dedicated camera. The grains show the Maltese cross which represents isotropic regions in the starch grains showing the dark background created by the crossed polarizers. Colours are due to crystal-like properties of the starch made up of amylopectin and amylose 400X - learn more about starch.
A polarizing microscope can be used to identify a wide variety of substances. They are often used in forensic science, chemical analysis, and biological studies to help provide information about the molecular arrangement of certain macromolecules e.g. wood, hair, muscle and microtubules. Any bright field microscope can be converted into a basic polarization microscope by adding a polarizer above the lower light source and an analyzer above the specimen and objectives. Ideally the analyzer is placed in the binocular or trinocular head so the image viewed with polarized light can be viewed with both eyes.

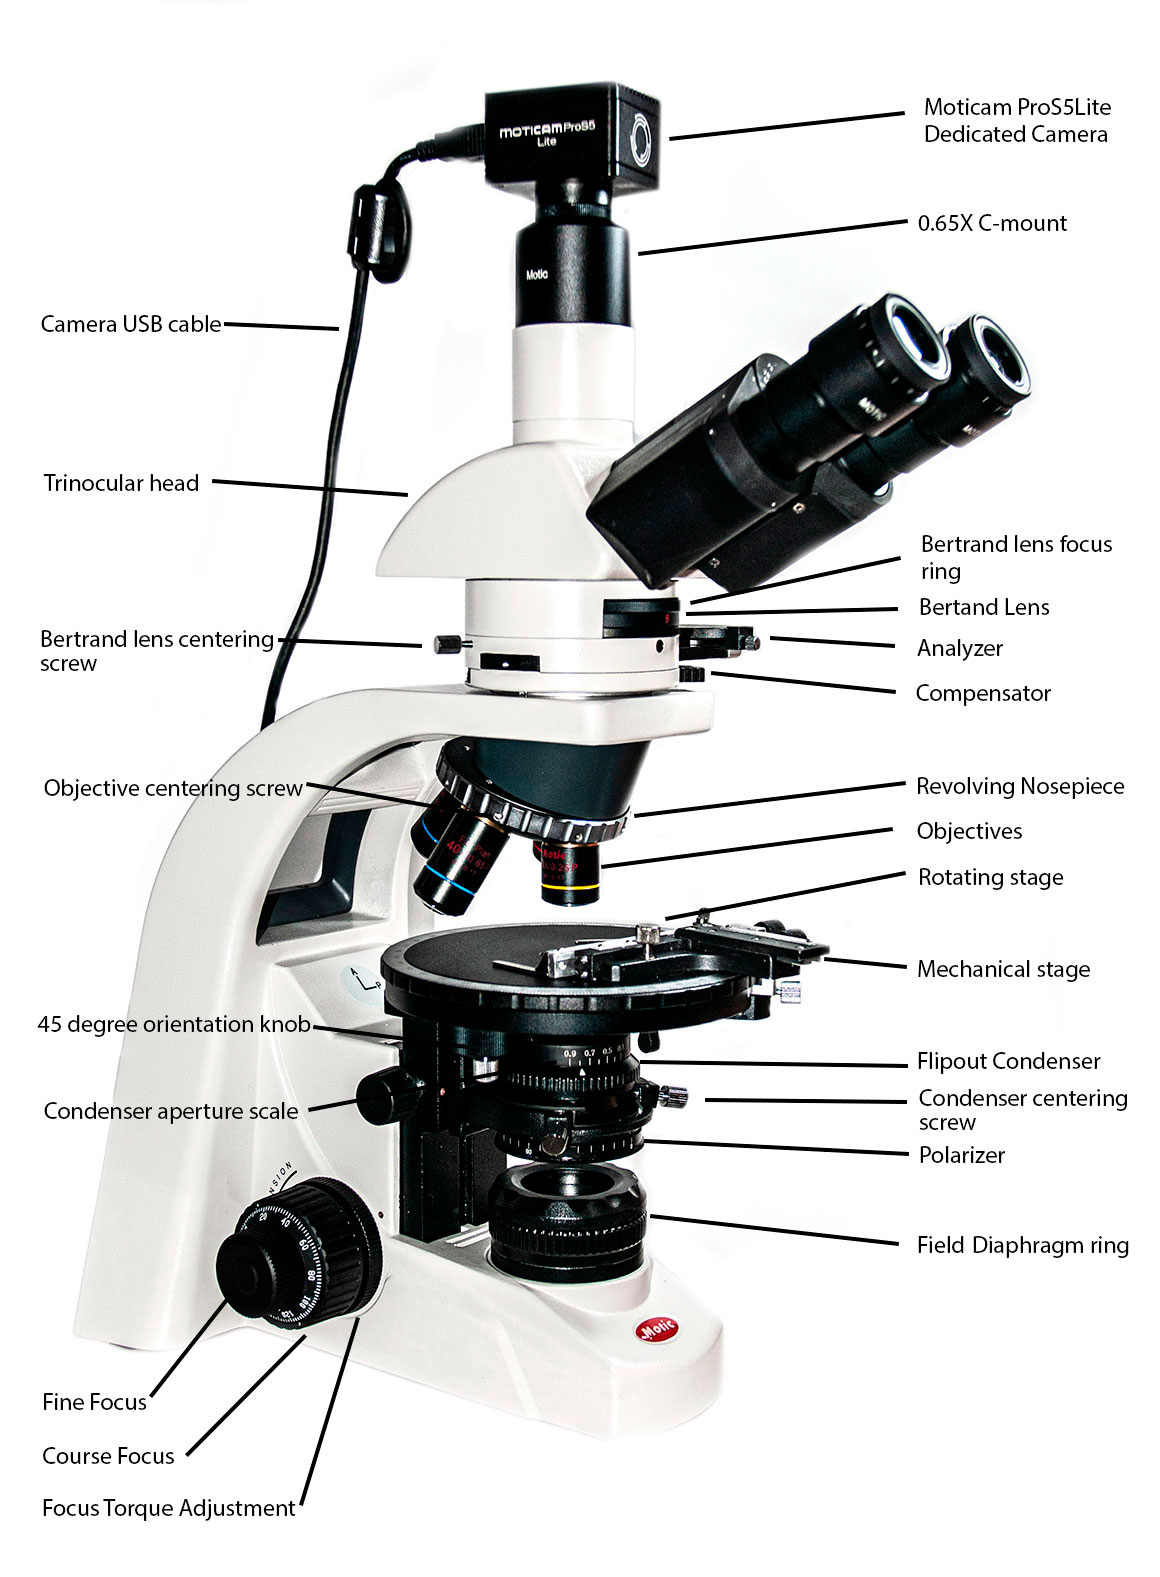
Motic BA310 Polarizing microscope shown with trinocular head - Prices start under $4000
Motic was established in 1988 and its headquarters are in Hong Kong; they are a publicly traded company. In the late 1990's the company began to develop affordable microscopy solutions, imaging hardware and application software. They employ over 2000 and have sales offices in Canada, US, Germany, and Spain. Motic uses ISO 9001 quality managment to deliver consistent quality. Motic sent me a BA310 Polarizing microscope (shown above) to evaluate - in short I was so impressed with the microscope I purchased it from them.

Copepod viewed by Polarized light using the BA310 microscope 400X showing striated muscle in this aquatic invertebrate. Photographed with a DSLR camera and Motics DSLR adapter and 2.5X photo eyepiece.
The Motic BA310 microscope comes with two different trinocular heads, one that when the trinocular head prism lever (see photo above top right above the logo) is pulled out all of the light is directed to the camera (0:100). Some trinocular heads have a 20:80 split where 20% of the light continues to go to the eyepiece and 80% to the light is directed to the camera when the lever is pulled out. Both options are good - if your specimens are thick and you need more light for photography you might prefer the 0:100 model. The model I received had a 20:80 split which allows me to view through the binocular eyepieces and examine the image on the computer screen via the USB (universal serial bus) connected camera. This permitted me to adjust colours on the monitor to be close to what I saw through the scope. I own other microscopes with both types of trinocular head.

Tardigrade (water bear) in polarized light showing the internal muscles coloured blue and orange and the stylet on the anterior end (bright white) is used to pierce plants while the pharyngeal muscles are bright yellow. 100X Photographed with DSLR (digital single lens reflex camera) using polarized light and a compensator.
A microscope specifically designed for polarization has a polarizer below the condenser oriented East-West that can be rotated. There is also a polarizer above the objectives that is oriented North-South that can be inserted or removed and in a proper polarizing microscope it can be rotated in precise increments. A proper polarizing microscope has a slot below the analyzer for insertion of various retardation filters also called compensators which include: 1) 530-550 nm full wave retardation filter 2) 1\4 wave compensator 3) quartz wedge 4) Berek compensator or 5) Sénarmont compensator - there are other types as well. Compensators are used to determine the precise birefringence of a specimen and the sign of elongation of substances which in turn is used to identify the substance and other molecular properties. For crystallographic studies a proper polarizing microscope has a Bertrand lens which can be inserted and used with a 40X, 50X or 60X objective to examine interference patterns of the crystals revealing information about their structure and symmetry.
Vitamin C crystals 100X Polarized light photographed with the Moticam ProS5 Lite camera.
I own several microscopes that are capable of taking polarized light photographs - after testing the Motic BA310 polarizing microscope those microscopes are now for sale - check Kijjii Calgary or contact me if interested.

Section through White pine wood using polarized light and full wave retardation filter 100X. Photographed with a DSLR.
The Motic BA310 polarizing microscopes price starts under $4000, but to put this in perspective I received quotes from two other major microscope manufacturers for a polarizing microscope that exceeded $20,000. Motic's reasonable price is the first reason I liked this scope. The second reason is that the quality of mechanics and optics are very good, better than any other microscope in its price range and similar in quality to more expensive brands. The circular stage and focus controls operate smoothly. The third thing that impressed me was the wide field field eyepieces, the eyepiece tubes are 30 mm in diameter, which is larger than older scopes which use 24 mm diameter eyepiece tubes. Wider is better in this case and makes viewing more comfortable. The fourth thing was the accessories that come with this microscope are specifically designed to do both qualitative and quantitative analysis using polarized light. I believe this microscope is suited for advanced amateur microscopists, college and university students (not high school students), graduate students engaged in research, petrographers, foresenic scientists, higher teaching institutions or any professional needing a quality polarizing microscope.

Damsel fly larva Polarized light 40X Motic 310 Polarizing microscope and Motic DSLR adapter with 2.5X eyepiece.

Damsel fly larva Polarized light 100X Motic 310 Polarizing microscope and Motic DSLR adapter with 2.5X eyepiece.
The circular stage has fiducial markings and has a lock which is used for photomicrography. Under the circular stage there is a 45 degree stage orientation device so that when the stage is rotated it has a click-stop and locks in place. This time saving device is used when specimens are rotated 45 degrees to the crossed polarizers for viewing. With this device you don't have to look at the stage vernier to know you are in the correct position.

The microscope also contains a built in Bertrand lens with a focus knob that is used for viewing anisotropic crystal interference patterns. Anisotropic substances have 2 or 3 refractive indices and permit light to pass through a pair of crossed polarizers. A Bertrand lens is placed above the Analyzer and once rotated into position (polarizer and analyzer should be crossed), you can then view interference patterns in what is called Conoscopic imaging; normal viewing with the microscope is called Orthoscopic viewing. Conoscopic viewing with a polarizing microscope is used to discriminate between uniaxial and biaxial crystals, confirm cutting surface orientation in crystals and determine the difference between normal and negative crystals.
If you own a polarizing scope and do not have a Bertrand lens, you can still see the interference pattern from certain crystals by removing an eyepiece and looking down the tube - the interference image is small but can be more easily seen using a phase telescope. When using conoscopic imaging use a high power objective e.g. the 40X, 50X or 60X so that the crystal fills the frame. The shape of the pattern changes as you rotate the stage. Watch the movie below by Motic that shows the interference pattern for a piece of Mica (muscavite) while rotating the stage - YouTube video. You can purchase Mica for viewing a biaxial interference pattern on Ebay.
Muscovite (Mica) under the polarization Microscope BA310Pol EC Plan 50X using the Moticam 10 by Motic - you can also watch the movie on YouTube.
 Mica (Muscovite) Biaxial interference pattern produced with a Bertrand lens.
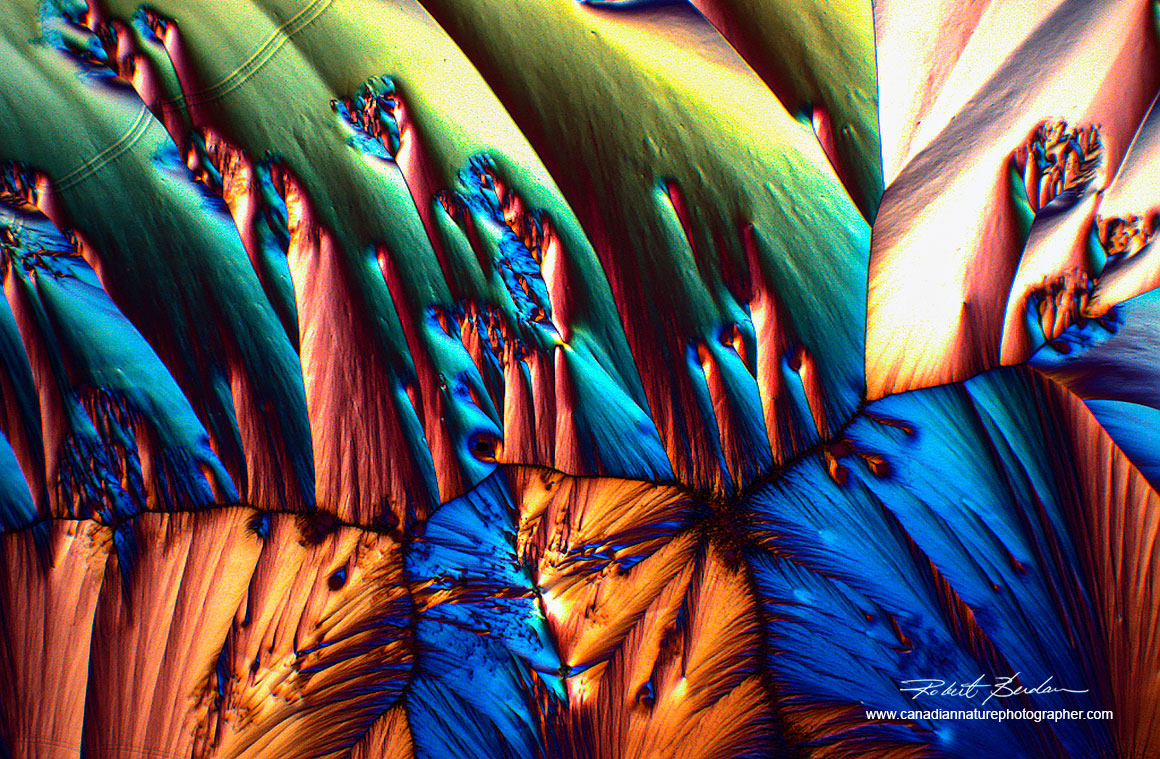
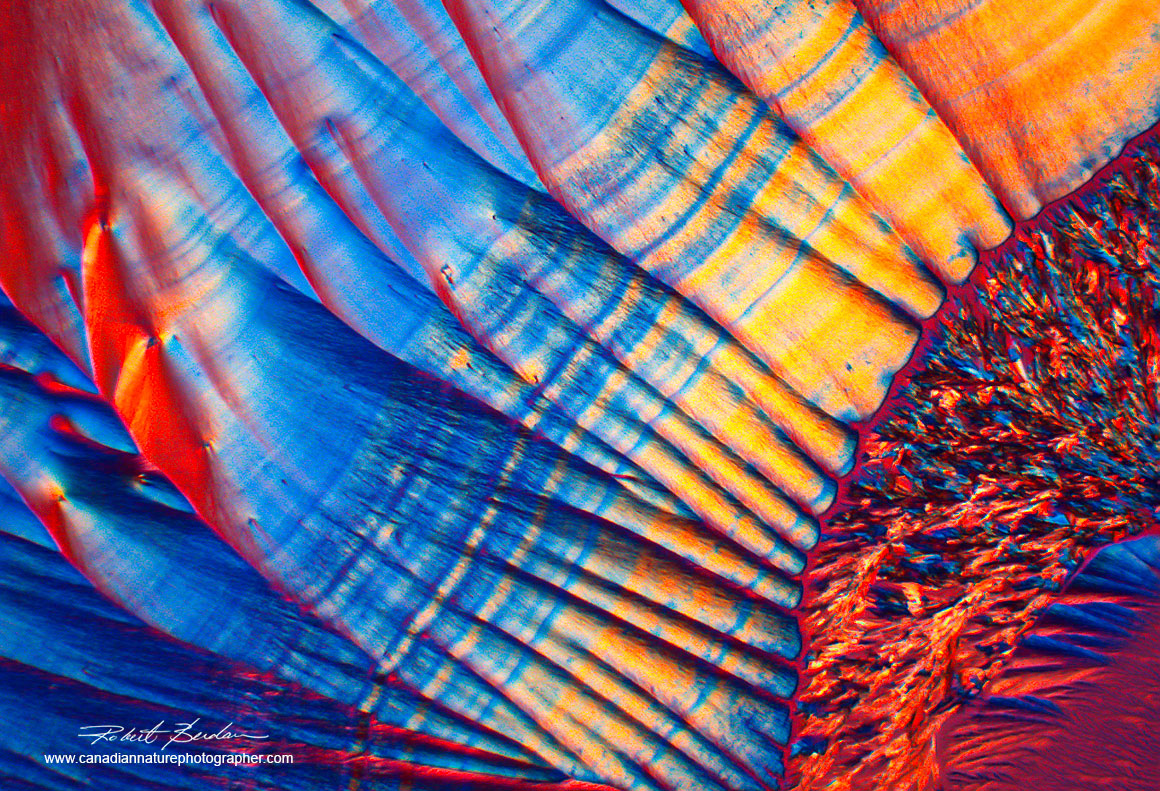
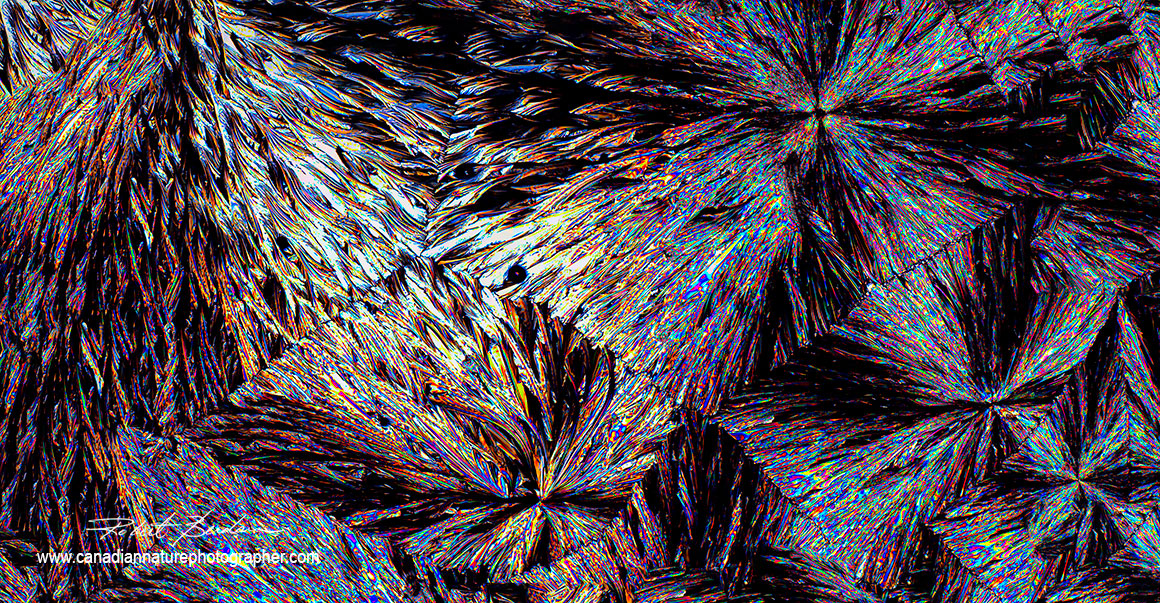
A polarizing microscope can determine the refractive index of a specimen which is unique to the substance. For those interested in photographing beautiful interference colours of various crystals, polarized light results in some of the most saturated colours available and the images make beautiful art prints. To learn more about how to create crystals and view them in polarized light see my article: Crystals Photographed with Polarization Microscopy: Water, Beer, Caffeine, Vitamins, Amino Acids and Human Tears on this website.
Vitamin C crystals taken with Moticam ProS5Lite dedicated camera 100X

Vitamin C crystals Polarized light and full wave retardation filter. Moticam ProS5Lite dedicated camera. Panorama of several frames stitched together and processed in Photoshop.
Vitamin C crystal in polarized light taken with Moticam ProS5Lite camera 100X. To get the best pictures with this camera I needed to turn the camera gain down and adjust the RGB color sliders manually with the Moticam software.
When testing this scope I wanted to take some large panoramic photos of crystals. Most polarizing microscopes come with stage clips to hold the slides and the slides are usually moved by hand. The Motic microscope included clips, but I found that moving the crystals by hand made aligning adjacent images for a panorama difficult. A mechanical stage can make the processing of moving the slides and aligning them much easier. Motic offers a mechanical stage, but I had purchased several economical ones for $20 on Ebay previously. I had to remove two metal pins on my mechanical stage and I attached it to the circular stage using a threaded pin and it worked beautifully (shown in photo above). Motic also offers stitching software called EasyStitchPro that automatically stitches images, but there are many stitching programs to choose from. I prefer to use Photoshop for most of my image processing. No matter what the resolution of your microscope camera might have by stitching several images together you can make almost any size photograph.

Vitamin C crystals taken with the Moticam SPro5 Lite 5MP camera- I combined 16 images that were taken with a 10X objective.

Vitamin C crystals taken with Moticam SPro Lite 5MP camera - I combined 16 images into a panorama. To view a high resolution version of this image 13.2 Megabytes in size Download it here.
Vitamin C crystals taken with the Moticam SPro5 Lite 5MP camera- 16 image panorama taken with a 10X objective.
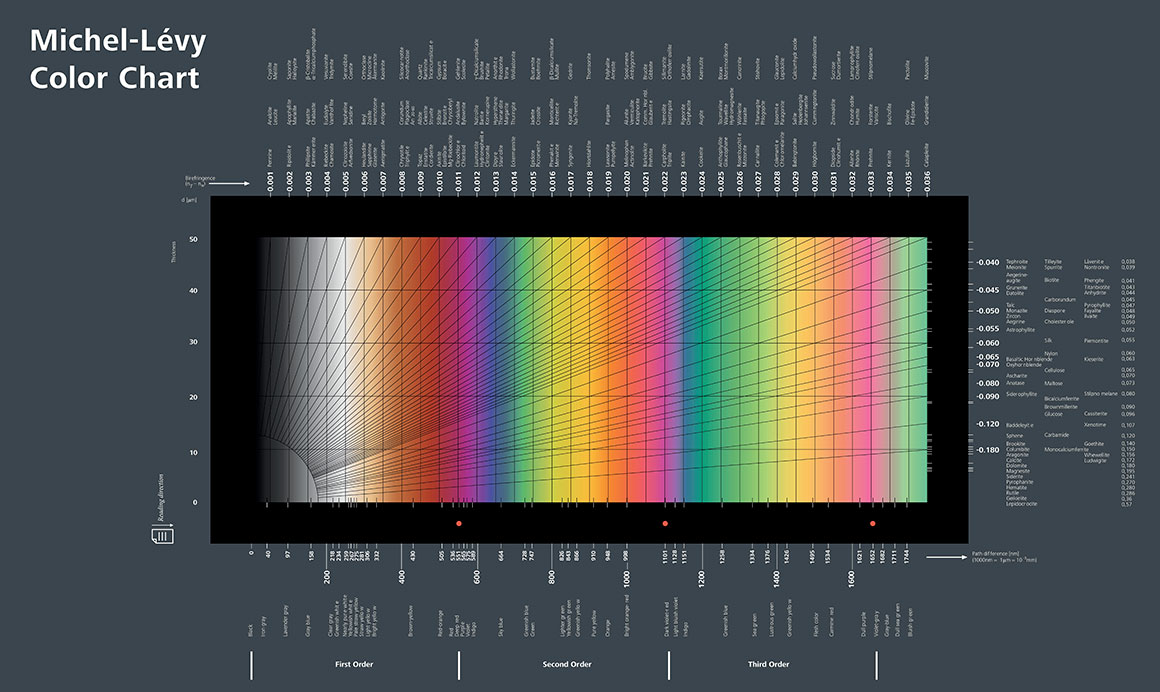
Above is a Michel-Lévy interference chart which is widely used with Polarization microscopes to identify substances. If one measures the thickness of the fiber or crystal and identifies the interference color in polarized light it is possible to determine the birefringence and the substances' refractive index which can be used to identify it. This chart is available from Wikipedia in higher resolution and is often included in books on polarizing microscopy. A Michel-Lévy color chart is included with the BA310 Polarizing microscope.
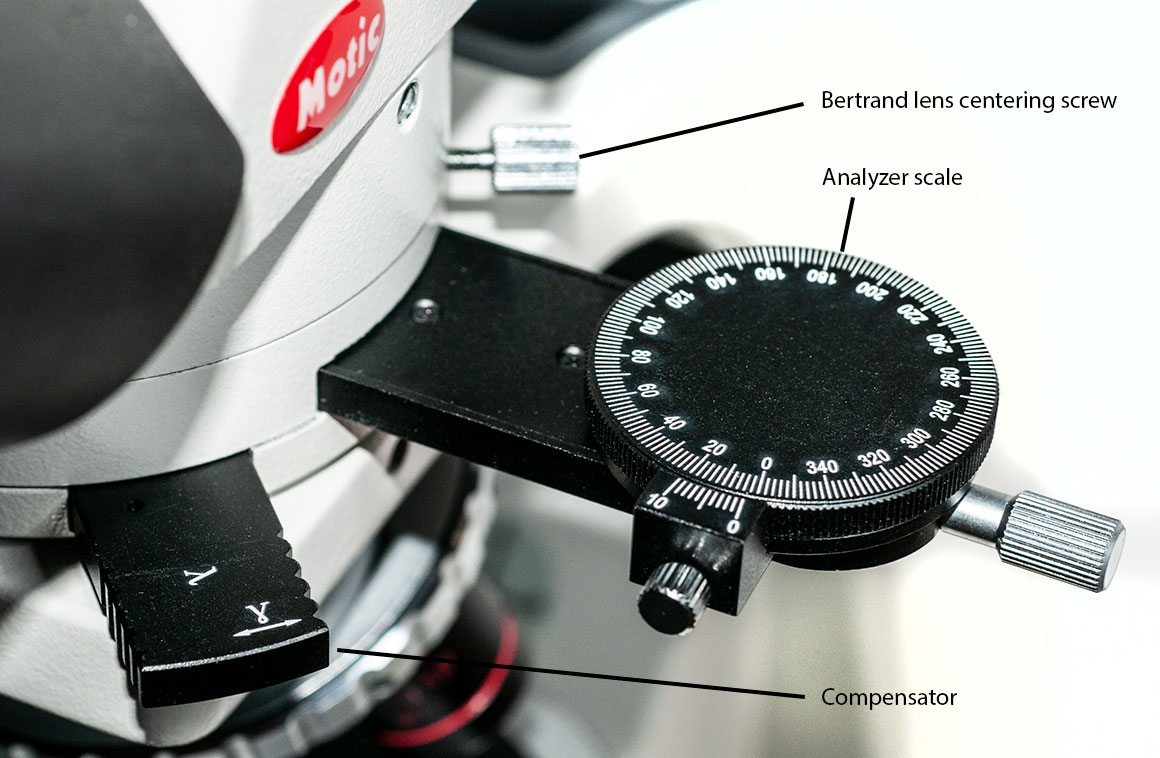
Shown above is a close up of the Motic Analyzer which can be pulled out of the light path and it rotates in precise increments. You can also see a full wave retardation compensator inserted into the scope - also called retardation filter, it changes the background colour and modifies the order of the interference colours of the specimen. Compensators are frequently used to determine the sign of elongation in longitudinal crystals, hair and synthetic fibres. A rotatable analyzer is used for "slightly" uncrossed polarizers 7-12° from crossed or for parallel polarizers in conjunction with monochromatic light and a Sénarmont compensator which provides retardation measurements having an accuracy approaching one thousandth of a wavelength.
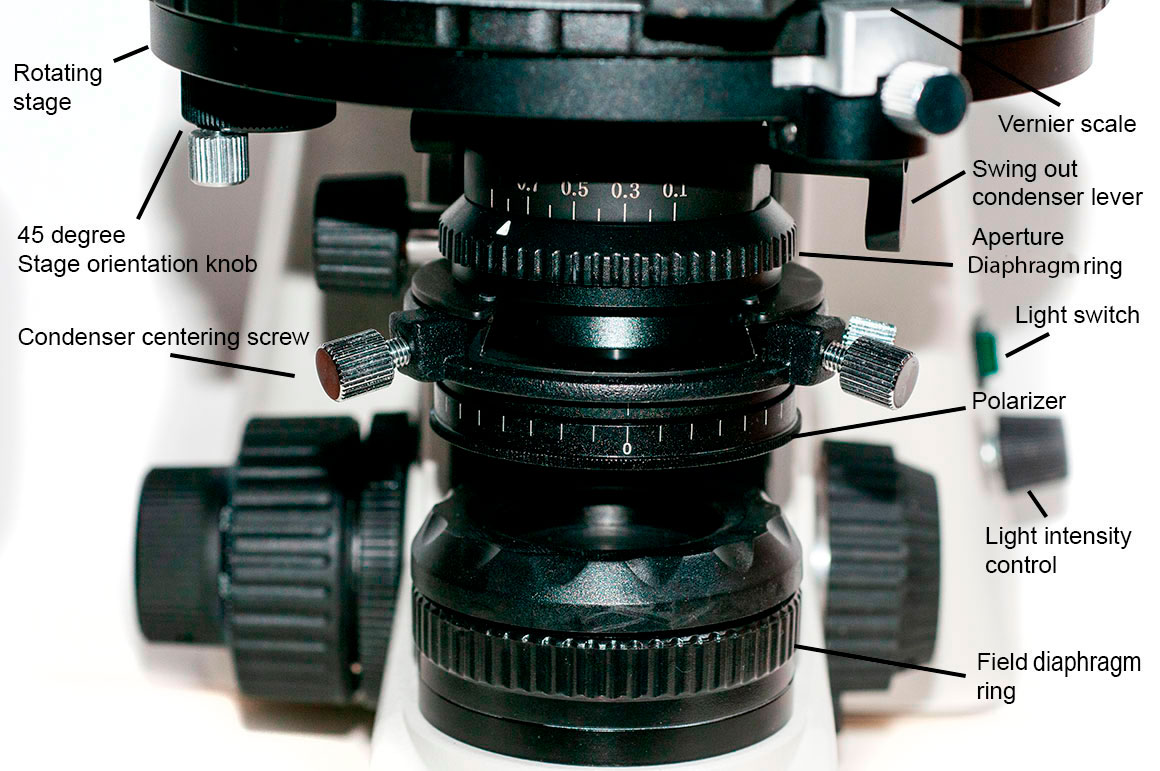 Above the Moticam BA310 Polarizing microscope condenser and light source, the light source includes a field diaphragm. The condenser includes a polarizer with markings and the condenser has a flip out top lens which is used to provide a broader source of light required with low power objectives (e.g. 4X). The condenser has a numerical aperture of less than one (NA 0.9) and is therefore not suitable for use with oil immersion objectives.

The objective turret fits 4 objectives 4, 10, 40 and 60X - all Plan Achromats are strain free and each can be centered. In polarized light microscopy if the objectives are not strain free the background will not be completely black when using crossed polarizers and this can lead to errors made in detecting weak birefringence. Biomedical objectives are not strain free and not suitable for quantitative polarized work. Images viewed through the objectives were clear, crisp and sharp out to the edges (Plan Achromats). When using a polarizing microscope to change objectives you should not grab the objectives as this could disrupt their alignment, instead rotate the objectives using the turret.

Wool fibers in polarized light microscopy Moticam ProS5Lite camera 100X.
I plan to swap the 60X objective with a 20X which I tend to use more often, but I am keeping the 60X for high magnification work. Would be nice if the microscope offered the ability to hold 5 objectives so I could just insert the 20X. The objectives that come with this scope are of the infinity type. Older microscopes used fixed focal length objectives (160-210 mm) whereas infinity objectives became popular in the 1980's. Microscopes designed to use infinity objectives allow additional accessories to be added in the light path without degrading the image and chromatic and spherical aberrations are corrected in the objectives. Objectives from older microscopes and infinity microscopes are generally not interchangeable (you can put them in but they don't offer optimal image quality).

Cross section through a section of Basswood (hard wood) Polarized light microscopy 40X Moticam ProS5Lite camera.

Cross section of Basswood by Bright field microscopy 100X taken with the Moticam ProS5Lite.
There are a lot of things I liked on this microscope, but one that would be nice is the ability to use a stronger light source for photography and making movies. The light source on this scope is an internal 6V 30 Watts tungsten which is plenty bright for most viewing, but for photography its always nice to have more light to use faster shutter speeds and with a DSLR lower ISO speeds which reduces sensor noise. When using two crossed polarizers there is a significant reduction in light throughput. An alternative would be to use a bright LED light source. I believe Motic offers additional lighting options on their Panthera microscopes.

Ground bone in Polarized light with a full wave compensator. Moticam ProS5Lite camera 100X
The BA310 polarizing microscope is sturdy yet easy to carry or transport. I own microscopes from most of the major microscope companies and the most attractive feature of this microscope is the quality to price ratio, which is one of best I have encountered. I have used polarizing microscopes that cost much more but this scope appears to be capable of doing almost anything the more expensive scopes can. I have always wanted to own a proper polarizing microscope with a trinocular head, circular stage, Bertrand lens, compensator slot and analyzer with graduated scale. I liked the value of this microscope so much that I purchased it from Motic. Anyone living in the Calgary area or in Alberta interested in purchasing a Motic microscope is welcome to visit me me to examine and try this microscope. If you live else where contact Motic directly. Also Motic offers a premium series of microscopes called the Panthera Series that cost a bit more and they offer additional options.
Moticam ProS5 Lite camera

Above is the Moticam ProS5 dedicated microscope camera. Motic offers a variety of digital cameras for their microscopes. Dedicated cameras have certain advantages including their small size, lack of vibration during exposure, and the ability to process the image by manipulating exposure, white balance, colour, contrast etc before taking the photo. Some dedicated cameras come with software to measure objects in the image, add scale bars, stitch images, focus stack, average frames, perform time-lapse, and take movies. The downside of dedicated cameras is that many have small sensors less then one inch. A few dedicated microscope cameras use a one inch sensor which is the same size as an APSC (Advanced Photo System type-C) crop camera e.g. Nikon D500. Sensor size matters (S.Crisp 2013).
Unfortunately Motic does not offer the larger sensor size cameras at the moment. The size of the sensor is a major factor that determines the image quality. One of the reasons most cell phones don't offer images that make big enlarments is they also use very small sensor chips. This Moticam ProS5 camera I evaluated provides good pictures, but the images can not be enlarged much unless one takes a panorama. I also believe the capture software could be made easier to use and the manual expanded to include a Quick guide and additional information about the various features. Below I wrote some simple instructions I used to take pictures that I believe will be helpful to first time users in getting started with this camera.

Mineral section in Polarized light 400X photographed with the Moticam ProS5 Lite camera. Mineral sections are 30 microns thick and sample mineral slides can be purchased online (e.g. Ebay).
Quick Guide to installing and Using the Moticam Software
1. Insert the USB stick provided with Moticam software into the USB port of your computer.
2. View the files on the USB stick. On Windows right click on the Motic icon and select open - you will see Linux, Mac and Windows folders. Open the folder with the operating system you are using on your computer. I went into the Windows folder and selected the x64 folder for 64 bit operating system, and double clicked on the setup.exe file to intiate installation - follow the on screen instructions.
3. Have a specimen on the microscope stage illuminated and in focus. With a trinocular head pull out the slider so the camera is illuminated.
4. Plug the Camera USB cord into the computer and start the Moticam software. Installation puts an icon on your Desktop if not look under programs. The camera has a blue LED indicating it has power. When the software starts you should see the screen below.

First screen that appears is shown above. When I did not see an image or how to select the camera - I read the help manual which lacked a guide to get started. I began exploring each button and menu. Finally I closed the program and installed the twain driver on the USB stick in the MoticTWAIN folder - MoticTWAIN.exe. TWAIN drivers are files and programs that are designed for the purpose of regulating communication between scanners, digital cameras, and other imaging devices and software applications that use them. After doing this I restarted the computer and the software. (Other dedicated cameras I use on the same computer did not require this step).
5. In the file menu shown below I selected File >Capture and a new window opened. If every thing is working properly you should see an image from the microscope camera, but the image might be over exposed (white) or underexposed (black).

Below is the window that appeared before installing the Twain driver - no image from the camera was visible initially.

Below is a screen capture showing the top window open and the camera image visible on the screen. The menu buttons on the right side display features to modify the image, capture a picture or make measurements. Click on a button and it expands into a panel as shown below.
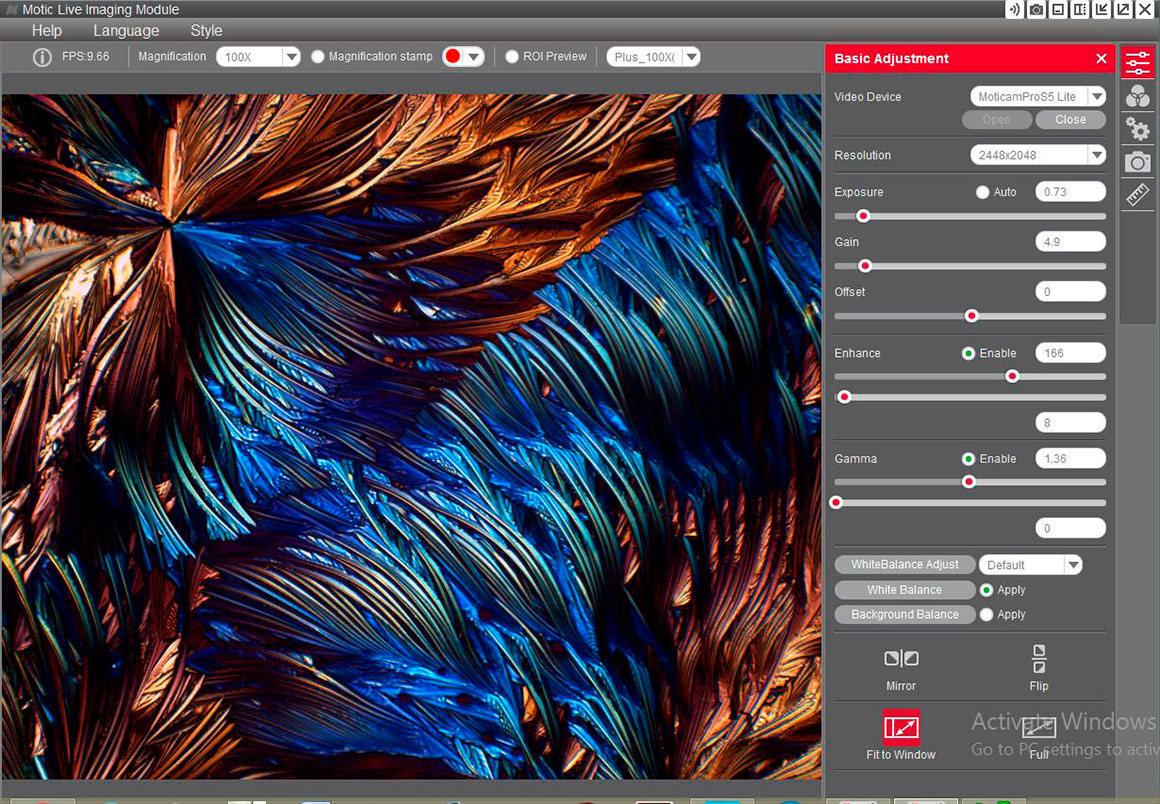
6. If the screen is white it is possible the image is overexposed, or if black underexposed - adjust the exposure using the control in the panel on the right (shown above). Adjust the gain and exposure until you see an image. If you don't see an image, make sure the trinocular slider is in the correct position to project light to the camera - also look down the trinocular tube - you should see the specimen. If these steps do not help - contact Motic Tech Support for help (1-877-901-4141 or technical@motic-america.com).
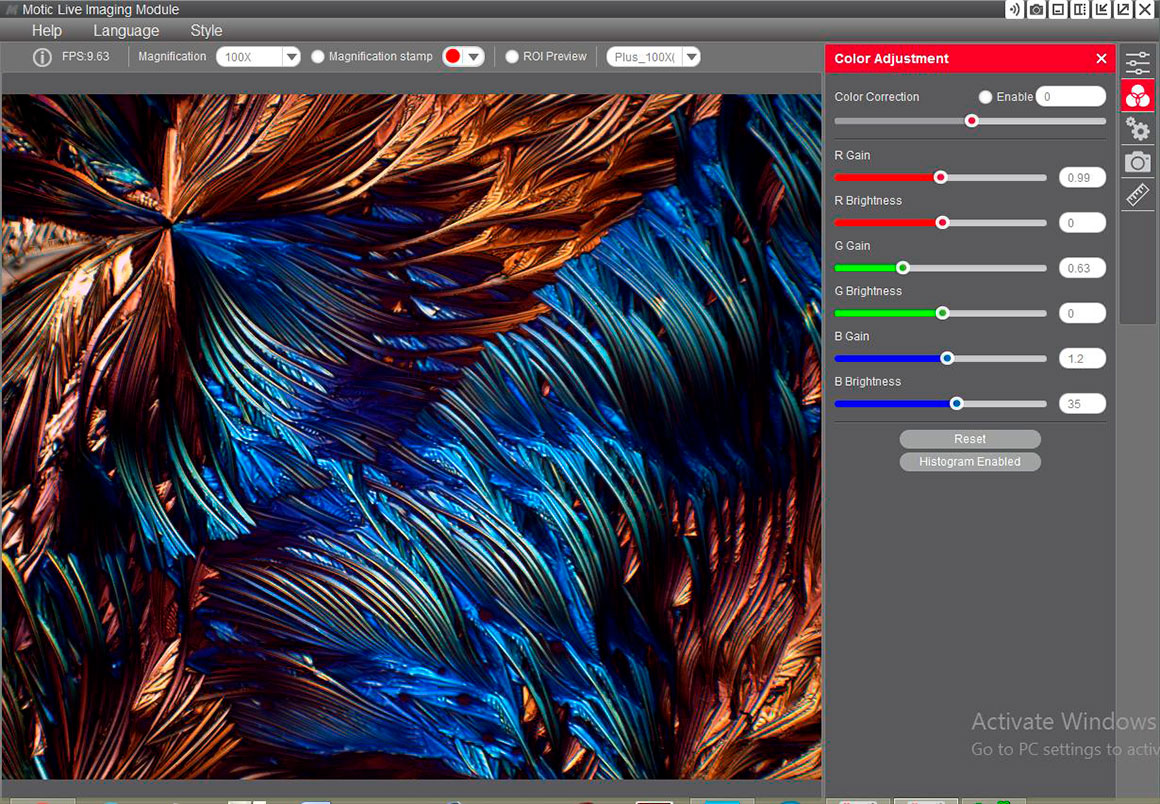
7. Adjusting the Color. When I first looked at the image of the crystals in polarized light on my monitor the colors were very different from what I saw looking through the scope even though my monitor is color calibrated. First I adjusted the exposure and gain. If the exposure is too high the highlights will be overexposed (completely white with no detail). After adjusting the exposure I went to the next button down on the side panel and began to adjust the color sliders to get as close to the colours I saw in the microscope. This may take some experimentation. Write the colour setting down for future reference as I have done down below. It is a good idea to keep notes when taking photomicrographs including settings, magnification, specimen information etc.
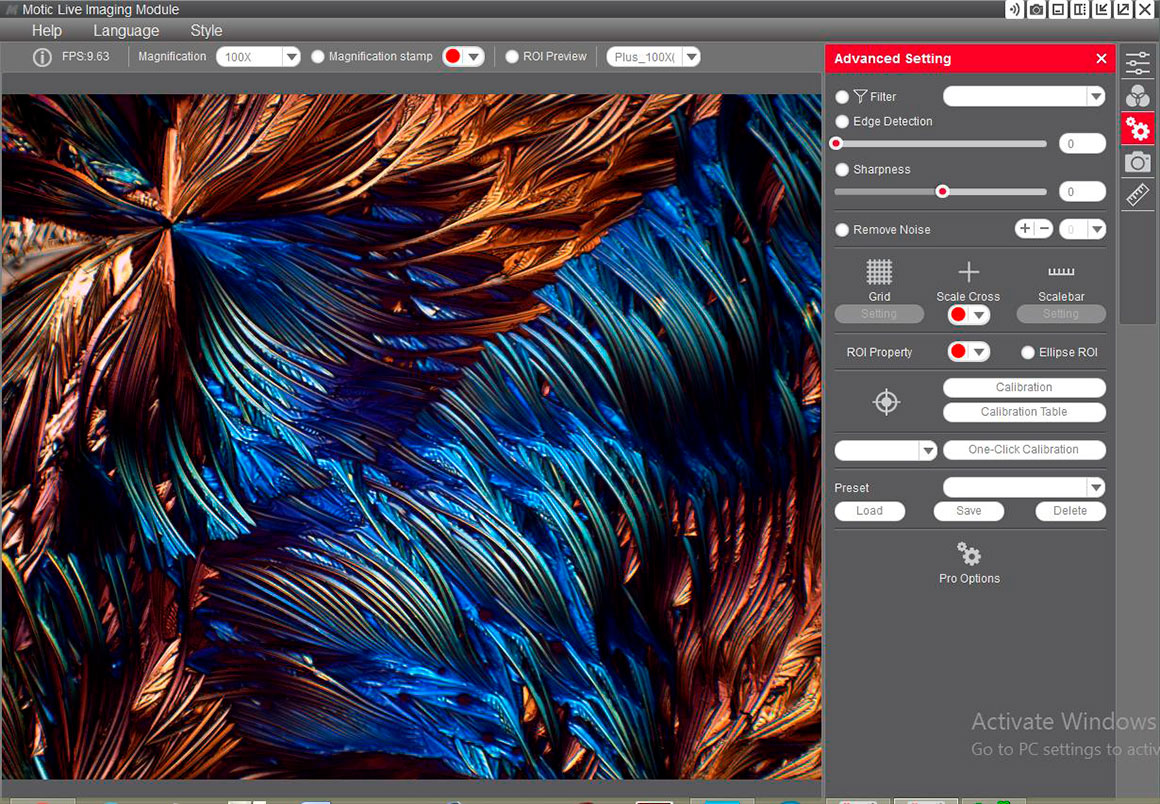
8. I selected the next button down on the side and experimented with the features in the Advanced and Pro settings (shown below) and tried to set the camera to the highest resolution, but it didn't seem to have any affect on the final image which always came out 1072 pixels wide in the main or first window. You can also use this panel to calibrate the camera to the microscope magnification - see the help > manual.
9. The ability to zoom into the window viewed on the computer is essential to achieve critical focus. To do this you choose the ROI (Region Of Interest) preview radio button in the top menu and drag a square rectangle over a small part of the image and chose a zoom setting. Now focus carefully. Then turn off the ROI button and delete the square box (select the box and hit delete or click on the picture outside the box). If you don't remove the ROI red box, it will appear in your final picture.
10. Select the Camera icon in the right menu. This shows you buttons to capture an image or movie. Click the Camera icon and it will take a picture. Click the record icon to start recording a movie and then stop the movie recording (see below). To see your captured picture or movie you need to close this window by selecting X at the very top corner of the window.

11. After closing the top window you should see the screen below with thumbnails at the bottom - you may see more then one thumbnail if you took several photos. Select a thumbnail and it appears large in the window above as shown below. Now you need to resize each image, then save it.

13. The last step is to resize the image before saving - if you don't do this the image will be 1072 x 764 pixels in size by default. At the top Select > Image and from the drop down menu Select >Image size you will see a pop up with the image size as 1072 x 764 pixels which appears to be the default size. Change this size to 1600 x 1200 which is the full size of the 5 MP camera - then save the image as .tif or .jpg file. After saving close that particular file by clicking on X at the top right of image window. You can now navigate to the folder where you saved the image and open it in another program for further processing. When you save the image it also saves a text file with it (filename.tif.mwi). MWI text files can be opened in Medline Payroll, Lotus and Windows notepad according to my search on the web. I was able to view the file with Windows notepad on my computer and it looks like this:
{"au":[],"bit":8,"calib":{"h":240,"name":"Capture","object":4,"w":320,"x":25,"y":25},"ch":3,
"fmt":0,"img":[],"over":"{\"overlayItems\":[]}"}
I also found a web site that permits viewing of the file by dragging and dropping the file onto the web page.
Filext
It is not clear how the text file might be used. Further explanation in the manual would be helpful. It is possible this file stores information after calibration. I did not test every feature of the software and there is the possibility that I missed some instructions. A table of contents, index and quick start guide would be helpful. The Motic Live Imaging manual and reference is relatively short (81 pages and most of it is well explained).

Vascular bundle in a plant stem by Polarized light microscopy. Motic BA310 microscope and Moticam Pros5 Lite camera 100X.
The steps I describe above need to be done in order to save each image. I experimented with the Pro settings and other buttons, but the image always defaulted to 1072 pixel size. I could save the image even larger i.e. 2448 x 2048 which results in a 12 MP image, but the image is simply interpolated up in size and does not offer any additional information or clarity, but it will allow you to make a larger print. It would be nice if the default size could be set to maximum 1600 x 1200 so it would not be necessary to resize each image before saving them.
There are other features in the software to measure objects, paint, create albums etc that I have not explored. The camera includes a glass microscope slide with calibration scales (dot, bar and ruler) that can be used to calibrate the software and the magnification for each picture.
A starting point for taking images of polarized crystals is:
Exposure: 0.2
Gain 12.1
Gamma 1.36
White Balance - Default
Red Gain 1.76
Green 0.81
Blue 2.4
Note these setting will most likely vary depending on the microscope, camera model, light intensity and the sample you are examining.
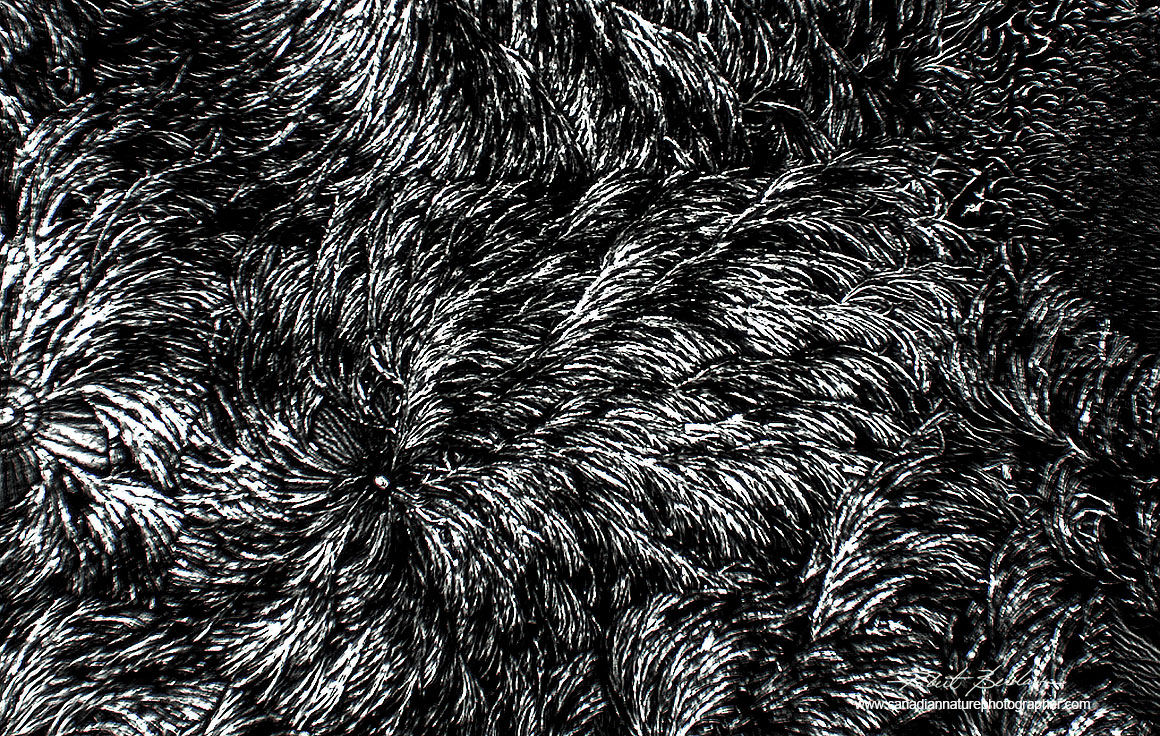
When colour correcting images I tried to select a gray area and make it neutral in colour by adjusting one RGB colour gain at a time. Bright field images seemed easier to correct. Some polarized light images may not have any colour - e.g. see below. Proper colours are important in polarization microscopy to identify birefringence.
Vitamin C crystals Polarized light 100X photographed with the Moticam ProS5Lite camera.
I generally process my photomicrographs afterwards in Photoshop and save files as .tif so they are uncompressed. I saw a feature in the Moticam software to use 12 bits but after selecting it the output images always defaulted to 8 bit. Anyone using this software should read the instructions and then experiment to get the best results.

Epsom crystals (magnesium sulfate) polarized Light microscopy 100X Moticam ProS5Lite camera
This Moticam ProS5Lite camera uses a 2\3 inch sCMOS (scientific Complimentary Oxide Semiconductor) chip. Live display mode through USB on a computer supports up to 2448 x 2048 pixels, however the maximum size of the pictures captured are 1600 x 1200 pixels though they can be interpolated up to twice that size or more, but there is no additional information in the picture. 1600 x 1200 is fine for web viewing and will permit images for printing up to 4 x 5.3 to about 5 x7 inches at 300 dpi. To get around this size limitation you will need to stitch adjacent images in which case you can include as many images as you like and can make very large images (see panoramas above).

Vitamin C crystals 100X Polarized light and full wave plate photographed with Moticam ProS5 Lite camera.
The camera supports USB 2 and 3.1. Pixel size is 3.45 microns and it offers exposures between 14 microseconds to 2 seconds. It attaches to the microscope via a C mount and the height of the camera can be adjusted with rings so it is parfocal with the eyepieces. When the camera is plugged into a USB port there is a blue LED light on the camera that lets you know the power is on.
What's to like about the Moticam Camera and Software
1. Software has a clean modern interface, you can change the colours of the interface
2. Camera is compact in size
3. No vibration induced by shutter
4. Software offers some image processing of the image before and after taking the picture
5. Software is capable of making morphometric measurements
6. Software provides live view and the ROI (region of interest) allows you to zoom in to achieve the best focus.
7. The software provides frame averaging to reduce digital noise and video capture
- movies on the Windows version are saved as an .avi file
What could be improved
1. Small sensor size and low resolution limits the size of individual images
2. Software work flow could be made faster and easier to capture and save images - for instance by being able to select all the photos taken (shift-click) and then resizing all of them at once.
3. Colour adjustments and white balance tool are not easy to work with and requires tweaking.
4. It would be nice to set the image size once and not have to resize each image before saving.
5. Instructions should be expanded, a quick start up guide in the beginning would be helpful along with a section on what do if something isn't working.
6. Focus stacking and image stitching would be nice additions to the software
For those needing small images for the web, technical reports, and science publications this camera provides adequate images. As a professional science photographer I need to be able to make large prints and therefore this camera does not fit my work flow. For the highest quality images I recommend a DSLR attached to the trinocular head. I have ordered a DSLR photo-tube, and photo-eyepieces for this microscope from Motic.
Coming soon. I am working an article which will compare cell phones, dedicated cameras and DSLRs for photomicrography and hope to post it later this summer on my web site. You will also see more pictures taken with this Motic polarizing scope on my web site in the future.
For full Moticam S5Lite camera specifications and pricing: https://moticmicroscopes.com/collections/moticams/products/moticam-pros5-lite
Motic also offers a variety of dedicated microscope cameras including higher resolution versions.

Smooth muscle cells viewed in polarized light 400X photographed with the Moticam ProS5 Lite, nuclei are oval shaped and black.
Summary
The Motic BA310 polarizing microscope is a high quality product for a very good price. The optics and mechanics are comparable to the major microscope brands (Zeiss, Leica, Nikon and Olympus) but at a much lower price. The camera I tested is adequate for making small prints for the web, technical reports and scientific publication, but for those wanting higher resolution a DSLR is the best option. Motic offers DSLR adapters and tubes to use with their microscope and I have ordered one.
Later this summer I will be presenting an article that compares Cell phone cameras, Dedicated microscope cameras and DSLRs (Digital Single Lens Reflex) cameras. In the future I will also be presenting more information about how to use a polarizing microscope to analyze fibers and identify specific substances. Please see the references below for more information about polarizing microscopy - the book by Delly 2017 is particularly good.

Single dog hair in polarized light 400X Moticam ProS5Lite camera
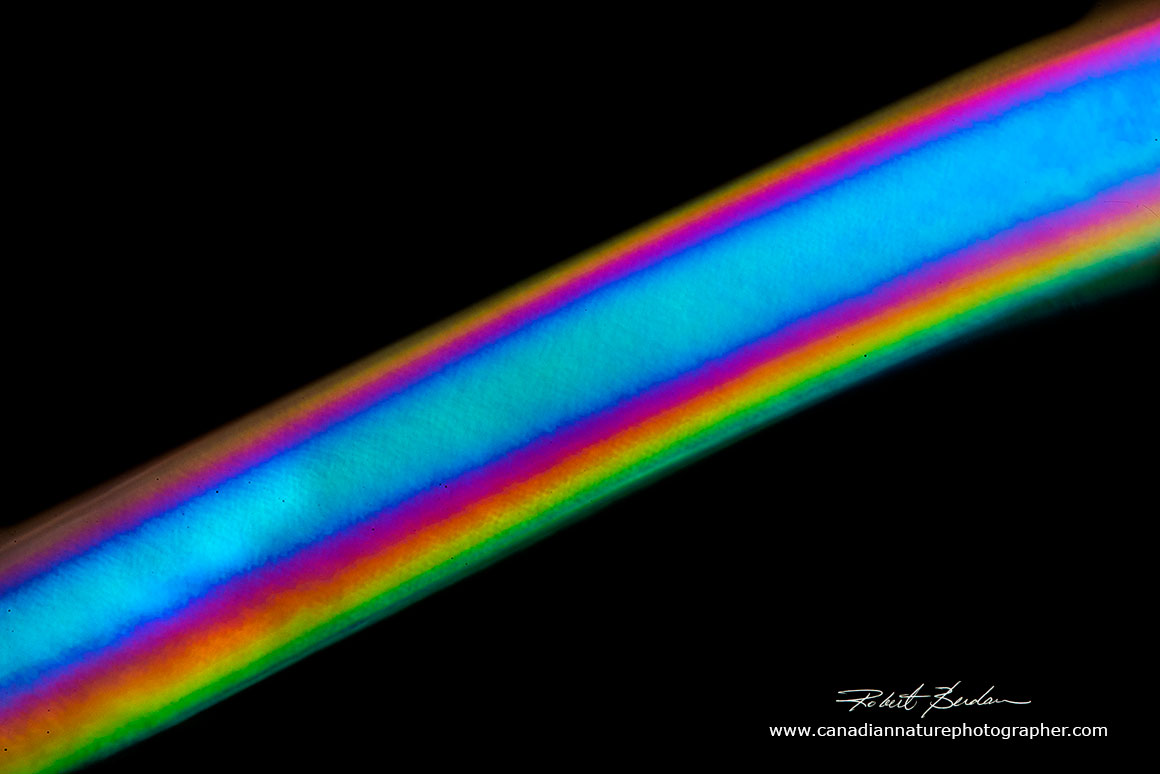
Synthetic fiber used in water filters for the oil industry. 400X Different colours are due to the differences in thickness of the fiber.Taken with Motic BA310 Polarizing microscope.
Addendum - How to Center a Motic Polarizing Microscope stage and objectives (Feb 2021)
WARNING do not remove the circular stage on the Motic BA310 polarizing microscope as it is centered in the factory and it is not easy to recenter after removal as I have learned. I removed the stage in order to get access to the lower polarizer to see if I could remove it temporarily which I wasn't able to do. I needed more light and each polarizer significantly reduces the overall light passing through the scope by about 50%. I though if I could remove the bottom polarizer and top analyzer I could get much more light with the 6 V 30W light source. I was testing the Motic's Polarizing kit on the BA310 microscope and needed extra light for the 100X oil immersion objective for making movies. My evaluation of the Motic phase contrast kit can be found on Motic North America's web site under articles.
The circular stage on the Motic polarizing microscope is attached by 4 small bolts that fit into oblong holes and it is easy to reattach the stage, but there are no centering tools to assist and one must center the stage by hand which is frustrating. The bolts that attach need to be tightened about 1/2 way before you can move the stage though it does not allow easy movement in 4 directions. Also the stage must be kept level while centering - it took me several days to achieve partial centering of the stage. To do this I used the 4X & 10X objective in the non centerable turret postion. Some microscope manufacturers offer stage centering tools on the stage to make stage centering easier.

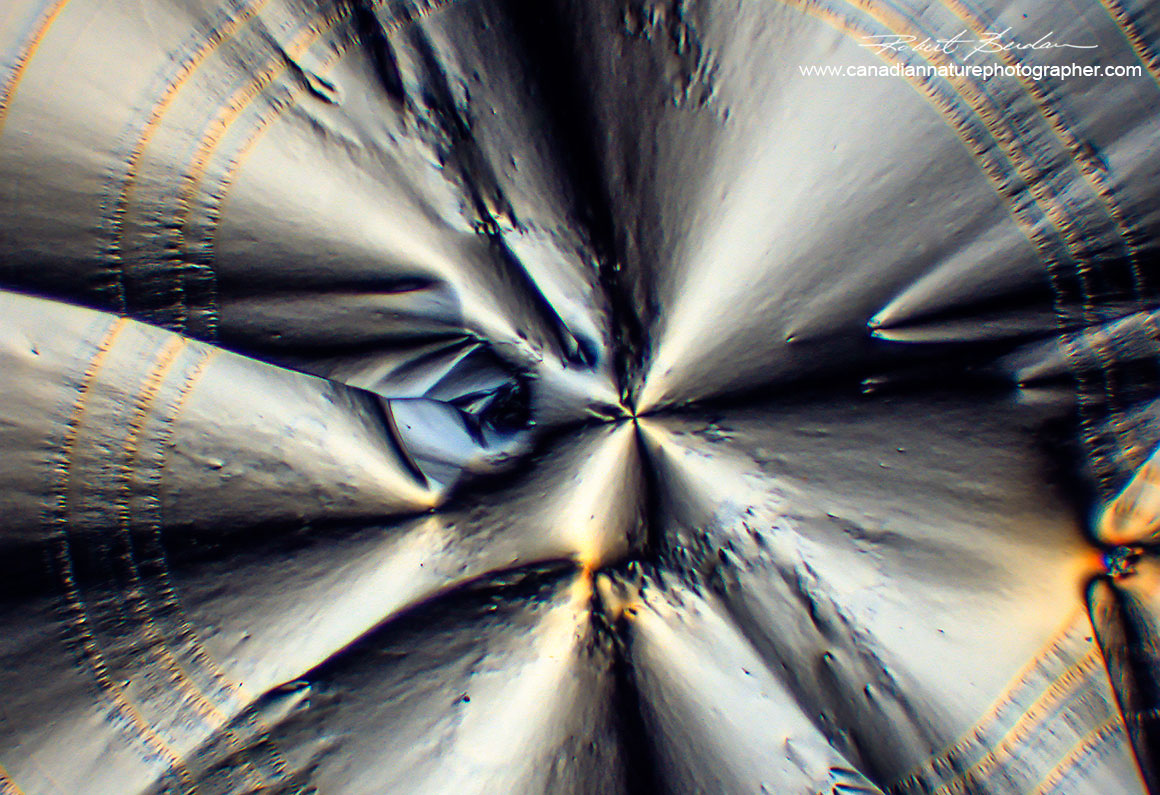
Rotating the polarizing stage and capturing the image with a long exposure shows the point of rotation. The goal is to get the point of rotation directly over the center of the cross hairs. I used the 4X objective and Motic circular stage. This requires moving the stage by hand with the bolts partly tightened. I required a second person to tighten the bolts while I held the stage in position. The process of tightening the bolts can also alter the centered stage position.
Centering the objectives once the stage is centered was more straight forward though it can be time consuming. I put the 4X objective in the non-centerable turret position and then centered the stage as best I could. After this I proceeded to center each objective (10, 20 and 40X). This process required approximately an hour for each objective and was more straight forward.
To center the objectives I used a white blood cell smear stained on a microscope slide. I placed a white blood cell over the cross reticule in the eyepiece. Any distinct particle will do, but the rotation of the red cells around the white blood cell makes the point of rotation easier to see. Photographs were captured with a DSLR and viewed on a computer screen. I used a slow exposure when rotating the stage so I could see the point of rotation clearly (see above). The white blood cells rotate about the central point. The challenge is to get the central point of rotation over the reticule cross.
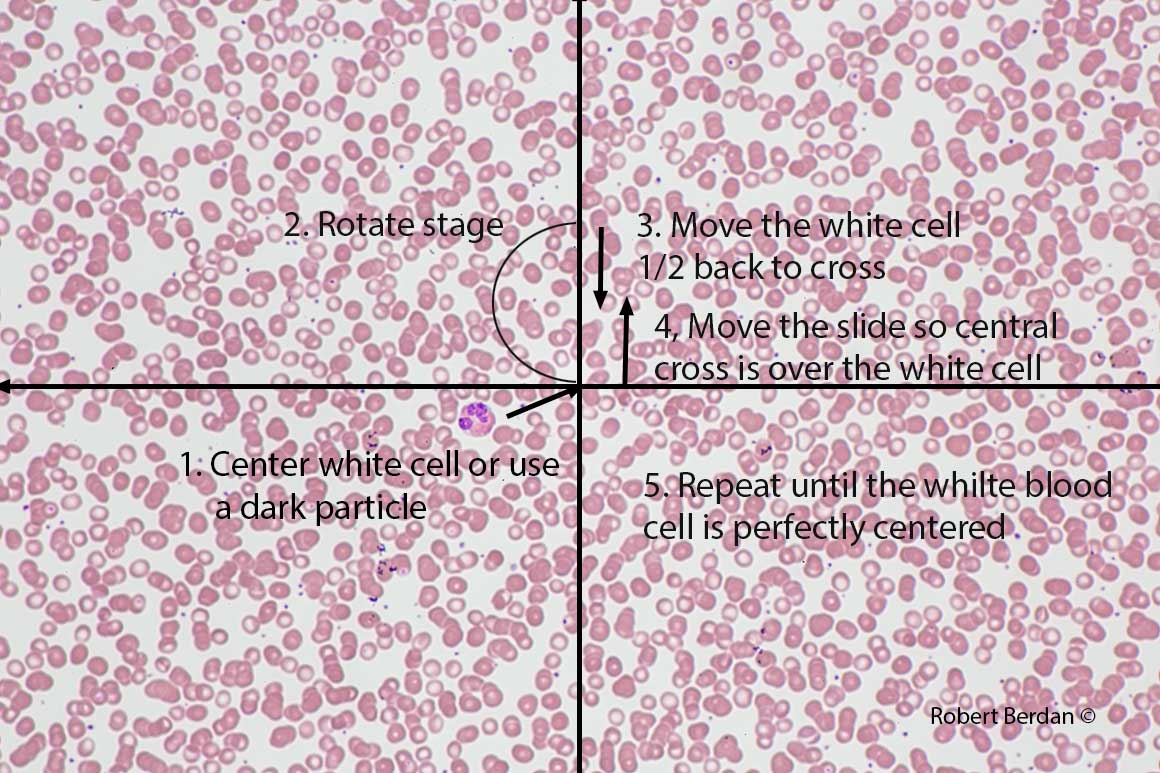
Centering the objective on the Motic BA310 polarizing microscope requires 2 centering tools that insert into the turret beside the objectives provided by Motic. The first step is to center an object over the cross hair - I used a white blood cell. Then rotate the object 180 degrees the object if not centered will move in a circle. Then move the white blood cell or particle with the objective centering tools until it is half way back to the cross. Then move the slide to the position of the white blood cell using the mechanical stage or by hand. Repeat these steps until the white blood cell or particle stays in the center when rotated. This procedure is described in detail by J.G. Delly (2017) - pages 25-28 and on The McCrone Group web site "How to" Tutorials and on the Olympus web site.

When a particle or white blood cell is rotated it should stay in the center when you the stage and objectives are centered. Photographing the specimen with a slow shutter speed while rotating the stage makes it easier to see if the particle is centered.
If you are not able to center the stage the only alternative is to send your microscope back to where you purchased your Motic Microscope and they will repair. I enquired about any special tools they might offer to assist in centering the stage but could not discover how they do this in the factory. Having a centered stage and objectives is important for quantitative analysis of birefringent specimens.
Acknowledgement - I thank Bob Martin at martinmicroscope.com and Justin Lee Tech support at Motic North America for helpful suggestions on how to center the Motic polarizing microscope.
Disclaimer: This article was not paid for by Motic nor was I given a microscope in exchange for the review. Motic has purchased some of my images and I have provided articles for their web site which is why they offered me the opportunity to evaluate this microscope. One of my goals is to promote microscopy to a wider audience than just scientists. The microscope in this review is designed for serious amateurs and researchers - and its price and quality reflects this, but this scope is significantly lower in cost then those from the big 4 (Zeiss, Leica, Nikon and Olympus).
My decision to purchase this polarizing microscope was based on its overall performance and its price. If you are looking for a new quality microscope I recommend exploring Motic's options. Some experienced microscopists may prefer to purchase a used microscope from a reputable source and I have done this, but I am also able to repair or replace most parts on a used microscope. The price of the Motic microscopes are competitive with used scopes and they offer a 5 year warranty, tech support and service.

Calanoid Copepod photogaphed in polarized light with a full wave compensator. Note the blue and yellow muscles. 100X Motic BA310 microscope and DSLR camera.
References & Links
J. G. Delly (2017) Essentials of Polarized Light Microscopy and Ancillary Techniques - available on Amazon and from Mcrone - Expensive yes, but it is the best book on Polarized microscopy I have encountered, with excellent illustrations, and photographs - it is written for teaching.
Motic BA310 Polarizing microscope instruction manual - PDF (microscope slightly different from the one shown above).
Motic BA310 POL microscope - website with microscope specifications and pricing
Motic Moticam dedicated cameras - website with camera specifications and pricing
R. Berdan (2019) Crystals Photographed with Polarization Microscopy: Water, Beer, Caffeine, Vitamins, Amino Acids and Human Tears - Canadian Nature Photographer.
R.L. Howey (2019) Advice for Microscopists and Natural Historians That Will Be Ignored. Micscape. Numerous photomicrographs taken with Polarized light microscopy.
R. Berdan (2017) The Art & Science of Photomicrography with Polarized Light - Canadian Nature Photographer.
S. Crisp (2013) Camera sensor size: Why does it matter and exactly how big are they? New Atlas website.
B.P. Wheeler and L.J. Wilson (2008) Practical Forensic Microscopy: A laboratory manual. Wiley-Blackwell. England - PDF
R. Weaver (2003) Rediscovering Polarized Light Microscopy. October American Laboratory - PDF
H. Pichler and C. Schmitt-Riegraf (1997) Observations under conoscopic light Chapt 10 in Rock forming Minerals in thin section. Springer.
R.E. Stroiber and S.A. Morse (1994) Crystal Identification with the Polarizing Microscope. Springer ideal for Petrographers.
E. Wood (1974) Crystals and Light: An Introduction of Optical Crystallography 2nd ed. Dover Publications, N.Y. Good introduction - available on Amazon.
R. E. Stoiber and S. A. Morse (1972) Microscopic Identification of Crystals. The Ronald Press Co. N.Y.
E. E. El-Hinnawai (1966) Methods in Chemical and Mineral Microscopy. Elsevier, N.Y.
P. F. Kerr (1959) Optical Mineralogy 3rd ed. McGraw-Hill, Toronto. Dated but lots of useful information for Geologists.
P.C. Robinson and M.W. Davidson Polarized Light microscopy - Microscopy U Nikon
S. Bradbury, M. Abramowitz and M.W. Davidson. Microscope Configuration - Polarized light microscpy - Olympus
Wikipedia - Polarized Light Microscopy and Michel-Levy Chart.
Polarized Light Microscopy - Specimen Preparation - Molecular Expressions
A.F. Frandsen (2016) Polarized Light Microscopy - NASA - PDF
Polarized Light Microscopy Educational articles Zeiss Web site - unfortunately many of the articles are not free.
Videos
Muscovite under polarization microscope by Motic Europe - YouTube
Granite under the Polarization Microscope by Motic Europe - YouTube
Motic Moticam Dedicated Microscpe Cameras - YouTube.
Note: Educators and students may use my images for reports and teaching, all other uses or for commercial use please contact me. If you use my images I appreciate attribution and a link back to my web site where possible. Note magnifications are approximate - 100X means taken with 10X objective, 200X with a 20X objective, 400X with a 40X objective.
Authors Biography & Contact Information

Bio: Robert Berdan is a professional nature photographer living in Calgary, AB specializing in nature, wildlife and science photography. Robert retired from Cell\Neurobiology research to pursue photography full time many years ago. Robert offers photo guiding and private instruction in all aspects of nature photography, Adobe Photoshop training, photomicrography and macro-photography. Portrait of Robert by Dr. Sharif Galal showing some examples of Robert's science research in the background.
Email at: rberdan@scienceandart.org
Web sites: www.canadiannaturephotographer.com
www.scienceandart.org
Phone: MST 9am -7 pm (403) 247-2457.