
How to Capture the Milky Way
Text and Photos by Alan Dyer
March 14, 2015
Self portrait at Reesor lake - July 13, 2013
An increasing number of landscape photographers are venturing out at night to capture scenes lit by the Moon and stars. The star attraction of the night sky is the Milky Way. It’s surprisingly easy to capture over landscapes, once you know a few basics.
Standing under the stars a Grasslands Park
The author shot this 360° panorama and self-portrait under the super-dark skies of Grasslands National Park, Saskatchewan, in August 2014.
What is the Milky Way?
The Milky Way figures in the mythology of every culture around the world. It is a misty band of light that arches across the sky. In ancient times it was usually thought of as a bridge to heaven. Since 1609 when Galileo first trained his telescope onto the mist, we know it is made of stars. Millions of stars.
The Milky Way we see in a dark sky is really the dense spiral arms of stars that make up the structure of our galaxy, itself called the Milky Way. Our galaxy is a flat disk, with us situated about halfway from the centre to the outer edge of the disk. When we look at the Milky Way in our sky we are looking edgewise down the spiral arm that we live in, and toward other arms that lie closer to and farther out from the galactic core.
Of course, for beautiful images of the Milky Way over scenic landscapes you need to go to those scenic sites. Locations with a good view to the south or southwest will be best, as that’s the direction toward the brightest area of the Milky Way, at least from Canadian latitudes in summer and early autumn, prime season for Milky Way portraits.
To be more precise in your planning, planetarium software will show you exactly where the Milky Way will be on the night and hour in question. I recommend Starry Night (for MacOS and Windows desktops), or Sky Safari (for MacOS desktop, and for iOS and Android mobile devices).
e
Waterton Lakes night panorama.
Even the lights of the Waterton townsite can’t diminish the brilliance and beauty of the Milky Way shining over Upper Waterton Lake, Alberta.
Where to Go
Photographers often have a misconception that the Milky Way can be seen and shot only from very special locations. That’s not so.
The Milky Way can be seen from any place on Earth away from city lights. The farther you can get from sources of light pollution the better. But you needn’t travel to the ends of the Earth. A site just 50 to 150 kilometres from most cites will suffice, provided that distance takes you into the country and not into the light dome of another city.
Of course, for beautiful images of the Milky Way over scenic landscapes you need to go to those scenic sites. Locations with a good view to the south or southwest will be best, as that’s the direction toward the brightest area of the Milky Way, at least from Canadian latitudes in summer and early autumn, prime season for Milky Way portraits.
To be more precise in your planning, planetarium software will show you exactly where the Milky Way will be on the night and hour in question. I recommend Starry Night (for MacOS and Windows desktops), or Sky Safari (for MacOS desktop, and for iOS and Android mobile devices).
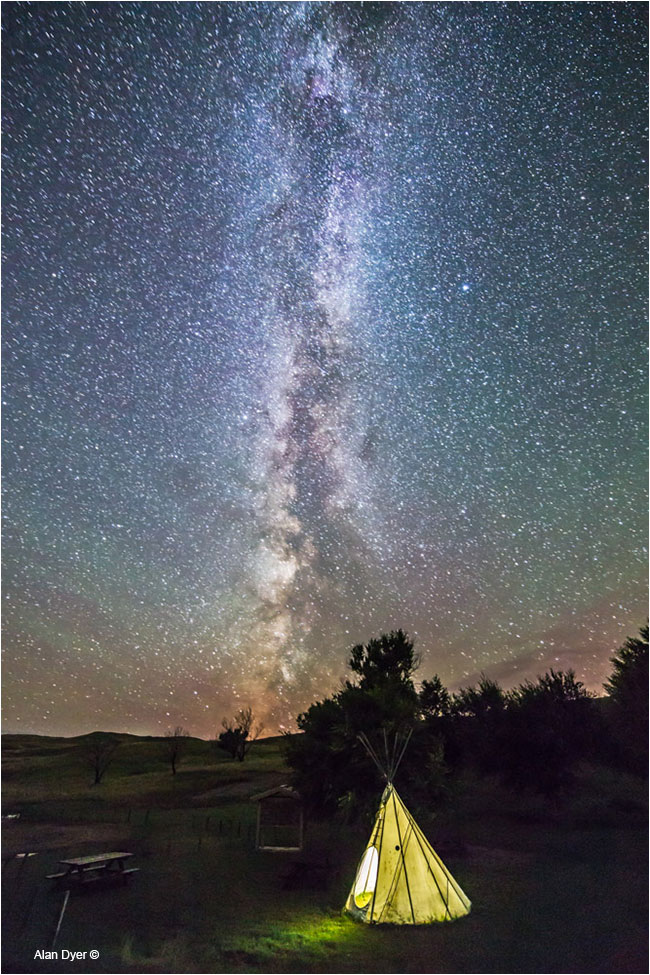
Tipi and Milky Way at Grasslands
The Milky Way is at its best and brightest in the southern sky in summer, seen here from Grasslands National Park, Saskatchewan.
When To Go
Unlike the Northern Lights, the Milky Way doesn’t appear only on select nights. It’s there every night – except in spring.
From April to early June the Milky Way is oriented so it lies out of sight along the horizon, not perpendicular to the horizon as it is in late summer to winter.
By late June the Milky Way is beginning to rise into the eastern sky late at night. However, from Canadian latitudes north of 48°, late June nights are bright and short. Not until July do the lengthening nights get dark enough to show the Milky Way well. By the end of July the bright summer Milky Way is up high enough in the early evening to include in nightscapes.
August and September are prime months. Darkness falls early, and the brightest part of the Milky Way, toward the galactic centre in Sagittarius, now lies due south at nightfall.
Through autumn the Milky Way is visible all night across the sky, but now running from southwest to northeast. By December the galactic centre area is gone from view, and the Milky Way now spans the sky from west to east, arching high overhead. The winter Milky Way is less prominent than in summer but contains the photogenic constellation of Orion.
He rises in the east on December evenings. By January and February Orion lies due south at nightfall, with the dimmer winter Milky Way oriented perpendicular to the horizon.
In March and early April Orion and the winter Milky Way are setting into the west as darkness falls. Come May and June Orion is long gone and we are again left with a night sky largely missing the Milky Way.
It’s not only the season that matters, but the time of the month as well. To see and shoot the Milky Way the sky must be moonless. The best nights will be during a week on either side of New Moon. While it’s possible to shoot wonderful nightscapes by the light of the Full Moon, don’t expect the Milky Way to show up, even from rural sites. You need dark nights … and dark sites
Sage Brush and Stars
Equipment
Any DSLR or high-grade compact system camera can capture the Milky Way. But the long exposures and high ISO speeds needed demand a low-noise camera for the best results.
That generally means a camera with as large a sensor as possible (ideally full-frame) and with a low megapixel count. That combination results in sensors with bigger individual pixels better able to capture scarce photons on dark nights without introducing excessive noise.
The Canon 6D and 5D MkIII, the Nikon D610, D750, and Df, and the Sony a7s – all full frame cameras – are favourites of nightscape shooters.
When it comes to lenses, the secret is speed. Slow kit zooms just won’t cut it. Capturing the Milky Way requires a fast f/2 or f/2.8 lens. It can be a zoom lens, though most suffer from noticeable off-axis aberrations when used wide open and at their shortest focal length.
One exception that is popular, though costly, is the Nikon 14-24mm f/2.8 zoom, highly regarded for its clean corner-to-corner images. My own preference is to use fast prime lenses, ones with fixed focal lengths. A 24mm is a good all-round choice. However, taking in wide sweeps of most of the Milky Way requires an even wider lens.
I use the Rokinon 14mm f/2.8, a no-frills manual lens, and can recommend it for its excellent optical quality yet bargain price. I also use the Canon 15mm f/2.8 full-frame fish-eye for vertical portraits of the Milky Way from horizon to zenith. But the curved horizon of fish-eyes makes them unsuitable for most landscape work.
Other than that, all you need is a good tripod and a remote shutter release, just as you would for any nighttime photography.
Milky Way over Waterton Lake
Painting the scene with a quick wash of light from an LED flashlight can help illuminate the foreground, as here at Driftwood Beach in Waterton Lakes National Park. This is a composite of a 30-second exposure, plus a 4-second exposure for the bright hotel area, both with a 24mm lens at f/3.5 and Canon 5D MkII at ISO 4000.
Focusing
The trick at night is focusing. Only a few lenses, like the manual Rokinons, will reach best focus when set to the infinity mark. All other lenses require care to focus so that stars appear as points, not fuzzy blobs.
Auto focus isn’t likely to work at night, and even if it did, for utmost precision I find it best to manually focus.
Put the lens into Manual focus mode and activate the camera’s Live Focus or Live View function. In the menu options for Live Focus turn on “Exposure Simulation.” Open the lens to its widest aperture and set the camera to a high ISO speed. Aim the camera at a bright star or planet, or a very distant light on the horizon. If the lens is far out of focus you might not see anything at first.
Focus until something appears on screen. Then zoom in to 10X for fine focusing. Adjust the lens so the star or light appears as sharp and colourless as possible. From then on, take care not to move the focus ring!
Red Rock Canyon Waterton National Park by Star light
Shooting at Red Rock Canyon in Waterton Lakes National Park, the author combined a 60-second exposure for the sky with a 3-minute exposure for the ground, long enough to reveal detail in a scene lit only by starlight.
Exposures
The exact exposure will depend on the brightness of your local sky. Assuming a dark sky at a rural site, exposures of 30 seconds at f/2.8 and ISO 3200 are typical. You can expose for longer, yielding a deeper image showing more Milky Way and details in the foreground. However, as a rule of thumb, in exposures over 30 seconds the stars will begin to trail due to the east-lo-west motion of the sky.
The guideline is called “The 500 Rule:” the longest exposure you can use before trailing appears = 500 divided by the focal length of your lens. A 14mm lens will be far more forgiving than will a 24mm, allowing exposures as long as 500/14 = 36 seconds before the stars begin to appear as streaks not lines.
In practice, you can tolerate a little trailing. I often use exposures of 40 to 60 seconds with 14mm or 15mm lenses. It’s a fair tradeoff to gain more detail in the Milky Way and starlit foreground.
To increase detail in the shadows, another option is to boost the ISO even higher, to 6400 or more, if you dare. Doing so introduces more noise. While noise can be tempered to a degree in processing, it’s always best to keep the ISO as low as possible.
However, if a super-high ISO is required for a well-exposed scene, then use it. Underexposing (by shooting at too low an ISO, or too short a shutter speed), then boosting brightness later in processing generally introduces much more noise than shooting at a high-enough ISO to begin with for a well-exposed image.
The mantra is to “expose to the right” — use the exposure combination necessary to ensure a histogram that is well-distributed to the right of the brightness scale, and not slammed to the dark, left end of the graph.
Another trick to capture the Milky Way without trailing the stars, yet record detail in the starlit landscape, is to take two exposures: one no longer than 30 seconds for the sky, and one as long as needed for the ground, perhaps stopping the lens down for greater depth of field. The two exposures are layered in Photoshop, with the sky masked out of the long ground exposure, and the ground masked out of the sky exposure.
I find that Photoshop’s Quick Selection tool combined with the Refine Edge function usually does a great job picking out the dividing line between earth and sky, even with complex tree branches to mask around.
Mars, Saturn & Milky Way over Ranch Corral
A composite of 1-minute tracked and untracked exposures taken in deep twilight captured the summer Milky Way over Grasslands National Park, Saskatchewan. The dark lanes in the Milky Way are obscuring clouds of interstellar dust. Can you see the prancing “Dark Horse?
Tracking the Stars
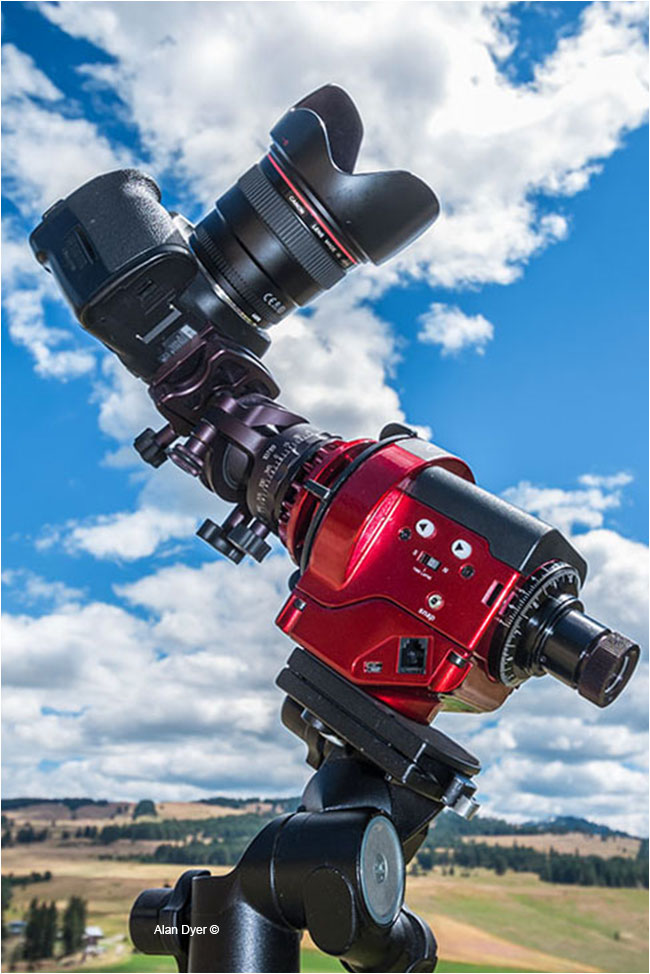
There’s yet another option for recording fabulous detail in the Milky Way while avoiding star trails. A number of low-cost tracking units are available made primarily for the amateur astronomy market, and sold by telescope dealers. For about $400 these devices will track a camera to follow the sky as it turns from east to west.
The Sky-Watcher Star Adventurer is a compact battery-powered tracking mount that, like all such units, must be aligned so its motorized rotation axis points to the North Celestial Pole near Polaris. Thus the small alignment scope at right.
Using a tracker, exposures can be several minutes long and not show any trailing. ISO speeds can be kept low to reduce noise, and the lens stopped down to avoid some of the nasty aberrations that plague the corners of fast lenses. The result is a Milky Way recorded with rich, sharp detail.
The downside is that the ground is now blurred. If it’s just a dark silhouette that may not be an issue. But including a sharp foreground in a tracked image takes some trickery.
One method is to keep exposures no longer than a minute or so. Set the tracker on its “half-speed” mode, a compromise between the correct speed for the sky and no speed at all for the ground.
Milky Way over Athabasca Glacier in Jasper National Park, AB
Shooting at the Columbia Icefields in Jasper, Alberta in September 2014, the author shot four 3-minute tracked exposures for the sky, plus four 4-minute untracked exposures for the ground, all later stacked and masked in Photoshop.
A method I use is to take several tracked exposures, then exposures for the ground with the tracker’s motor off. Inevitably, due to the motion of the camera, the horizon of the tracked sky shots won’t match the horizon of the untracked static shots. But with careful layering and masking in Photoshop, often requiring shifting the position of the ground layer, it’s usually possible to create a realistic composite that literally combines the best of both words, earth and sky.
See www.amazingsky.com/nightscapesbook.html for details.
The ebook is available exclusively through the Apple iBookstore. Go to https://itunes.apple.com/ca/book/how-to-photograph-process/id944708252?mt=11 for the Canadian store.
Alan Dyer is an astronomy author and photographer living in southern Alberta. His new ebook How to Photograph & Process Nightscapes and Time-Lapses contains 400 pages of extensive tutorials, tips and techniques for creating great still-image nightscapes and time-lapse videos of the night sky. It includes 50 embedded HD videos and 60 step-by-step tutorials on image processing.
Alan’s photos can be seen at his blog at http://amazingsky.net
and in his on-line photo galleries at http://amazingsky.photoshelter.com
© 2015 Alan Dyer, Calgary, Alberta
website: amazingsky.com
blog: amazingsky.net
email: amazingsky@icloud.com
Other references
- See Alan Dyers previous article "Shooting Stars - Part I & II " on the Canadian Nature Photographer
- How to Photograph & Process NIGHTScapes & TIMELapses by Alan Dyer
- PTGUI - web site - panoramic software http://www.ptgui.com/
- Starry Night Software
- Sky Safari 3 - Mac astronomy simulation sofware
- See Robert Berdan's article on Night Sky Photography
- See Robert Berdan's article on Creating Star Trail Photomontages in Adobe Photoshop CS6
- See Robert Berdan's article on Star Trail Photography and Time Lapse Movies
.jpg)


[ Top ]