
Shoot the Solar Eclipse
Traveling to the total eclipse of the Sun? Here’s how to bring home a souvenir image, simply.
by Alan Dyer
June 12, 2017
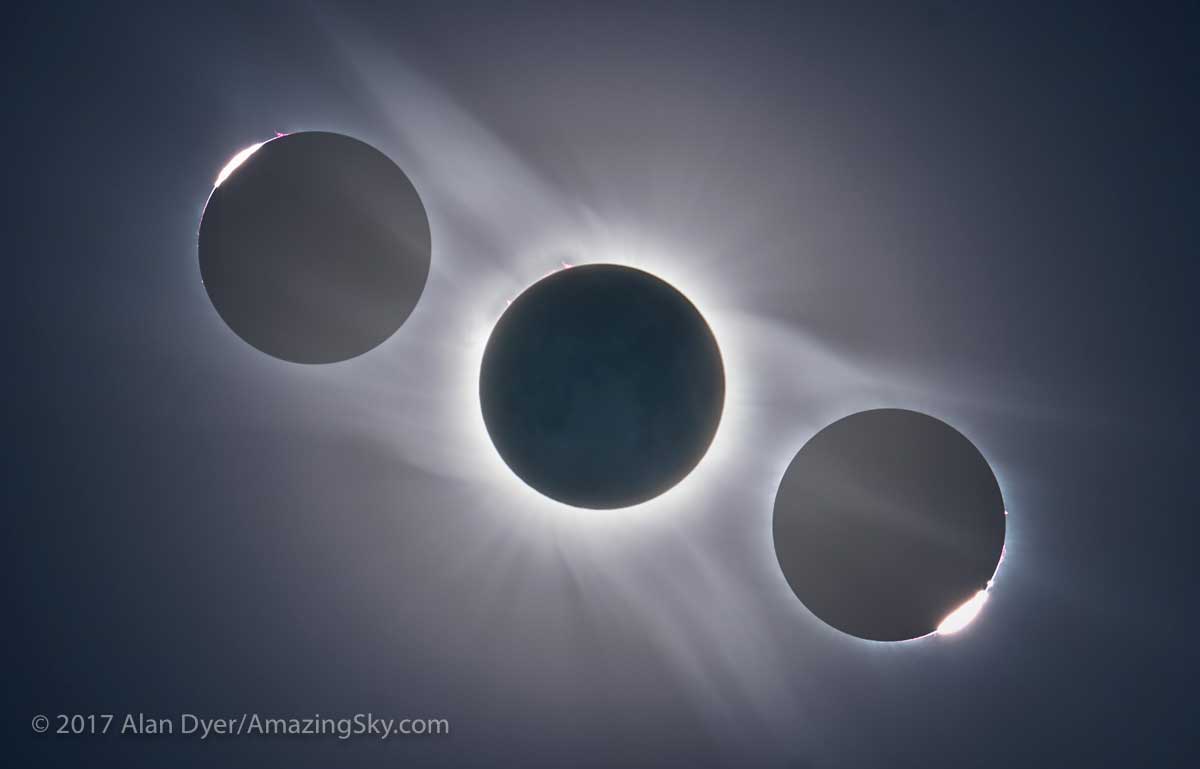
2006 Eclipse Libya - Composite Photo
This summer an amazing natural phenomenon will sweep across the United States. On August 21 the shadow of the Moon will touch the Earth and trace a path from coast to coast, from Oregon to South Carolina.

Eclipse 2017 USA Map
Anyone standing in that 100-kilometre-wide path will see the Sun disappear for just over two minutes at midday. During the short duration of totality the dark disk of the Moon will completely eclipse the Sun, turning the bright disk of the Sun into what looks like a black hole in the sky. In moments day will turn into deep twilight.
ECLIPSE ACROSS AMERICA
The yellow band indicates the narrow path of the Moon’s umbral shadow and the region where you must be to witness a total solar eclipse on August 21. The length of totality is labeled, with a maximum length of 2m40s in southern Illinois. Outside the path you’ll see only a partial eclipse, with the percentage indicated (0.9 = 90%). Map courtesy www.greatamericaneclipse.com. That website has many other detailed path maps.
To experience the total eclipse you must be within the path of totality traced by the Moon's umbral shadow. From just outside the path you'll see only 99 percent, or less, of the Sun covered by the Moon. That isn't 99 percent of the experience. Even the remaining one percent of the Sun is so bright you won't see the full range of phenomena that a total eclipse provides.
.jpg)
Wide angle photo (10 mm) of eclipse, Libya, 2006
Stay at home in Canada and the best you'll see, from southwestern B.C., is a 95 percent partial eclipse. That's good enough to make the day grow dimmer, but the Sun will remain a brilliant source of light in the sky.
Traveling to the path of totality might seem a long way to go, but it's nothing compared to the effort of reaching most total eclipses, whose paths cross only remote regions of the world. This is the first total solar eclipse in southern North America since February 26, 1979. The next is April 8, 2024.
While some total eclipses are witnessed by only a few hundred avid shadow chasers, tens of millions of people live in the path of the August 21 eclipse, while tens of millions more will travel to it.
Challenging Close-Ups
While aiming a monster telephoto lens at the Sun is the first thought of aspiring eclipse photographers, capturing a good closeup image is not without its challenges. The sky is slowing moving from east to west, requiring constant effort, and a solid but easily adjustable tripod, to keep the Sun well framed.
A safe solar filter is also essential, not for shooting totality itself, but for the partial phases, which is when you need to precisely focus the image. Then, just before totality you have to quickly remove the filter. In their excitement, many forget to do so.
During totality, shooting on Auto Exposure with a long telephoto lens will work. But capturing the full range of phenomena, from the brilliant pink prominences to the faint streamers of the outer corona, requires manually stepping through a wide range of shutter speeds. That all takes effort, and time taken away from just looking at the eclipse. Remember, you have only two and a half minutes!
Instead, may I suggest another way to shoot the eclipse. This technique produces publication quality results, yet requires little effort, and takes no time away from just looking.
WIDE-ANGLE ECLIPSE
A wide-angle lens (a 10mm on a cropped-frame Canon 20Da) captured the same 2006 total solar eclipse in a scene that takes in the Sun, twilight eclipse sky, and eclipse observers below. The image is part of a sequence taken with the camera on Auto Exposure and fired by an intervalometer for hands-off operation. This was 0.8 seconds at f/5 and ISO 100.
Simply Wide
The key is to use a DSLR or mirrorless camera that accepts interchangeable lenses. Use a lens wide enough to frame the ground below (perhaps including your eclipse group), distant scenery, and the sky and eclipsed Sun above.
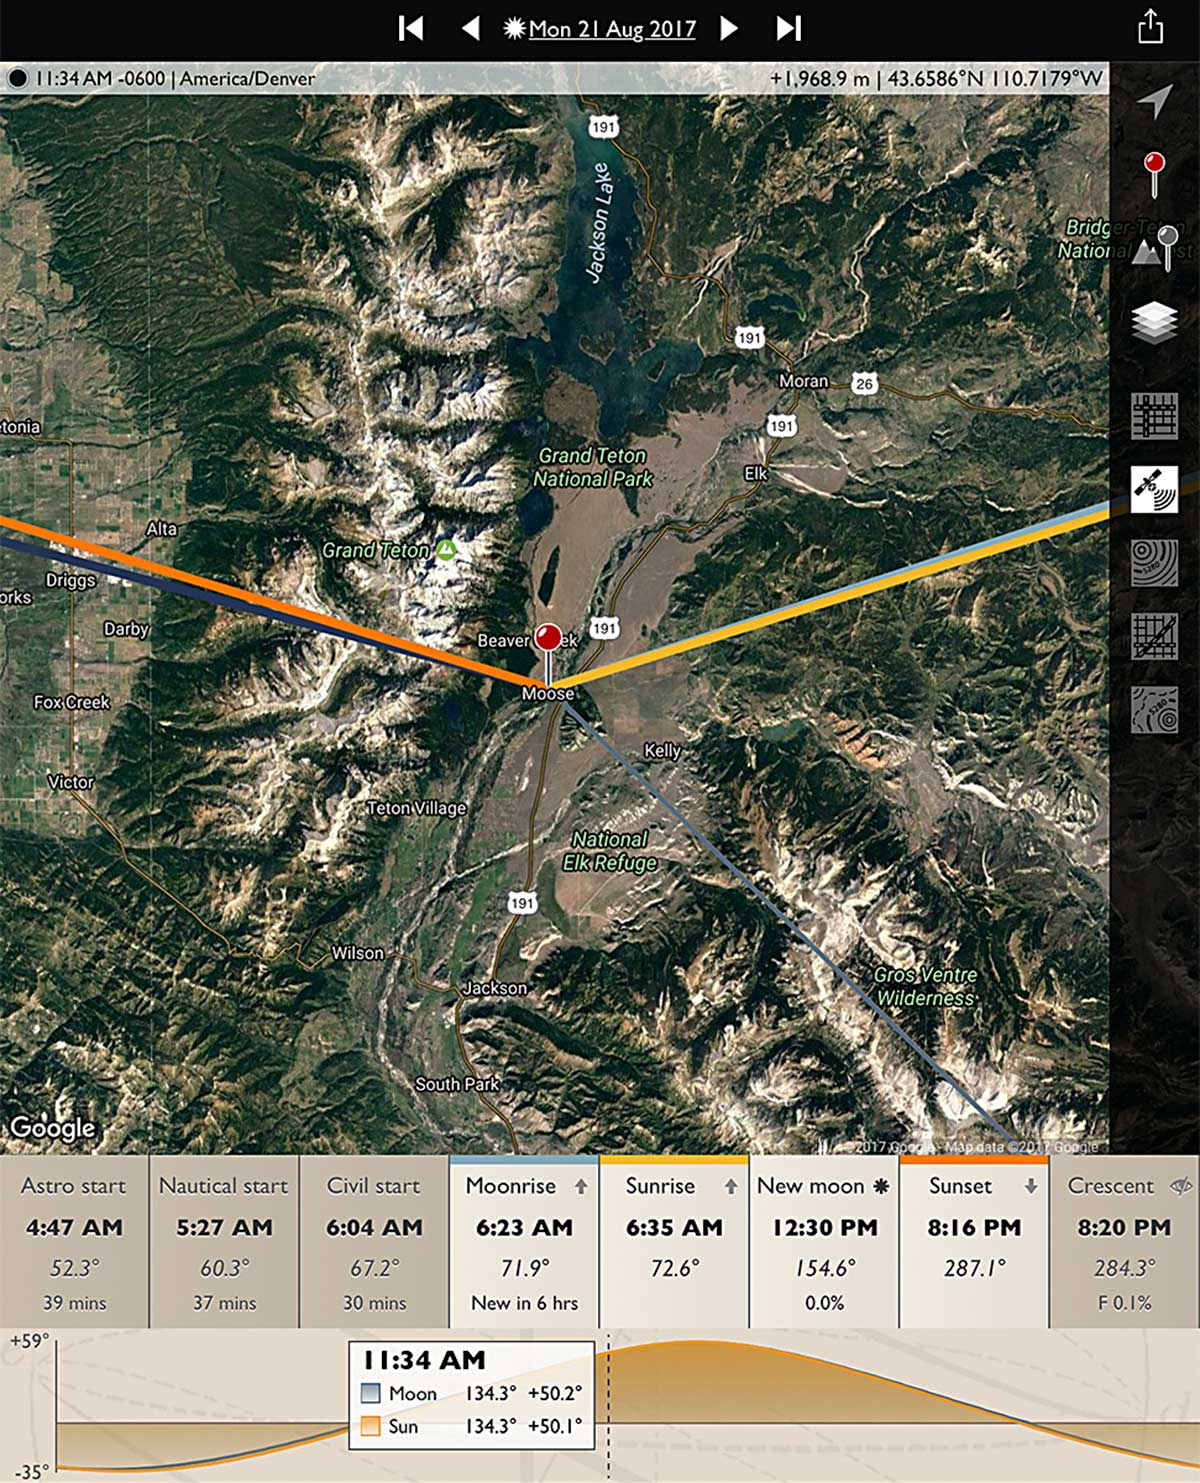
Map of Teton site of eclipse 2017
PLANNING THE SCENE
A screen shot from the TPE mobile app shows the position of the Sun (the grey line) in the southeast during the eclipse from the popular destination of the Teton Valley in Wyoming. The Sun won’t be over the peaks of the Grand Tetons, but opposite them.
To help you plan the scene, use photo planning software such as TPE, The Photographer’s Ephemeris™ (http://photoephemeris.com), set to your site and to the time of totality at that site. You’ll then be able to see where the eclipsed Sun will be in relation to landscape features.
Framing a suitable scene might require moving to a location off the centre-line where totality lasts the longest. Doing so doesn’t sacrifice too much precious totality time. Even halfway to the path edge you lose only 20 seconds or so, worth it to get the money shot of the eclipsed Sun over dramatic scenery.
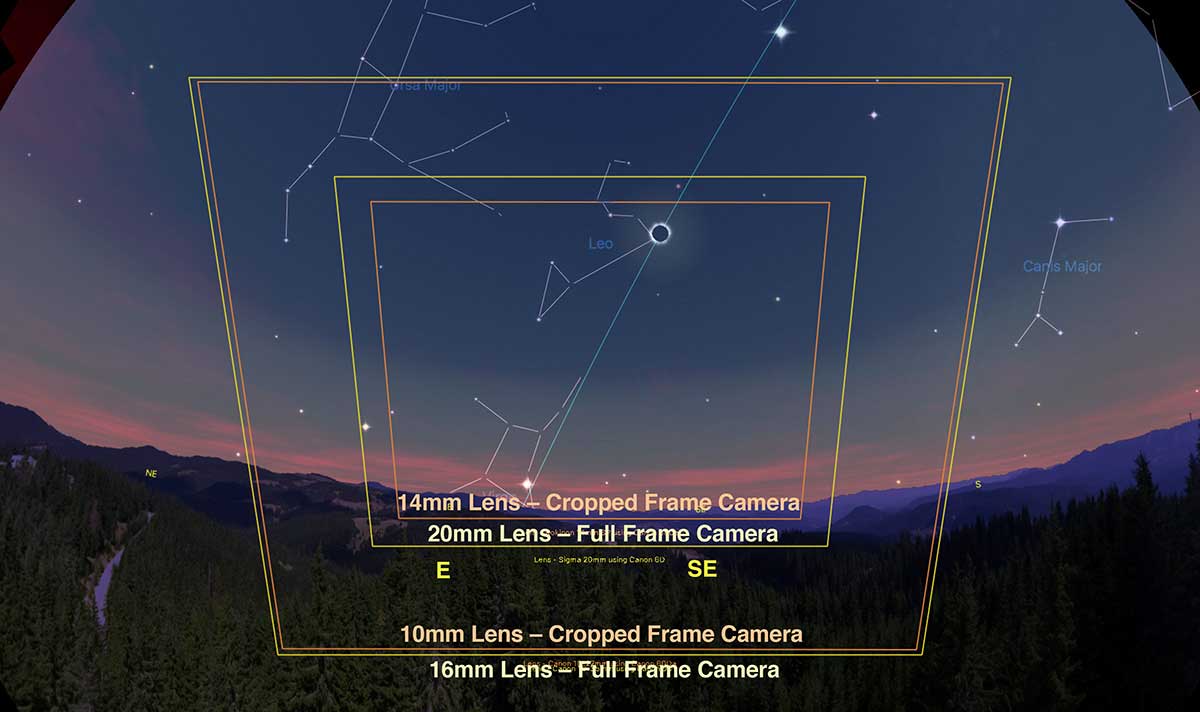
Wide angle FOV (Field of Vision) of Eclipse path - Idaho
ECLIPSE FRAMING
Planetarium software, such as Starry Night™ shown here (https://starrynight.com), can help plan the framing of the sky. This scene is for eastern Idaho, and shows that wide lenses are needed to take in the high Sun of late morning, as well as the landscape below.
How wide a lens you’ll need depends on how far east or west you are on the eclipse path (the Sun appears higher from the eastern U.S.), and whether you frame the scene with the camera turned horizontally or vertically.
Your lens choice also depends on whether you are shooting with a cropped-frame camera or a full-frame camera. But in general, you will need a 10mm to 24mm lens to take in the entire scene, with the eclipsed Sun over your eclipse site.
.jpg)
2005 Eclipse over the South Pacific (10 mm wide angle lens)
ECLIPSE AT SEA
At this eclipse in April 2005 the author was at sea in the South Pacific. The Sun was at a similar high altitude in the sky as it will be on August 21, here requiring a 10mm lens on a cropped-frame DSLR to contain the scene. This was 1/4 second at f/4.5 and ISO 100.
What makes this method easy is that you can use Auto Exposure, on Av or “aperture priority.” Set the lens to a fixed but wide aperture of f/2.8 to f/4 and the camera at a fixed ISO of 100 to 400. The camera will then alter the shutter speed as the scene darkens when totality begins, then brightens as the Sun and daylight return to normal. The shutter speeds likely won’t get longer than one second, even at mid-totality when the sky is darkest.
Contrary to popular expectations, the day will not turn to full night, but to an eerie but still fairly bright twilight.
.jpg)
Eclipse 2012 Australia (15 mm wide angle lens).
ECLIPSE FROM DOWN UNDER
In Australia in November 2012, the author used a 15mm full-frame fish-eye lens to capture the low eclipsed Sun and the shadow of the Moon, the dark blue wedge seen here in the sky. The camera was on aperture priority Auto Exposure and ran unattended using an intervalometer to fire the shutter every second. This was 0.3 seconds at f/2.8 and ISO 100.
To automate the camera for hands-off operation, use an outboard intervalometer, or the camera’s own built-in intervalometer if it has such a function, to fire the shutter once a second. Start the sequence about three to four minutes before totality (there’s no need to have a solar filter on the lens), and end it a similar time after totality.
Later in processing you can pick the best single images from the sequence, or turn the entire set into a time-lapse movie. Alternatively, you could just shoot a continuous HD or 4K movie with sound.
.jpg)
2013 Eclipse over the Atlantic (15 mm wide angle lens).
SHADOW PLAY
For the November 2013 total eclipse, the author was again at sea, but in the Atlantic. A camera on Auto Exposure captured the twilight and changing colours of the clouds as the lunar shadow engulfed the ship for a brief 45 seconds of totality. This was 1/40 second at f/2.8 and ISO 800, with the ISO purposely set high to keep shutter speeds short on the rolling ship.
Either way, for stills or movies, don’t use Auto Focus (AF). Set the lens and camera on Manual Focus (MF) and use Live View to focus the lens on the horizon or a distant object prior to the eclipse, then leave it. If you have Auto Focus on, the camera might fail to fire at crucial moments as it tries, unsuccessfully, to focus on what might be largely blank sky.

Alan Dyer - Self Portrait in Libya
With only modest effort, what you'll record is the changing lighting and sky colours, and the Sun turning from a bright overexposed orb into a black hole. You might also pick up the dark edge of the lunar shadow sweeping across the sky from west to east, from right to left on your frame.
You'll get images that record the scene as your eye saw it, all without any effort during the brief moments of totality itself. While the camera fires, you can just stare up in wonder.

Left - Alan Dyer's eBook and Right - Video Course
Authors Biography & Contact Information

Alan Dyer’s astronomical images have been published in SkyNews, Astronomy, Sky and Telescope, National Geographic magazines, on Discovery Channel, and on the CBS, NBC, and UniverseToday websites.
He has authored the ebook How to Photograph the Solar Eclipse, available as a PDF and for Apple iBooks. See http://www.amazingsky.com/eclipsebook.html.
He also offers an extensive video course on Nightscape and Time-Lapse imaging, through All-Star Telescope at http://www.all-startelescope.com/sales/index.php?cPath=209
Email: amazingsky@icloud.com
Website: www.amazingsky.com
Flickr Page: https://www.flickr.com/amazingsky/
Click on the buttons below and share this site with your friends