
Tips for Better Landscape Photography
by Dr. Robert Berdan
May 14, 2016
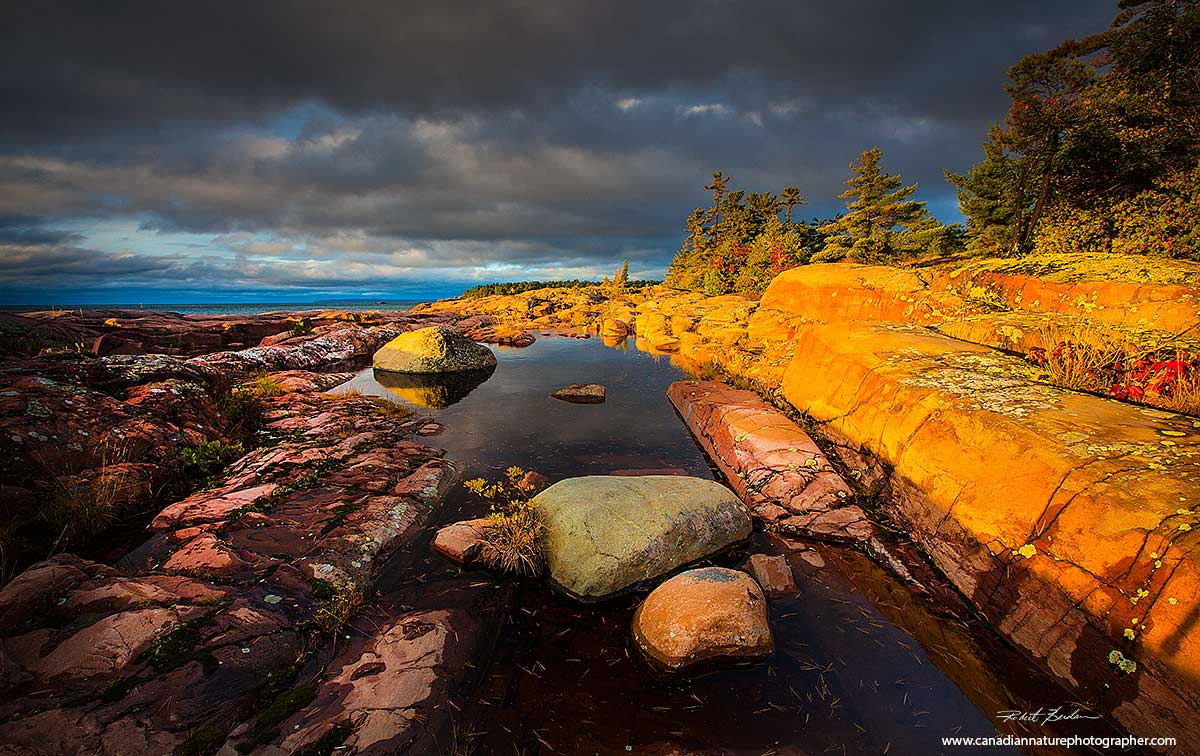
Sunrise Killarney Provincial Park on Ontario
The nice thing about landscapes is that they don't run away. Once you have found something you would like to capture you just need to wait until the light looks great. There in lies the challenge. First you have to find a spectacular landscape and then you have to be there when the light is great. Having found a nice landscape, there are lots of things you can do to improve you landscape photography and I will discuss some of them here.
Things you need to think about when you take a landscape photo
1. What type of lighting do I have to work with?
2. How should I frame the picture - vertical or horizontal?
3. Where should I place the horizon?
4. Where should I focus in the picture to get a maximum depth of field?
5. How can I get the greatest depth of field possible in the photo?
6. Do I need to reduce the contrast range with a Graduated Neutral Density filter or use HDR imaging?
7 . Can I use lines or other visual elements to lead the eye into the picture?
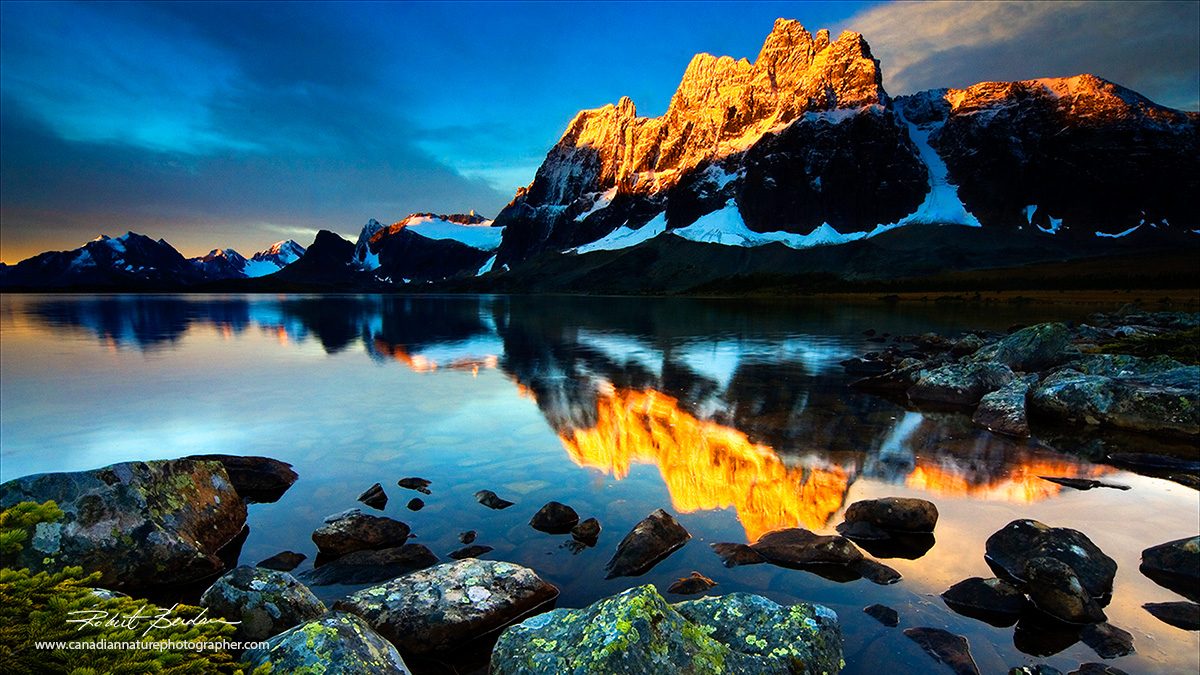
Ramparts - Amethyst Lake, Tonquin Valley at sunrise - I used a neutral density grad filter and tripod.
Finding Landscapes
Finding a nice landscape may mean travelling to a provincial or national park or it may mean simply driving out into the country. You may already know of some good locations if so then it is a matter of returning when the light or weather is interesting. Usually the light is most interesting around sunrise and sunset, or early and late in the day because of the low angle of the sun produces side lighting which emphasizes texture. The light is usually more colourful being warm or sometimes cool. But simply showing up at sunrise is no guarantee the light will be good. I have found that only about 1 in 10 sunrises turns out to be colourful. It usually helps if they are a few clouds in the sky. You can take good photos in the middle of the day, but you need something really interesting. With the sun overhead I found that it's great for panoramic photography - the light tends to be even in all directions making it easier to stitch the images. Otherwise mid day light makes for great "post card" pictures.
Writing-on-Stone Provincial Park, AB at sunrise. The oblique light fills the valley. I used a grad filter and Photoshop to lighten the foreground - this is close to what I saw with my eyes.
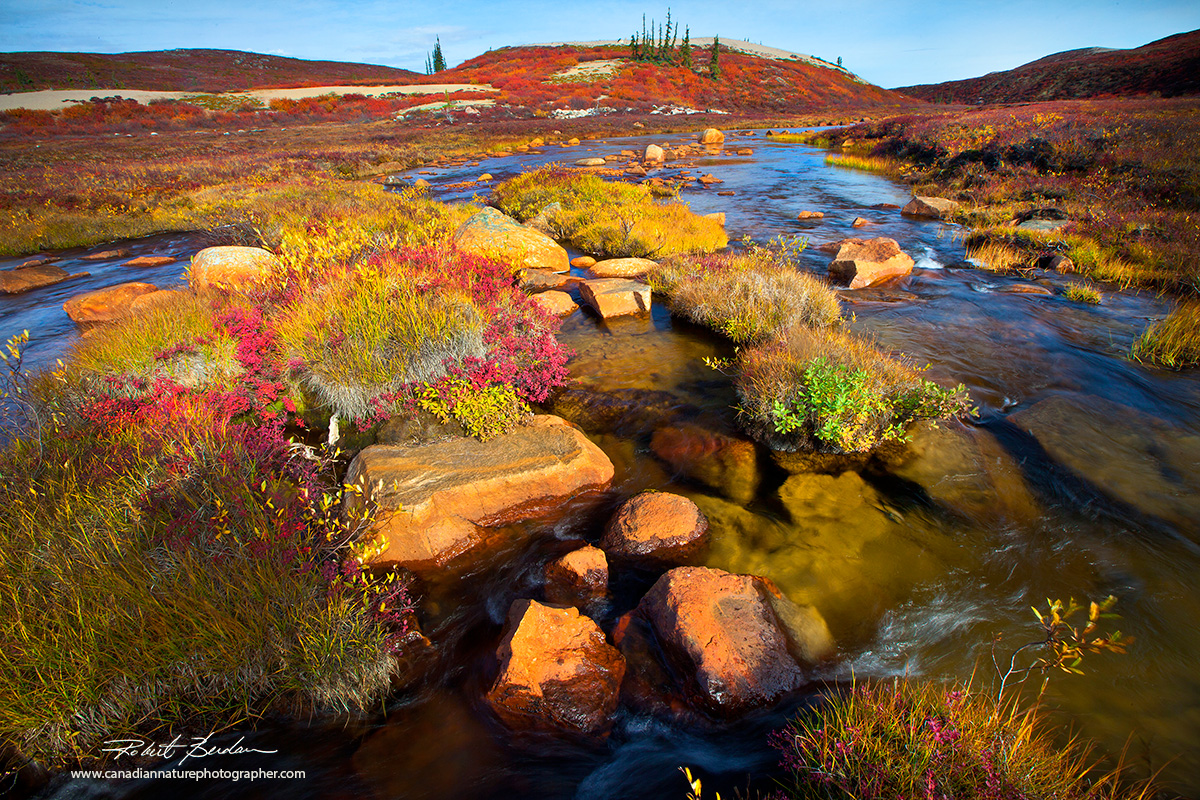
Above - Tundra in Autumn - mid day near Esker Bay, Point Lake, NT. I used a tripod and polarizing filter.
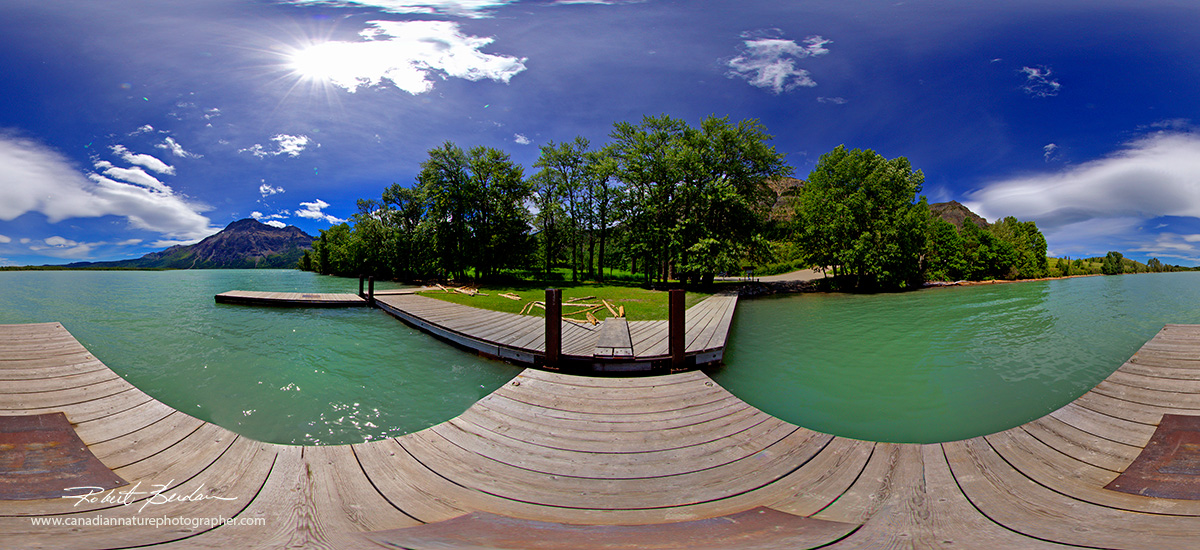
Waterton Lake - Panorama mid day - this photograph was stitched together from 4 images taken with a 10.5 mm Nikon fish-eye lens - I used a tripod and locked the exposures so they were even.
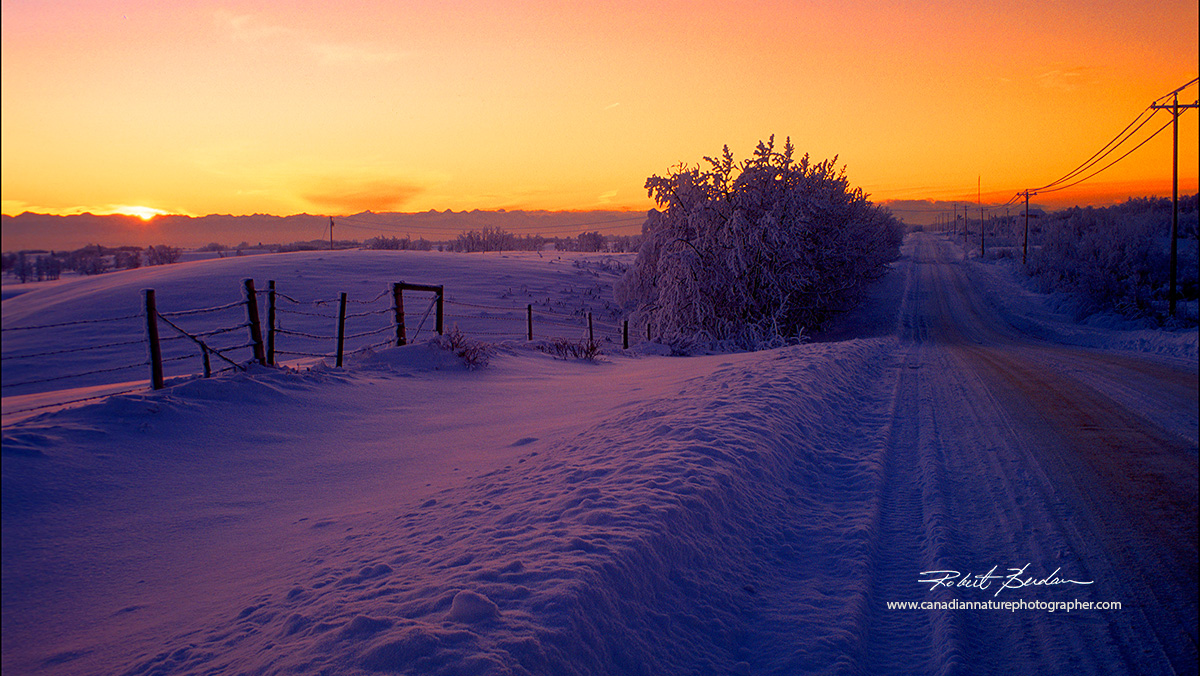
Sunset over Canadian Rockies in winter near Cochrane, AB - I used a tripod and Blue-Gold Polarizer.
Use a Tripod
Yes a tripod is a pain to carry around and they slow you down. I suggest you keep one in the car when you travel and pull it out when you have something special to capture. The fact that the tripod slows you down is a good thing. It will make you compose more carefully, you can check the edges of the frame, make sure the horizon is level - all of these things will promote better composition. The tripod is also necessary in low light, and so you can use a small aperture (e.g. F16) for greater depth of field, or photograph a series of different exposures and then combine them into an High Dynamic Range (HDR) image later. Most serious landscape photographers use a tripod. I am not saying you always need one - but there are circumstances when they can be very helpful. If you want to blur a stream or waterfall you will need an exposure of 1\8 of a second or longer and this requires a tripod. If you are looking to purchase a tripod read my tripod review. One last suggestion - vary the height with which you set the tripod to get different perspectives.
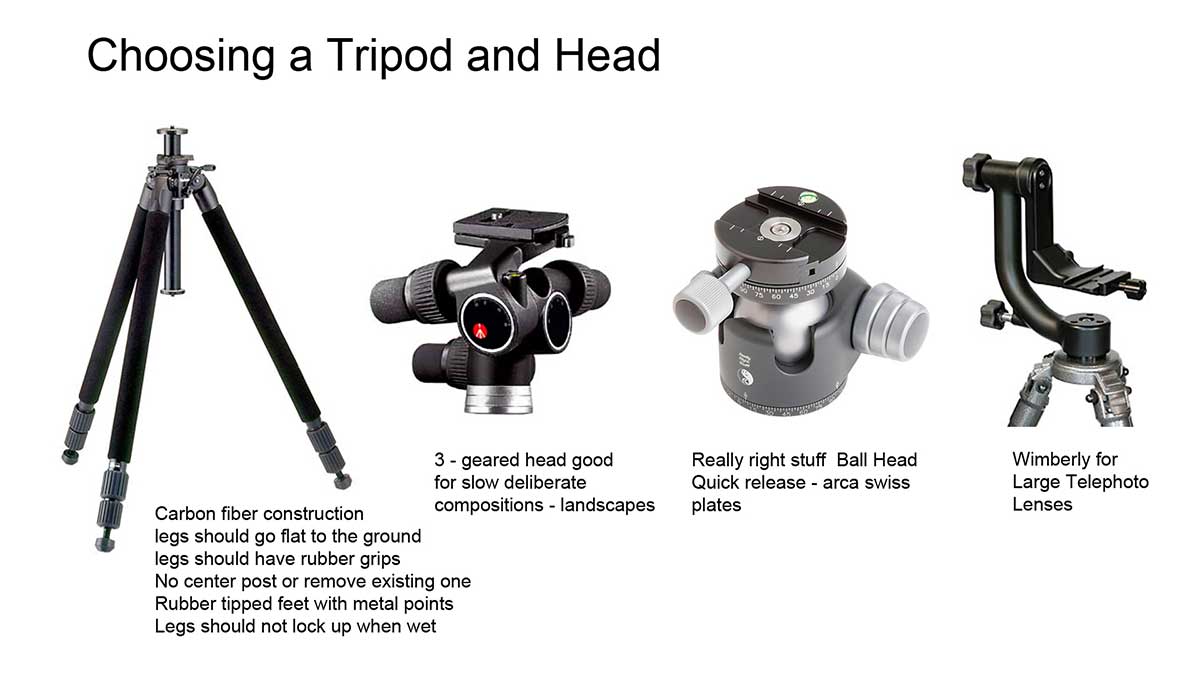
Tripod and different types of heads - a ball head or geared head is best for landscape photography.
Horizontal or Vertical Format - I recommend shooting both.
For most landscapes you will probably put the camera in landscape orientation and it will work fine. However, sometimes you may photograph a waterfall or other scene that might work better in a vertical format. Vertical format tends to lead the viewer from the bottom of the picture to the top. I try to remind myself to take both type of pictures so I have variety. Also magazine covers use vertically oriented photos. The point I am trying to make is that sometimes a vertical format may be more effective, so think about it when you take your photos - or at least take both a horizontal and vertical oriented photos. If your camera use square format - then there you don't need to think about this until you enter the editing stage.
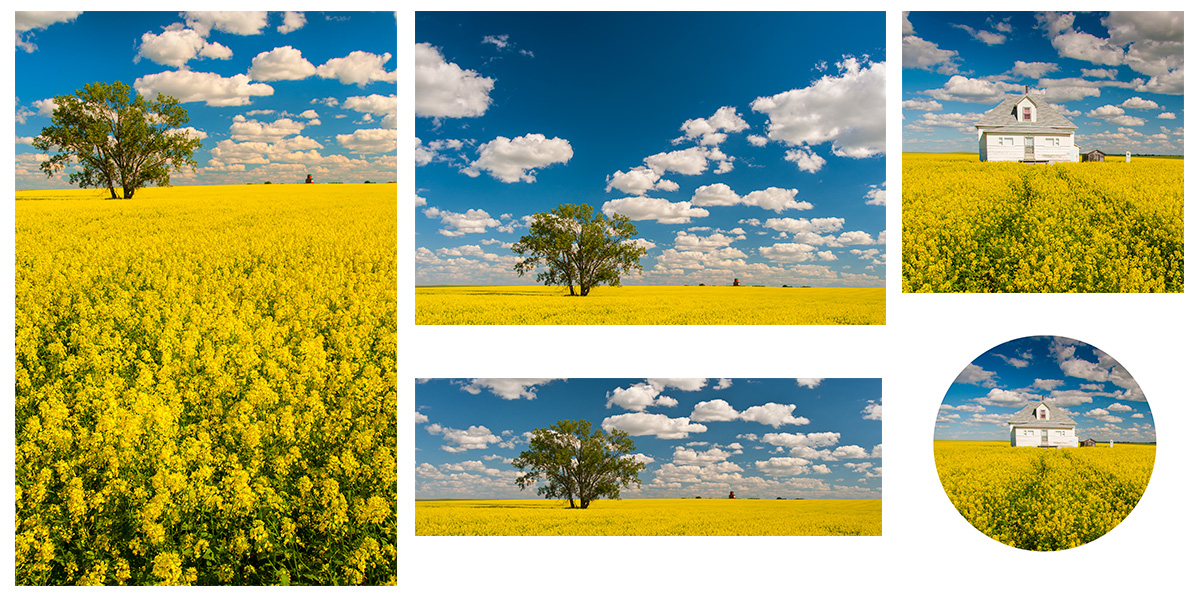
One can use many different framing formats for shooting a landscape such as a vertical, horizontal, panorama, square or even a circular or elliptical format. Start by experimenting with both vertical and horizontal formats.
Where to place the horizon in the picture?
Some photographers just point and shoot without thinking where the most effective place is to put the horizon. In most landscapes the placement of the horizon is important. If the sky is spectacular or there are storm clouds, put the horizon low, if the sky is white or lacks detail you may want to minimize the sky or eliminate it all together. I often crop the sky out all together on overcast days. If you are photographing a lake scene and there are interesting reflections, then this might be a good instance to place the horizon in the middle of the frame, but most of the time it just cuts the picture in half.
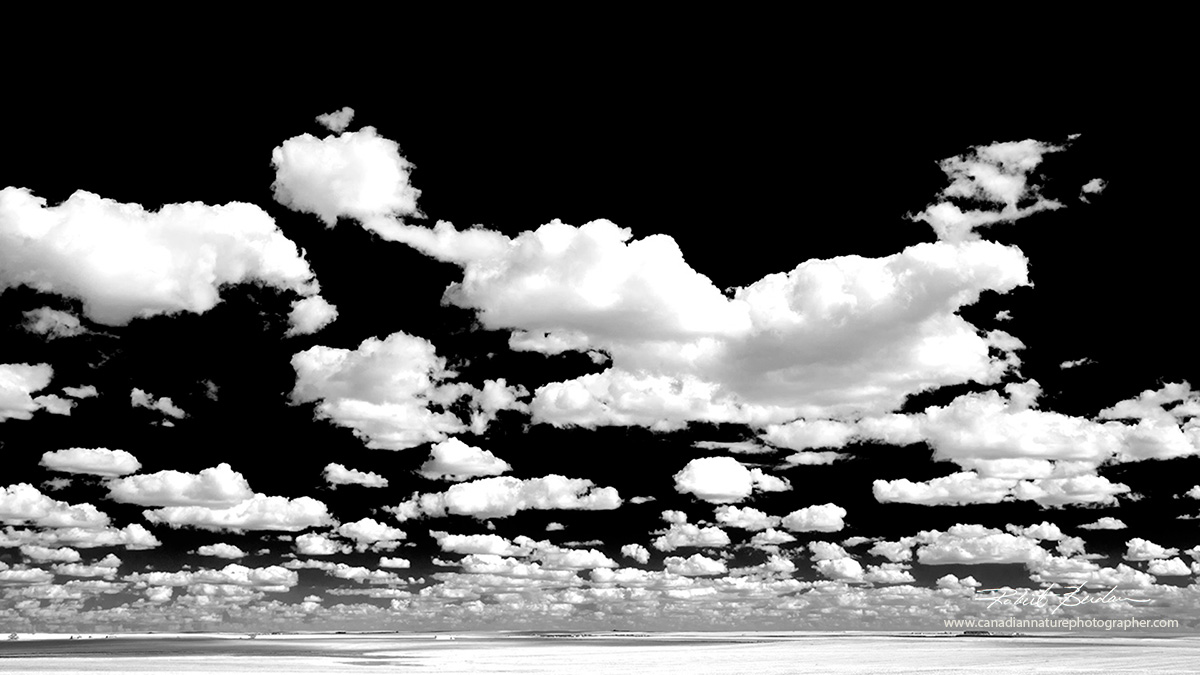
Low Horizon
In this prairie photograph I put the horizon very low in the picture and converted it to Black and white in order to focus attention on the sky and clouds.
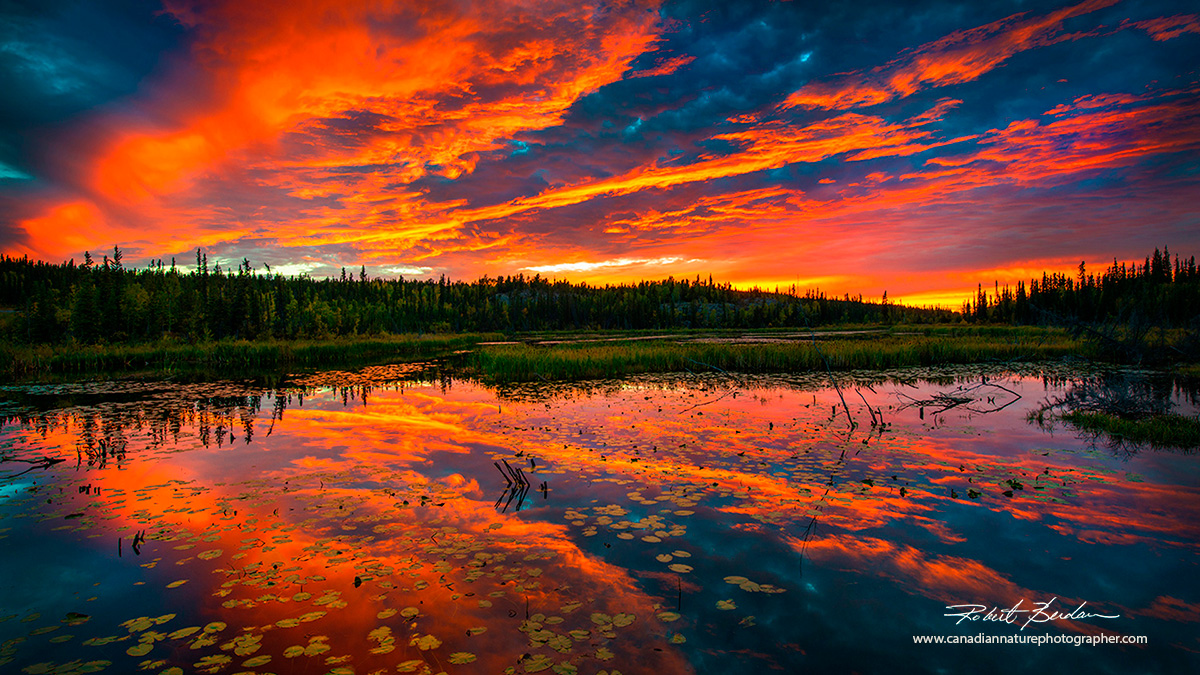
Centered Horizon
In this sunset photo taken near Yellowknife, I placed the horizon near the center of the picture because of the colourful reflections of the sky and clouds in the water.

High Horizon
In this photo taken at Red Rock Coulee in southern Alberta, I put the horizon high in the picture to draw attention to the back light on some of the rocks and plants. I also used a neutral density grad filter to balance the exposure of the foreground with that of the sky and setting sun.
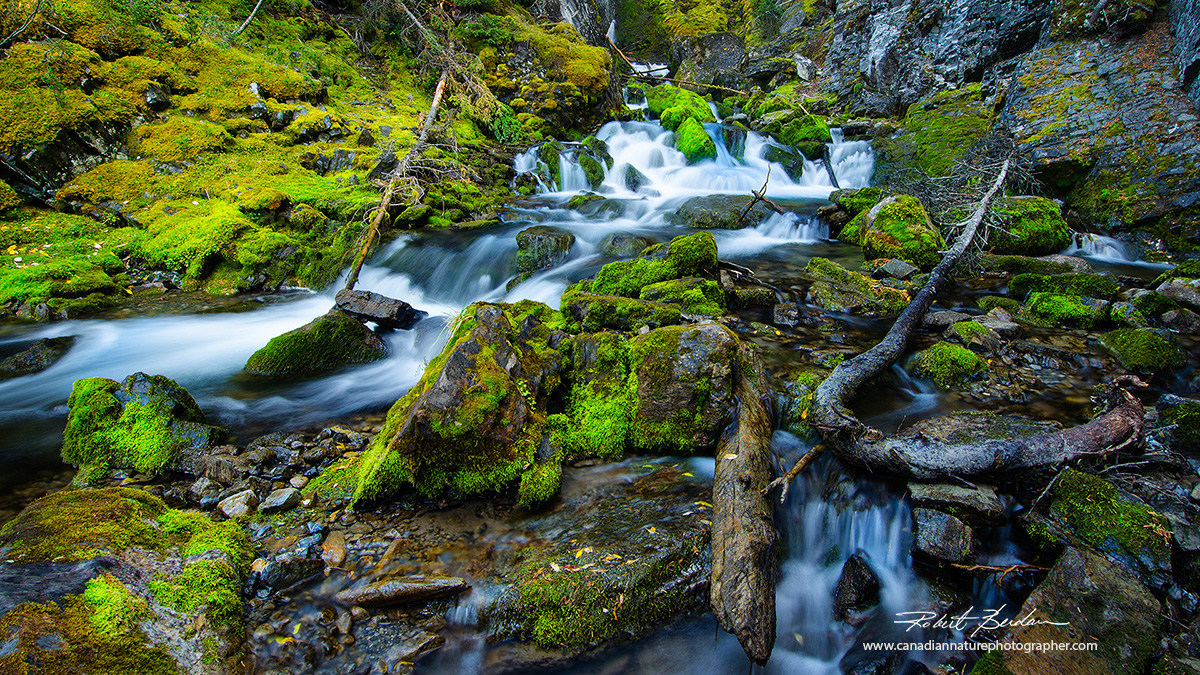
No Horizon
In this photo of Sarrail falls along Upper Lake in Kananaskis, I cropped the sky out of the picture. I often cut the sky out of the picture when it is overcast. The flat lighting is excellent for waterfalls and wild flowers. A tripod is necessary for this type of photo since the exposure was longer than 1\8 of sec so the water blurs. I also use a polarizing filter to darken the rocks and make the exposure even longer.
Where do I focus in the picture?
After arriving at your location, the first thing to do is set up your camera. For serious photographers a tripod is a must so that you can compose carefully and not have to worry about how low the light is since you can use any shutter speed, and you can use any f-stop. Usually I use an f-stop between f/11 and f/22 to achieve a maximum depth of field and I focus at or close to the hyperfocal point. With new cameras you want to select the lower 1\3 focus point on the screen it will be close to the hyper-focal distance. The hyper-focal point is a point in the scene where focusing on will result in the greatest depth of field. With older lenses you could set this easily using the lens distance scale - see below.
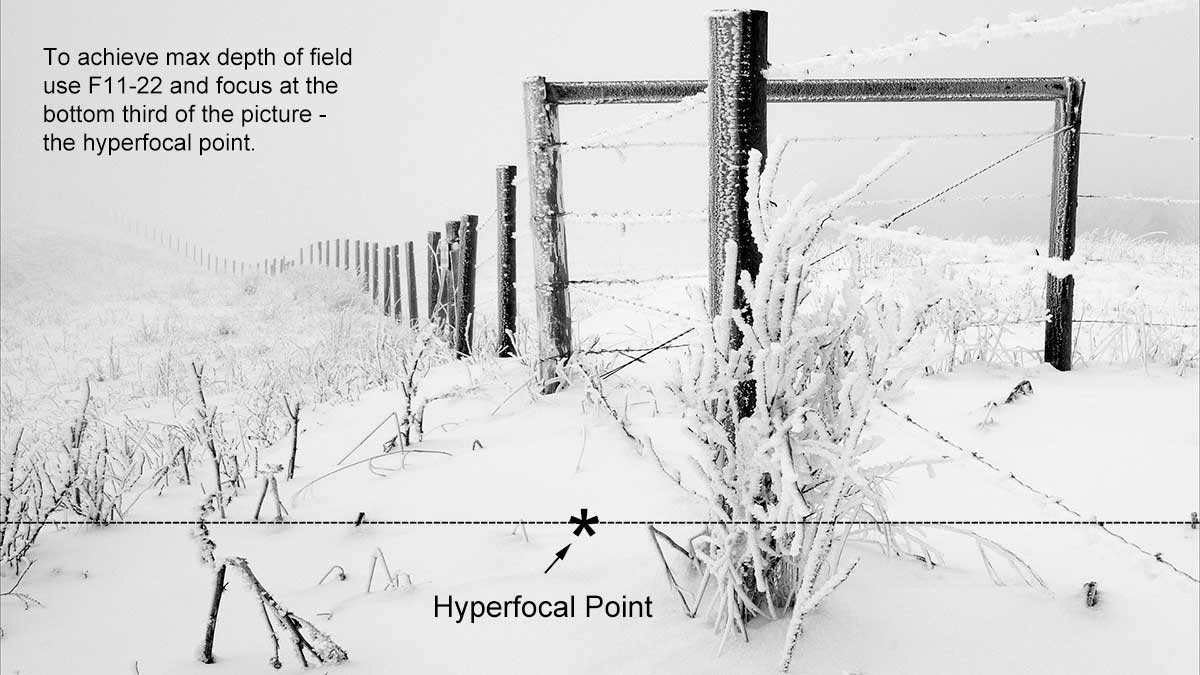
A winter scene showing the hyper-focal point in the picture.
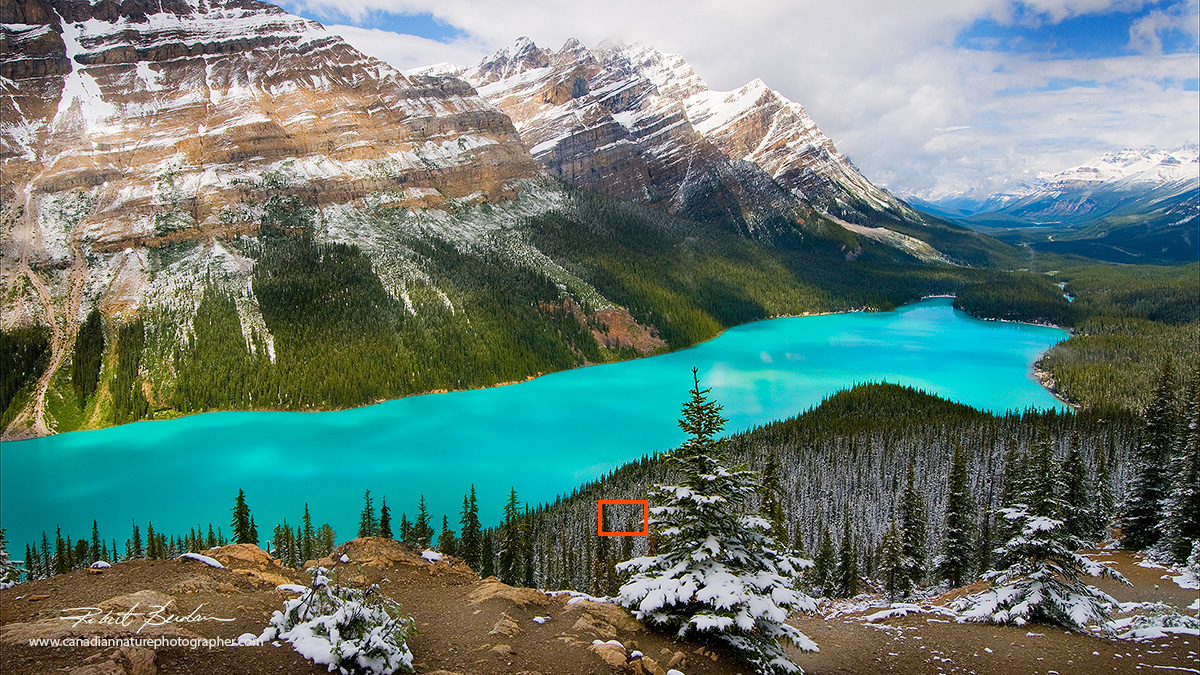
Peyto Lake after summer snowfall. The red rectangle indicates the "hyper-focal point". The location is about half way between the bottom frame of the picture and the middle and that is where you should focus. You can use your lower auto-focus point if you camera has one. With older lenses you can move the lens infinity focus point to where the edge of the F-16 line is - this results in extending the focal range a few more feet in front - see graphic and photo below.
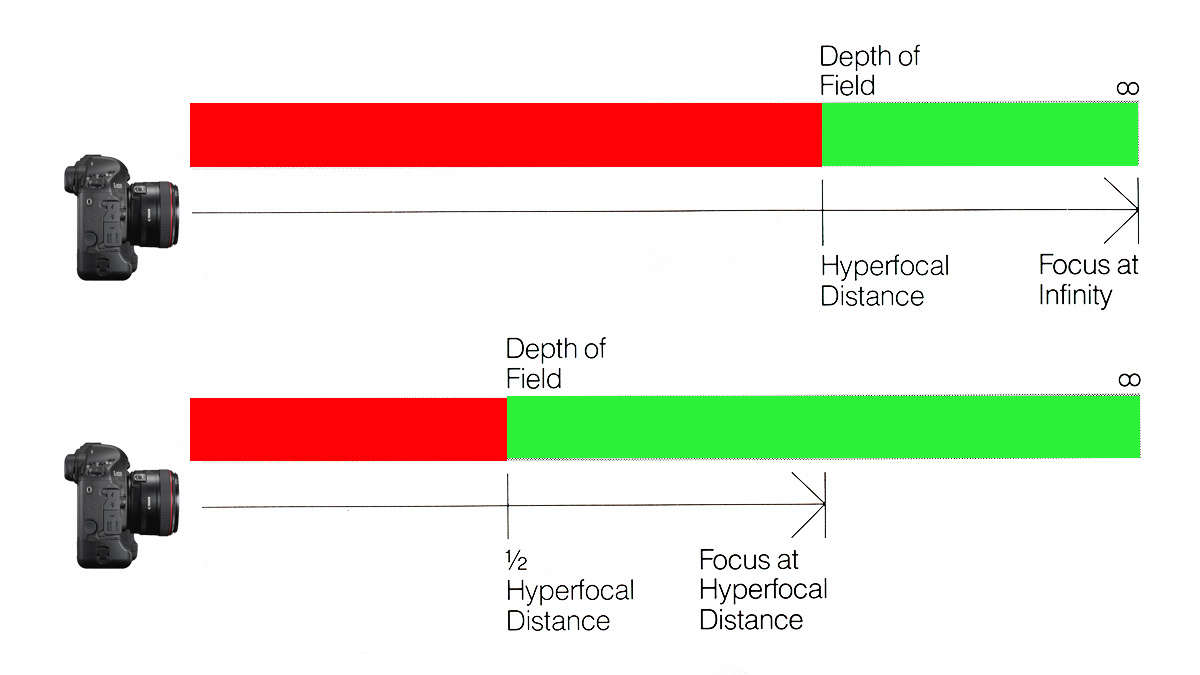
This diagram shows you that you can achieve greater depth of field by focusing on the hyper-focal point rather than infinity. In the top graphic the camera is focused on infinity. By moving the focus point to the hyper-focal point - you can achieve a greater depth of field in front. You can approximate the hyper-focal point by simply focusing on the lower third of your picture frame as shown in the photos of the winter scene and Peyto lake above.

With older lenses it was possible to set the infinity symbol to the f/16 mark (red arrow) - shown on the right top photo - this is the hyper-focal distance. Many new lenses don't show this scale, but you can estimate the hyper-focal point by focusing at the lower third of the picture frame. There are also aps that you can download, but in the field I don't find them useful - follow my guideline and you will be close to the hyper-focal point.
In general when photographing a landscape you can increase the depth of field by using f/11-f/22 apertures.

Diagram showing that as you use higher f-numbers, the aperture (hole) becomes smaller. Each full f-stop reduces the light by 1 shutter speed. This is one reason why a tripod becomes necessary in low light as the f-stop becomes smaller the shutter speed may drops below 1\30 of a second which you can't hand hold (image from Wikipedia).
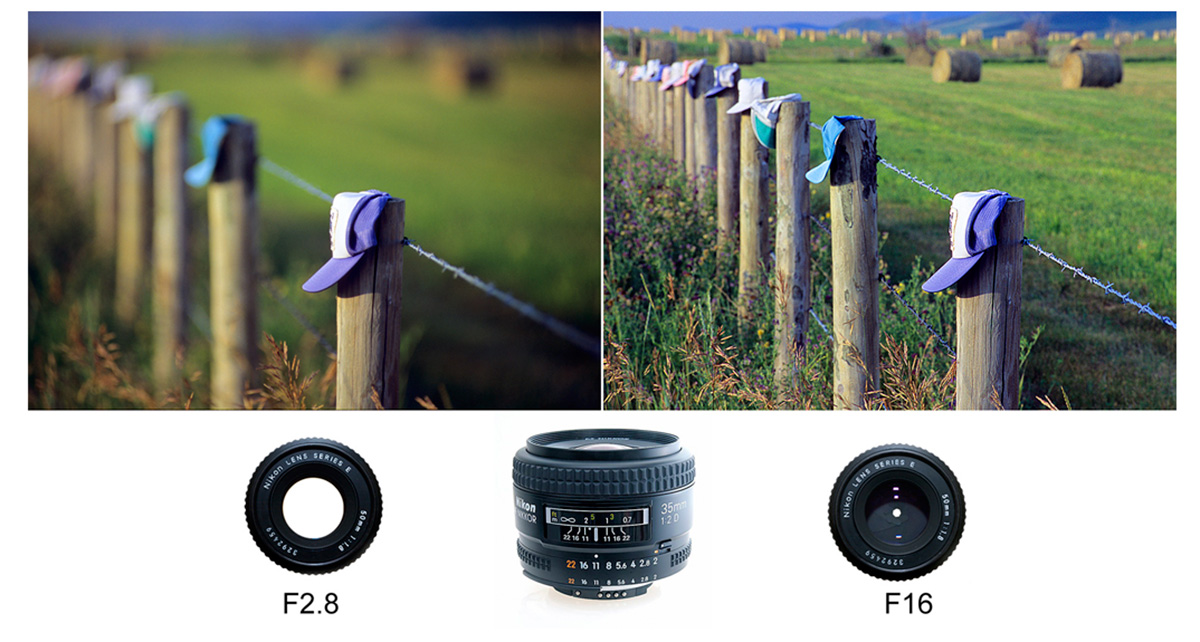
The simplest way to increase the depth of field in a photo is to use a smaller aperture. One of the downside is that past about f/11 the picture begins to lose sharpness due to the diffraction (bending) of light as it goes through small holes. The loss of sharpness can be noticed by comparing the picture with one taken at f5.6- f11. Still some photographers will utilize f/22 or and on larger format lenses some even offer f/64. The loss of sharpness with smaller apertures is noticeable if you look closely at the picture (most photographers don't). Most of the time I use f/11, but if greater depth of field is essential I will use f/16 or f/22. My macro lens offers an f/22 and is great for landscapes as well.
Another method to increase depth of field and maintain optimum sharpness is to use focus stacking. Focus stacking simply means taking two or more photos at different focus points. In landscape photography usually just two photos are enough. In macrophotography we sometimes use more then two images. I recommend using a tripod for this. Take one photo and focus on the foreground or subject that is close to the camera, then take a second photo focused on infinity. You then open both photos in Photoshop, put one image in a layer on top of the other so they are aligned. Select both layers and auto align the images and then auto-blend them as described below.
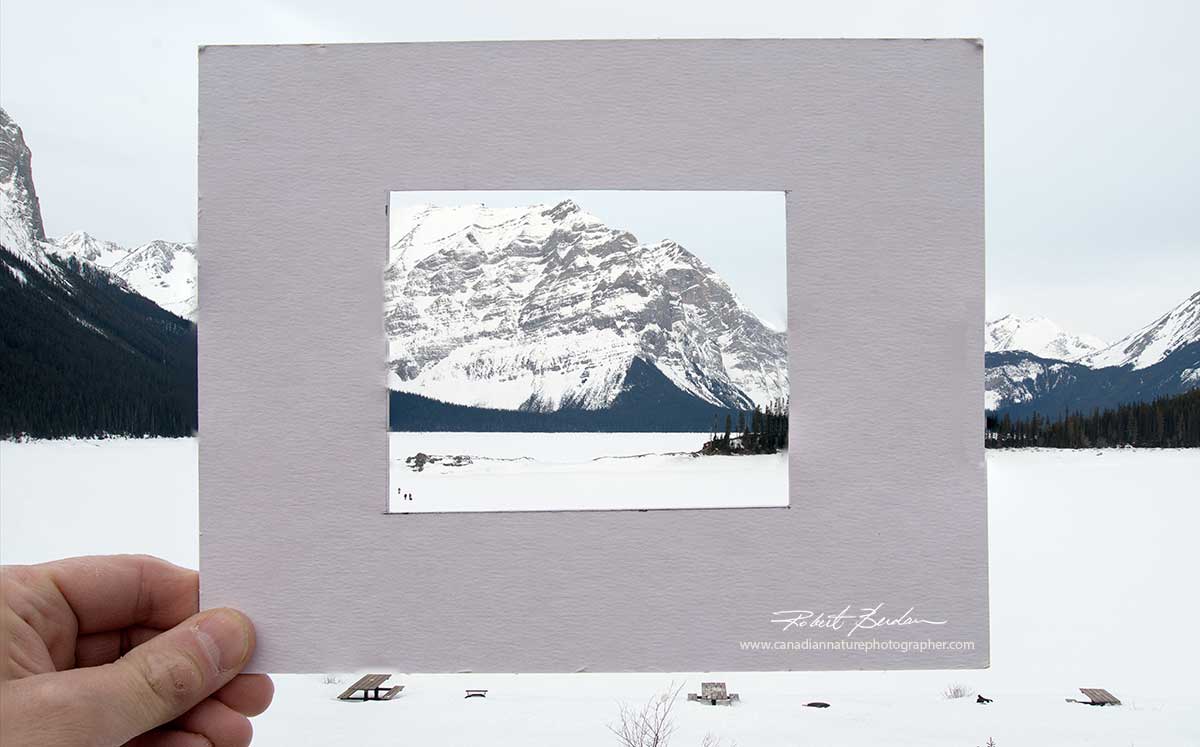
In this photo I held a small card with a window that can help identify scenes with photographic potential. The problem was that the card was only a few inches from the camera and I wanted both the card and the distant mountain to be in focus. Even using F16 this was not possible. So I focused one photo on the card, another on the distant mountains and then focus-stacked them in Photoshop. This technique provides the greatest depth of field possible.
Focus Stack in Photoshop
To focus stack your images in Photoshop, you take 2 photos open them in Photoshop, put one on top of the other so they appear in the layers palette one above the other. If the photos were taken with a tripod you can drag them into alignment or you can use Photoshop to auto align them - Select both layers in the Layers palette: Select > Edit > auto-align the layers > OK - Photoshop will ensure they are aligned even if you did not use a tripod. Then with both layers selected Select > Edit > Autoblend > Stack Images> Seamless Tones and Colors > OK - the image will be stacked. Flatten the layers and save (see my Photoshop II book for detailed description of this technique). The result is an incredible depth of field including both the foreground objects and distant ones will be in focus.
Controlling contrast with Neutral Density Grad filters or by using High Dynamic Range Photography
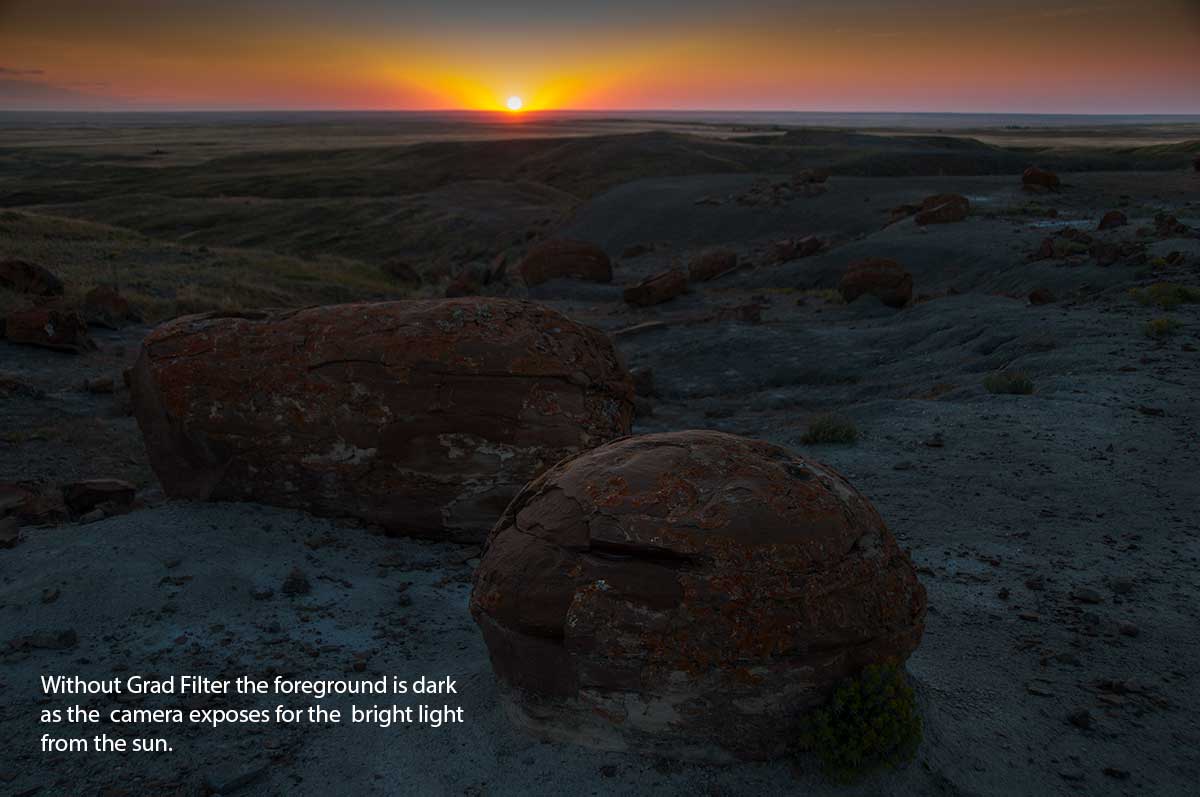
Above is the photo without a graduated neutral density filter - the camera exposes for the sun leaving the foreground dark.

Red Rock Coulee in southern Alberta photographed at sunset. I used a two stop graduated neutral density filter with a hard edge and set my lens to f/16. The filter reduces the exposure of the sky so it better balances with the foreground. If I did not use this filter the foreground would be entirely dark.

Neutral Density Grad filters are useful when photographing into the sun at sunrise or sunset. They come in different densities: 0.3, 0.6 and 0.9 - equivalent to 1, 2 and 3 F-stops. They also come in soft edge and hard edge. The hard edge filters are good for prairie scenes or lakes. The soft edge is better for mountain photography. There are a variety of coloured grad filters sometimes called sunset filters, but I don't recommend them. You can add a "digital" grad filter in Adobe Photoshop using Camera Raw or to .jpg files scanned from slides. (see my Photoshop notes on how to do this). In most instances I also manipulate the image by dodging and burning and some advanced Photoshop users apply luminosity masks to balance the exposure of the photos (explained in Photoshop II e-book).
The purpose of using these filters and Photoshop is so the image looks more natural and similar to what you saw with your eyes. The neutral density grad filters are available from Cokin (cheapest), Singh Ray and Lee and are made of acrylic. Acrylic filters are lightweight, expensive (over $100) and unfortunately scratch easily. Once the filters scratch the scratches catch the light and cause flare or other optical artifacts. For this reason I have invested in Tiffen glass grad filters - they are more expensive (over $300 each), but they don't scratch easily, but will break if dropped. I am interested in their better optical quality and I have had mine for over 10 years without needing to be replaced. They glass grads are used in the movie industry as well. Regardless which filters you use, they will significantly improve photos taken at sunrise or sunset and you should own at least one if you are a serious landscape photographer. I would recommend - the 2 stop hard edge as the first one you buy. Also learn how to apply grad filters in Photoshop, you can also add any colour you like using Photoshop.
When using grad filters in the field you can purchase a lens adapter so they attach to the front lens, but I rarely use it, instead I put the camera on a tripod and hand hold the filter in front of the lens. I first move it up and down so I know where the grad line is - then hold it steady and take the shot - another reason for owning a tripod.
Castle Junction in January at sunrise. For this photo I took 9 exposures and blended them together to form a high dynamic range HDR image. I first tried using grad filters, but the bow river was too reflective and I couldn't balance the foreground with the sky. I combined the 9 images using Photoshop as described in my articles on HDR photography. This was the only way I could achieve detail in both sky and river.
Using Visual Elements - Lines can lead the eye into the picture
Bow river looking east the Rocky Mountains - taken from Stony Plain Park in Autumn. Note how the zig zag of the river leads your eye into the picture and toward the mountains.
In this photograph of Cone Mountain in Kananaskis - I used the road to lead the eye into the picture and simulate depth.
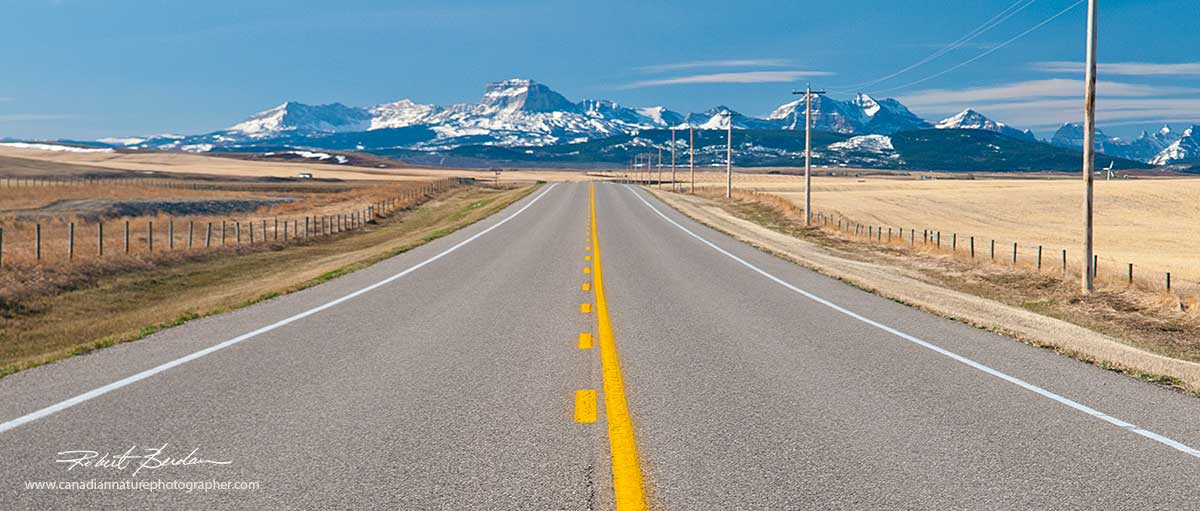
Road near Waterton National Park - I used the lines on the road to lead the viewer into the picture.
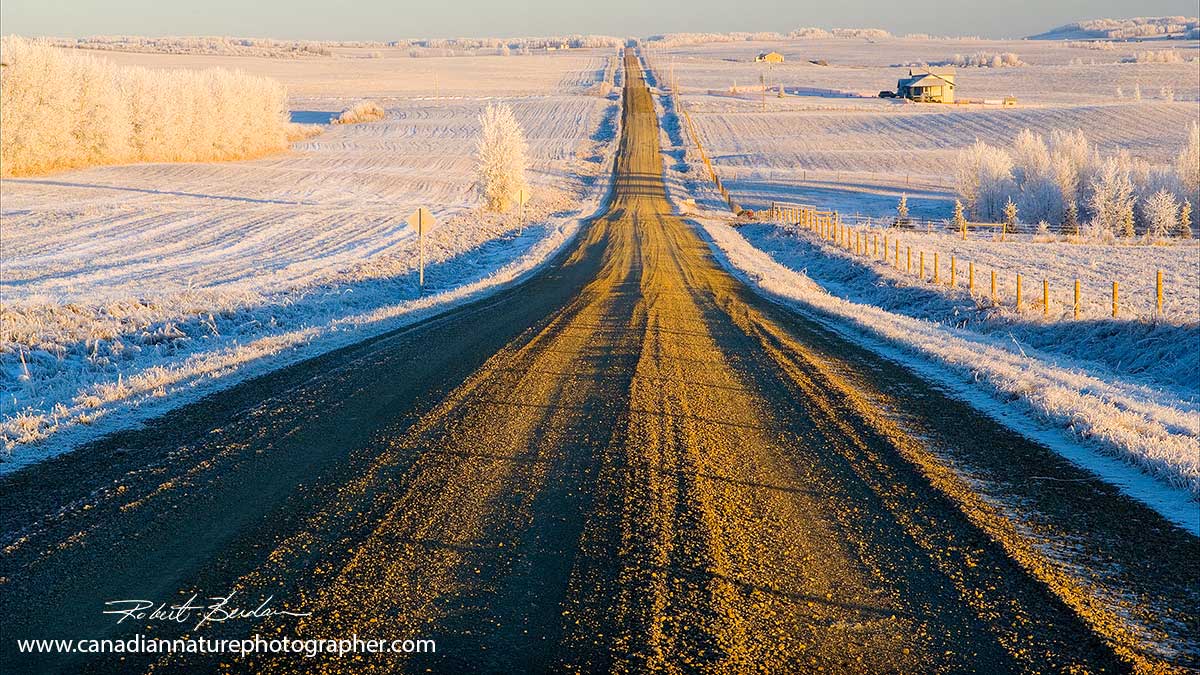
Road in winter north of Calgary - note the leading lines
Landscape photography is popular because its fun yet challenging. To get the best results try some of the techniques I describe here and you will see your images improve. A neutral density grad filter and tripod are the most essential tools for better landscapes. Photoshop can help, but you still need to start with a good photo. Weather and the light is something you can't control but if you go out at early or go out late in the day you can increase you chances of running into some good light. If landscape photography was easy everyone would have great photos - so take the challenge and see what you can come up with. RB
Authors Biography & Contact Information

Robert Berdan is a professional nature photographer living in Calgary, AB specializing in nature, wildlife and science photography. Robert offers photo guiding and private instruction in all aspects of nature photography and Adobe Photoshop training.
Email at: rberdan@scienceandart.org
Web site: www.canadiannaturephotographer.com
Phone: MST 9am -7 pm (403) 247-2457.
Click on the buttons below and share this site with your friends